JAVASCRIPT IS DISABLED. Please enable JavaScript on your browser to best view this site.
This post is password protected. Enter the password to view any comments.
JAVASCRIPT IS DISABLED. Please enable JavaScript on your browser to best view this site.
This post is password protected. Enter the password to view any comments.
JAVASCRIPT IS DISABLED. Please enable JavaScript on your browser to best view this site.
This post is password protected. Enter the password to view any comments.

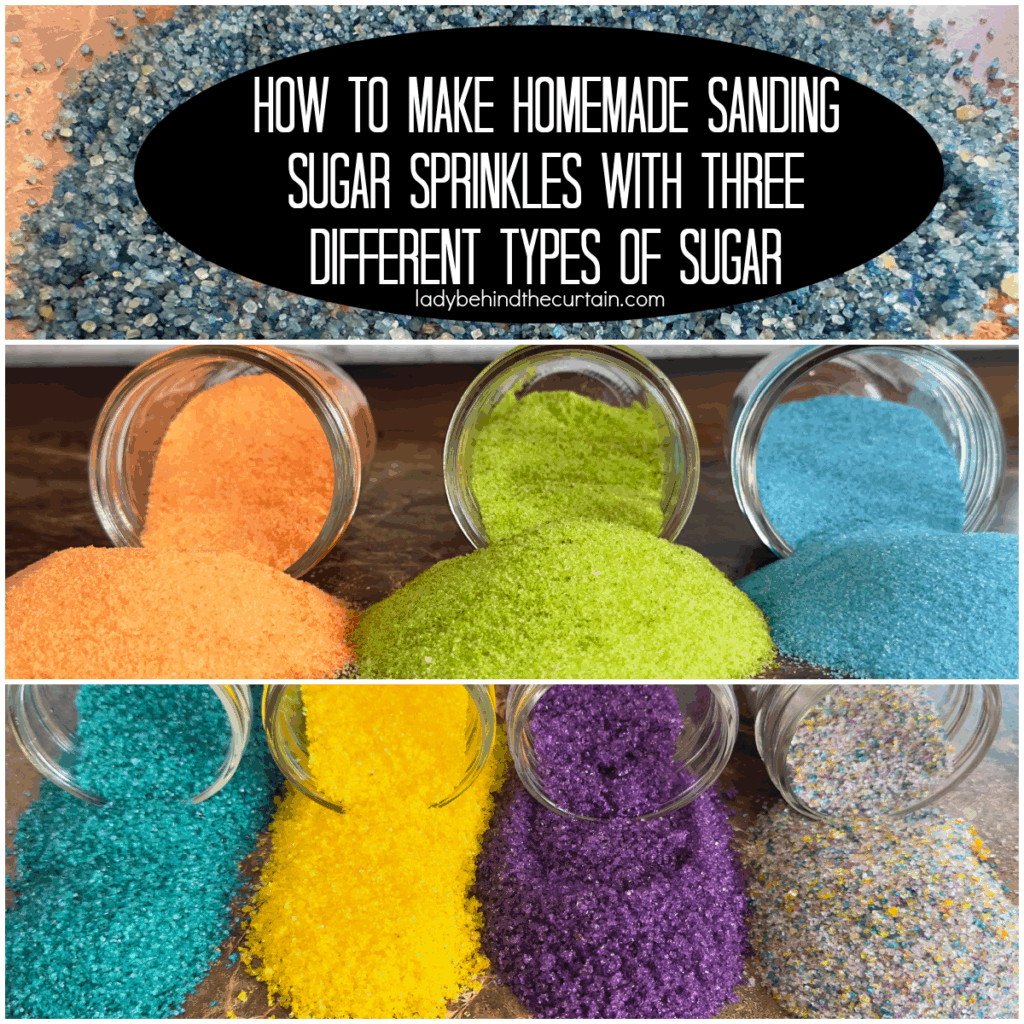
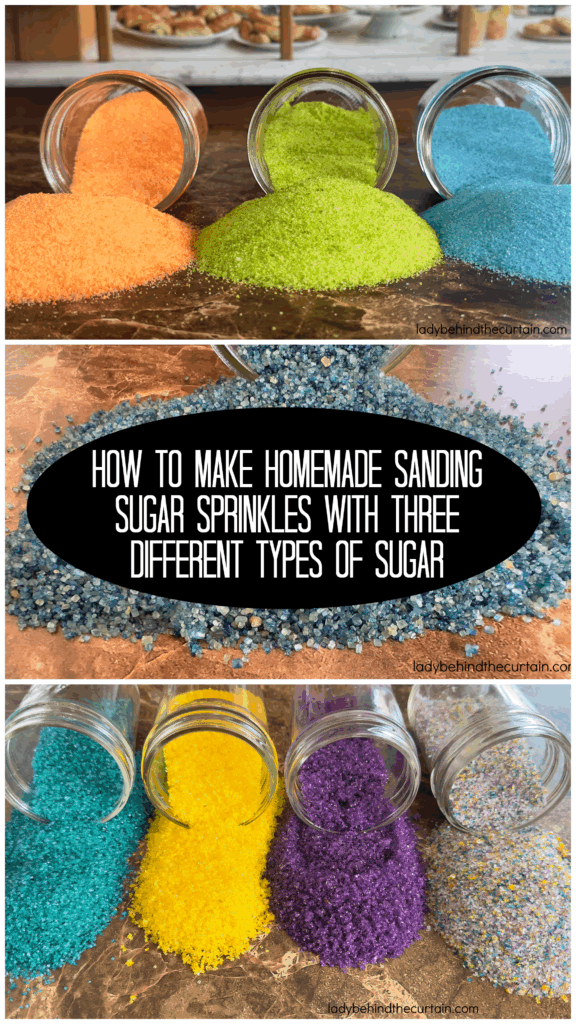
Making homemade sanding sugar sprinkles is incredibly easy and so much fun! With just a bit of sugar and food coloring, you can create vibrant sprinkles in any shade you like—no fancy tools required. It’s a great way to match your treats to any party theme, whether for a summer tropical party, pastel baby shower tones, or bold birthday colors. Customizing your sugar sprinkles adds a personal touch to your desserts and makes your creations look even more festive and special!
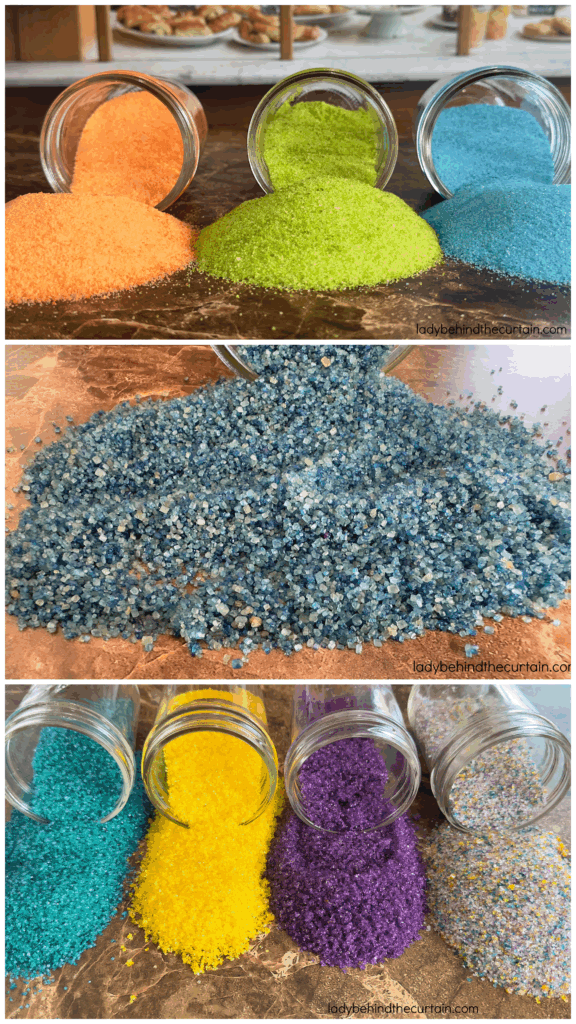
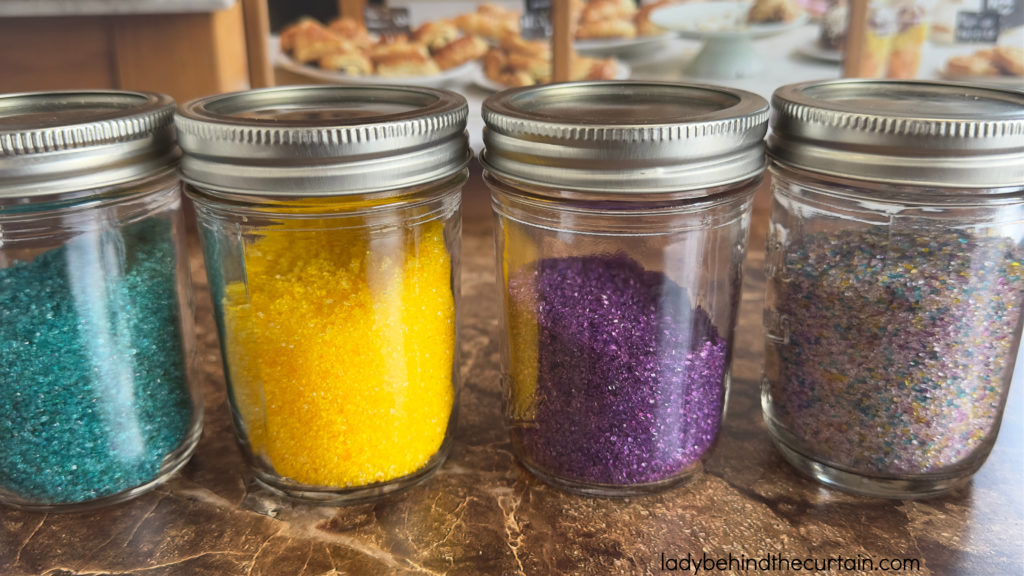
No special tools are required; they are affordable, customizable, and will stay fresh for at least six months! You won’t be restricted to what you find in the store. Making homemade sugar sprinkles is easy and fun, and they add a personal touch to your baked goods! Here’s how you can whip up your own colorful, crunchy sprinkles right at home.
WHAT SUGAR SHOULD I USE?

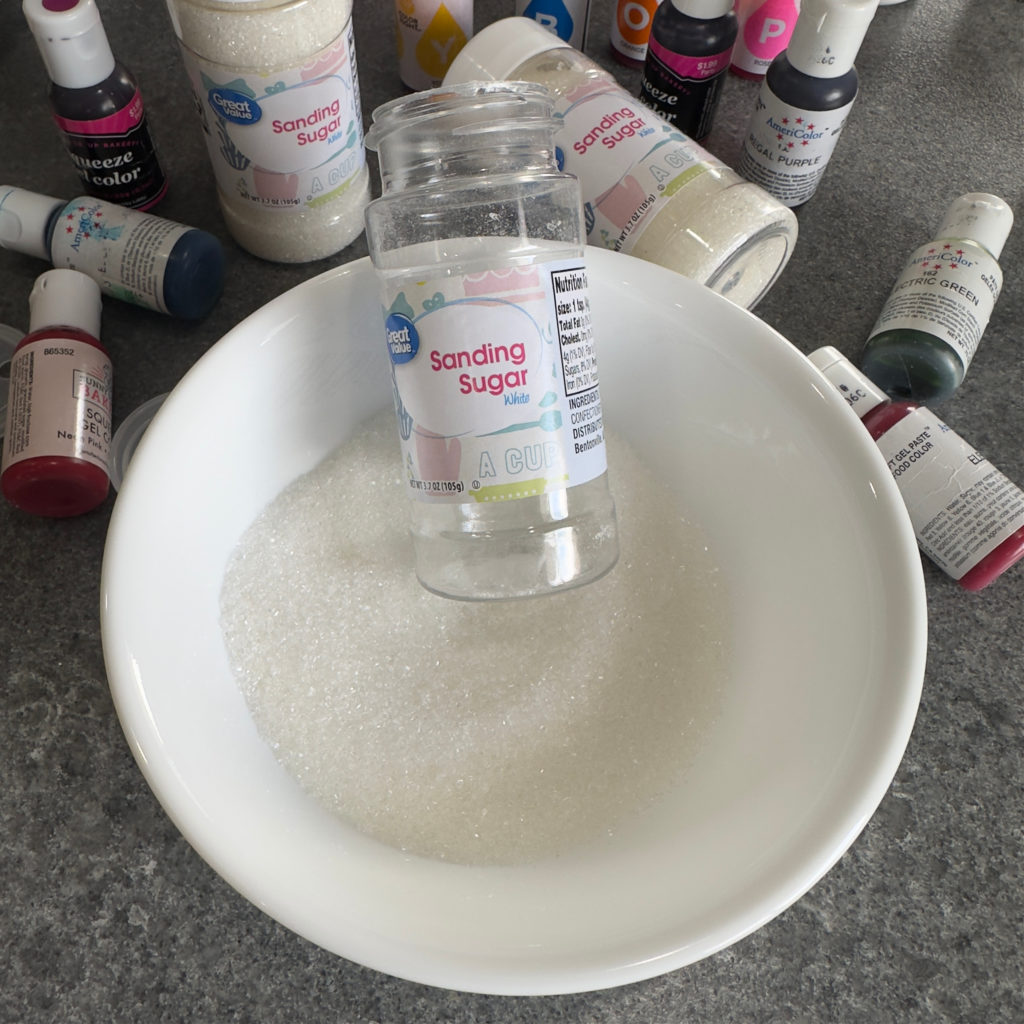
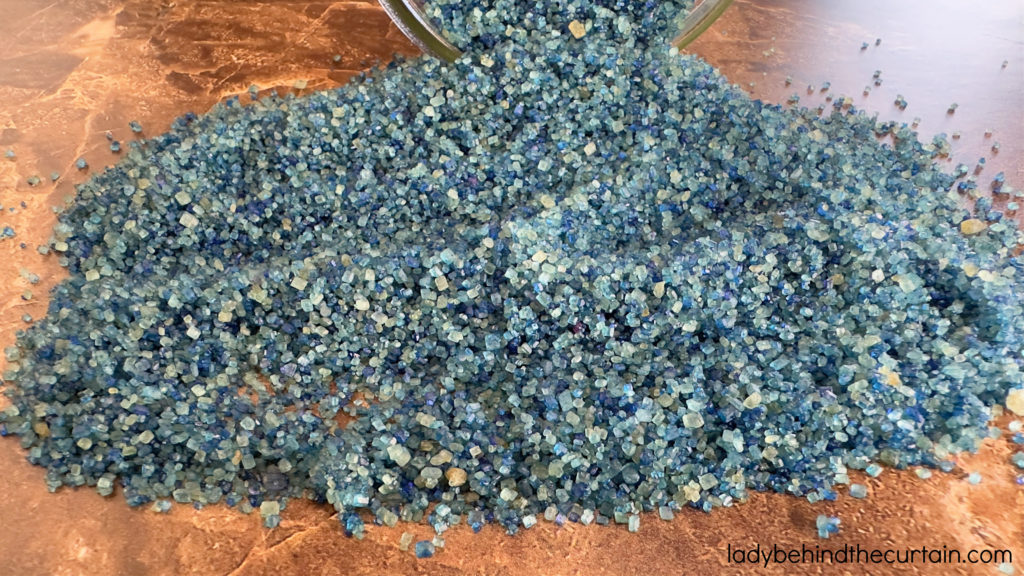
There is no one answer to this question. All forms of white sugar will work—superfine, granulated, coarse, raw, and even powdered sugar (scroll down for special instructions for coloring powdered sugar). The only exception is light or dark brown sugar.
The idea of coloring sugar to make sprinkles might seem unnecessary. But unless you live close to a bakery supply store, it’s hard to find specific colors of sanding sugar. Making colored sanding sugar at home ensures you have the colors you need. Also, it will save you a trip to the store if you find yourself without a particular color.
STORE BOUGHT CLEAR SANDING SUGAR
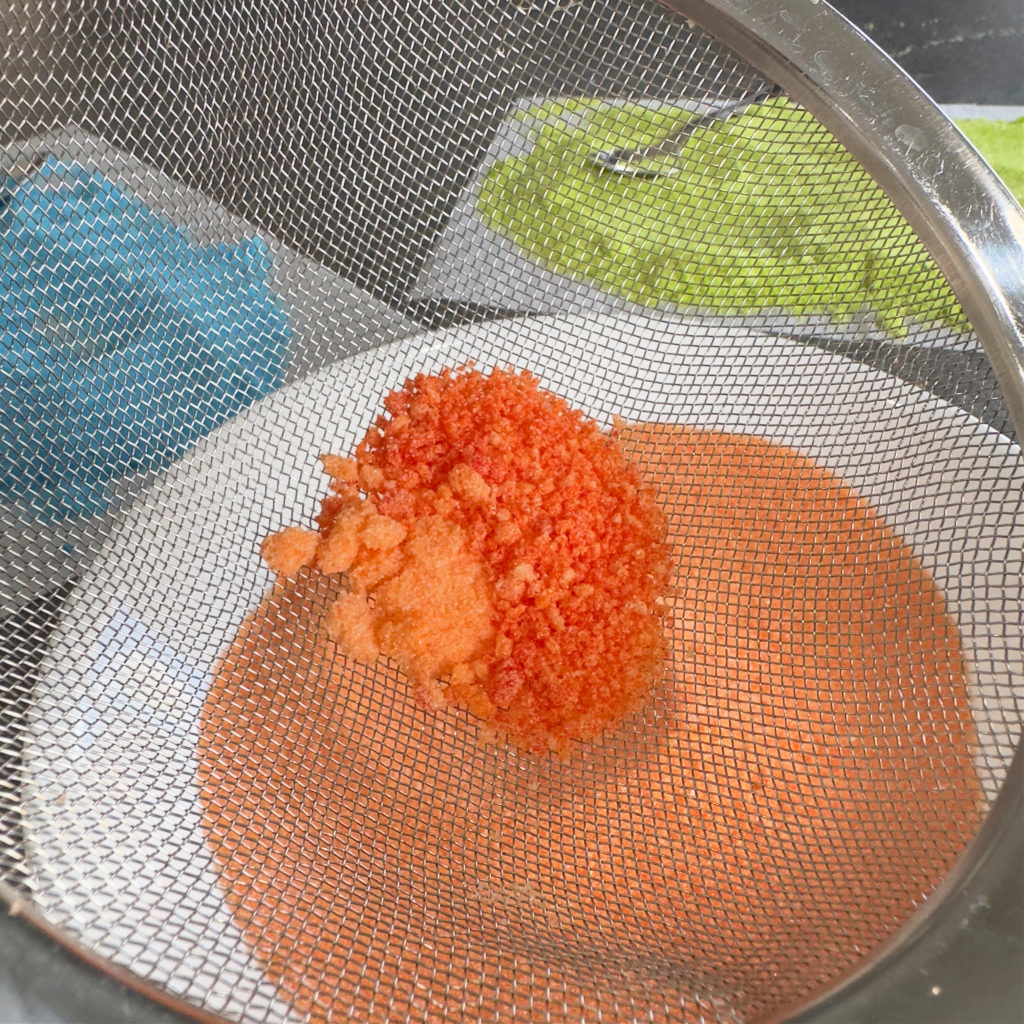
LET THE SUGAR DRY, RUN THE CLUMPS THROUGH A FINE SIEVE.
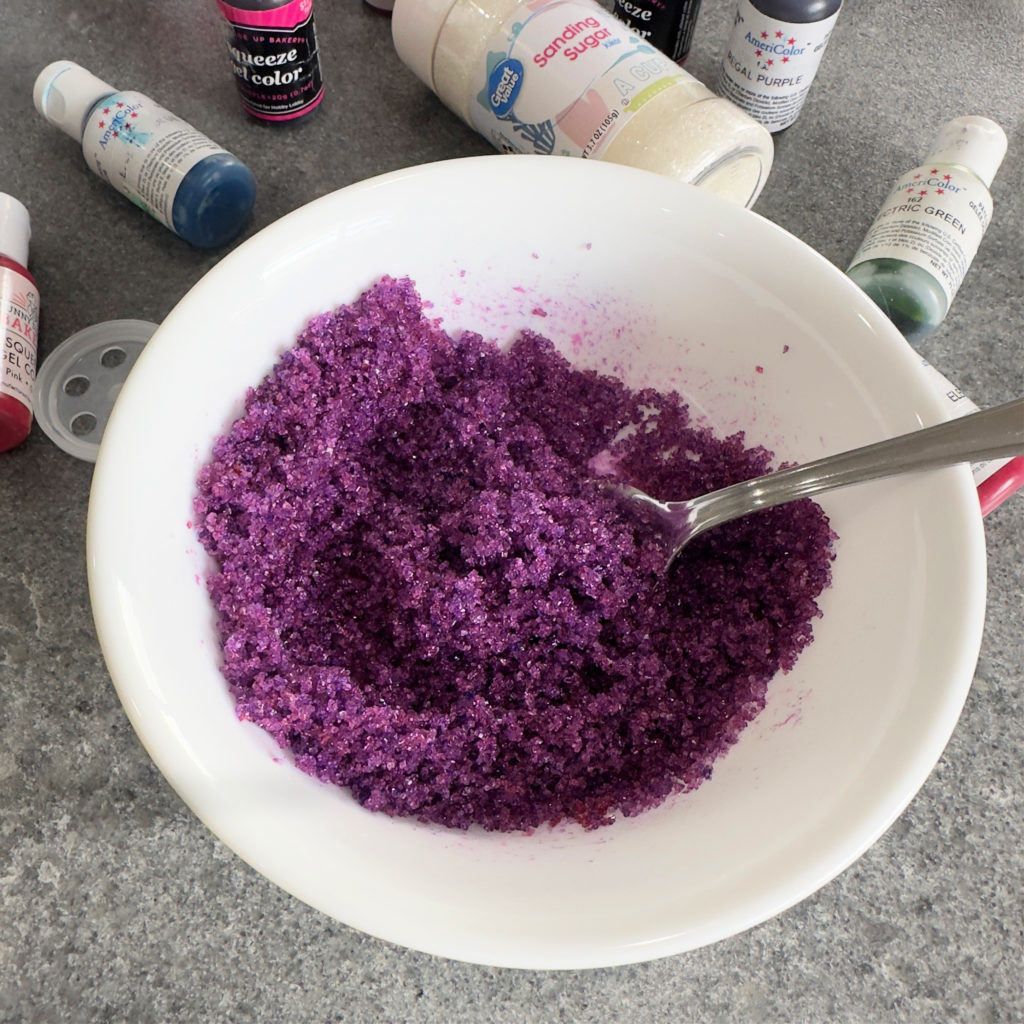
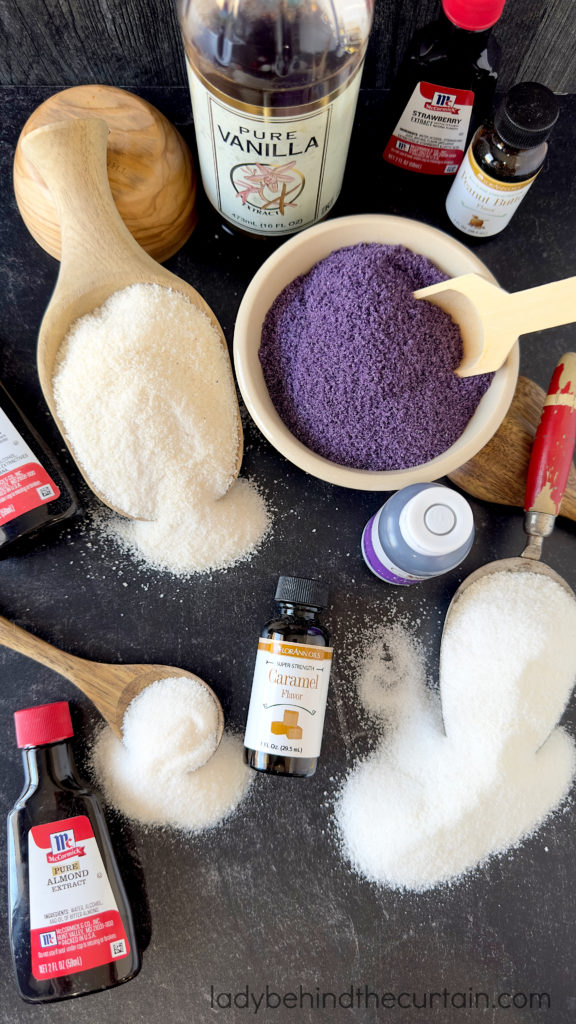
HOMEMADE SPARKLING SANDING SUGAR INGREDIENTS LIST- full printable recipe below in recipe card
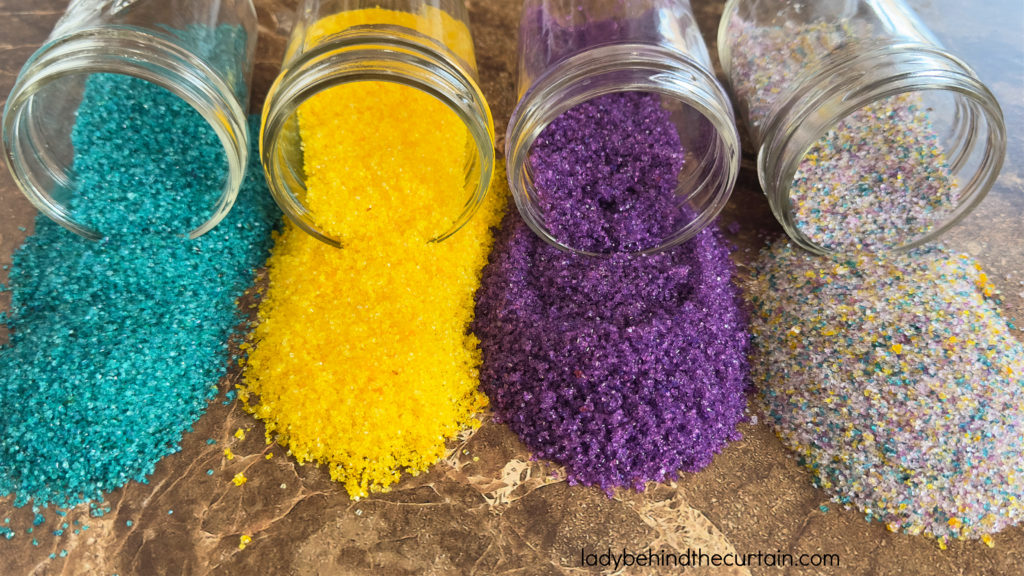
COLORFUL SANDING SUGAR INSTRUCTIONS
TIPS FOR MAKING HOMEMADE COLORED SUGAR
GRANULATED SUGAR

STORE BOUGHT WHITE OR CLEAR SANDING SUGAR
RAW SUGAR
MY FAVORITE CONCENTRATED FOOD COLORING SET
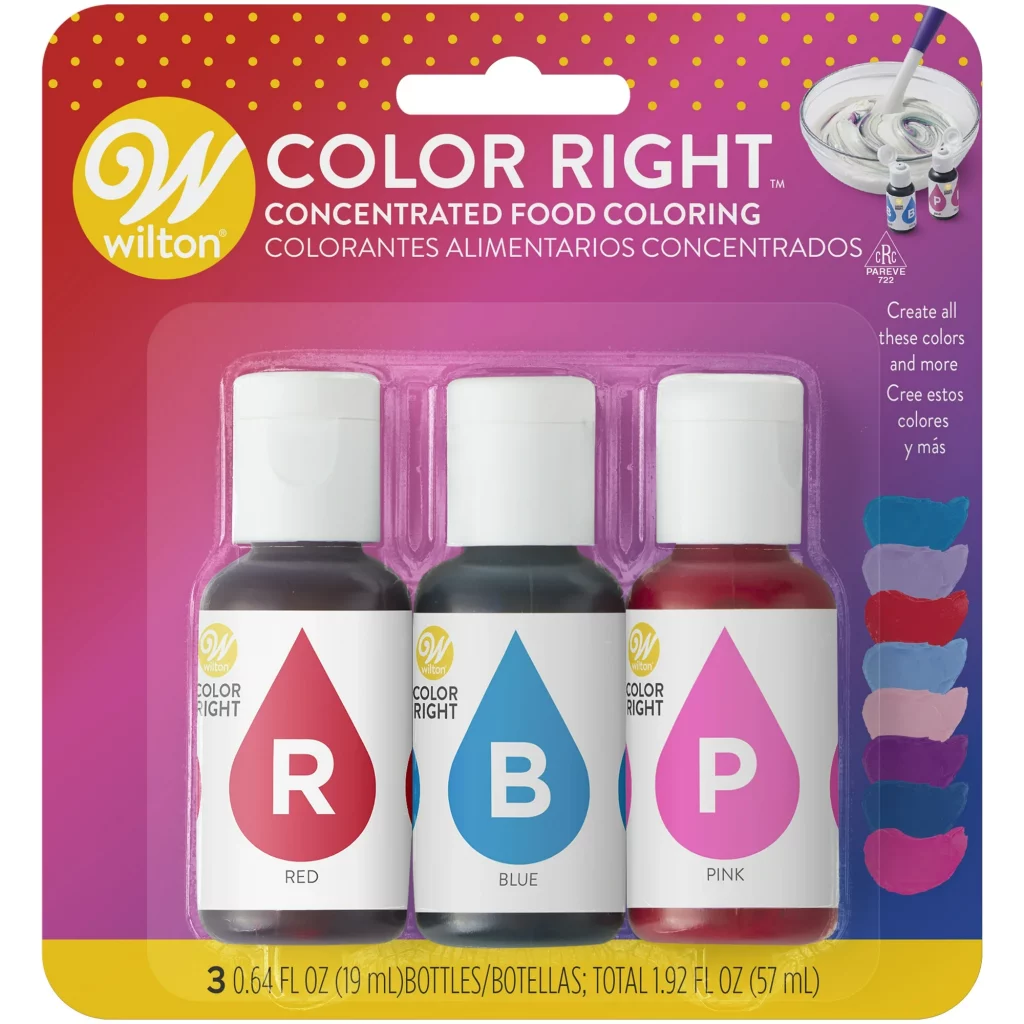
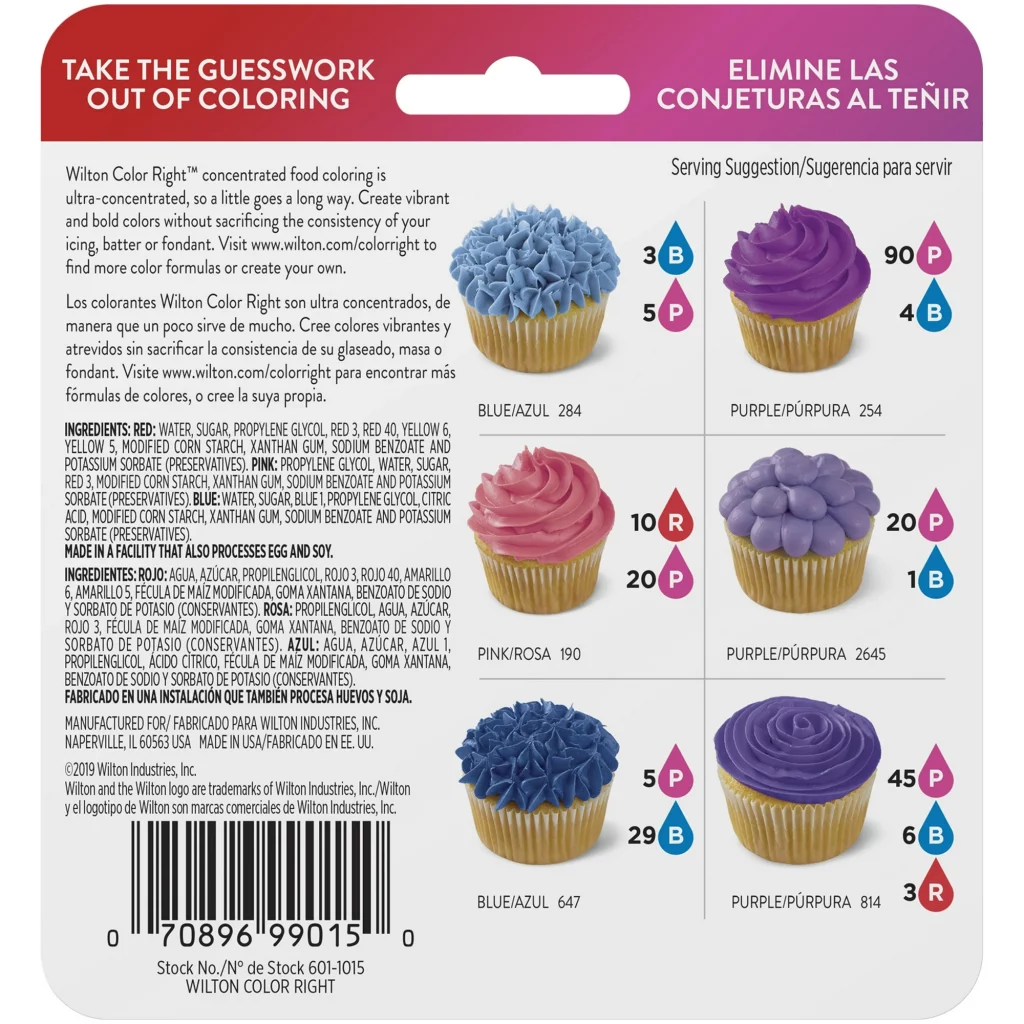

I love these Wilton sets. With these sets, you can create an array of colors. On the back of each color set, there are recipes for each color. I found my sets at Walmart.
You might be thinking, “Why do I need colored powdered sugar? ” Well, obviously, you don’t, but if you love themed food, colored powdered sugar is a game changer. It’s perfect for crinkle cookies, sprinkling on top of treats or French toast, and making a dramatic, colorful sugar drizzle. Colored powdered sugar adds a lot of fun to any treat or dish.
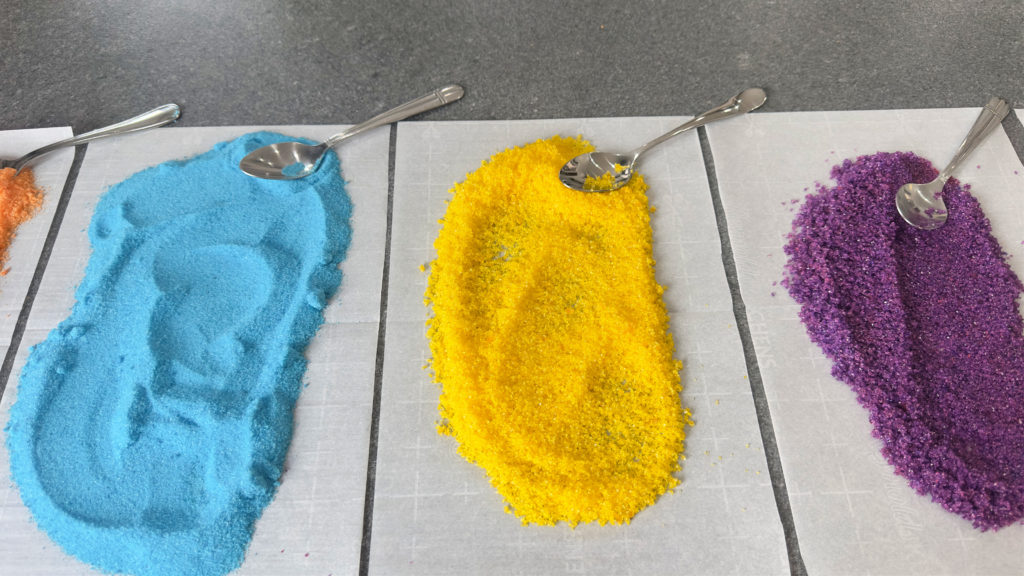
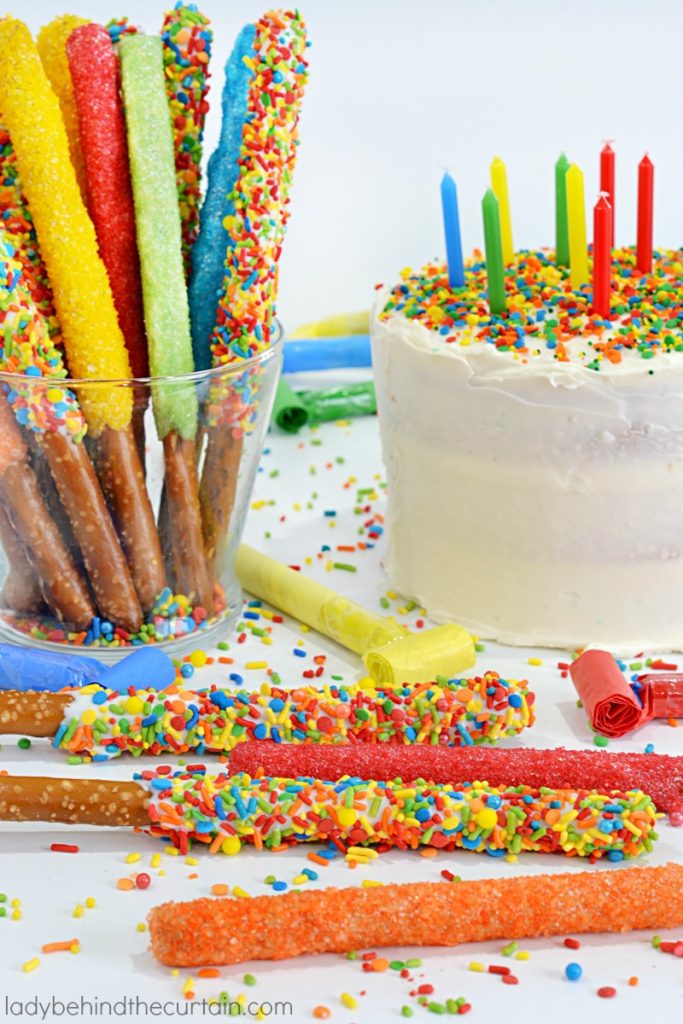
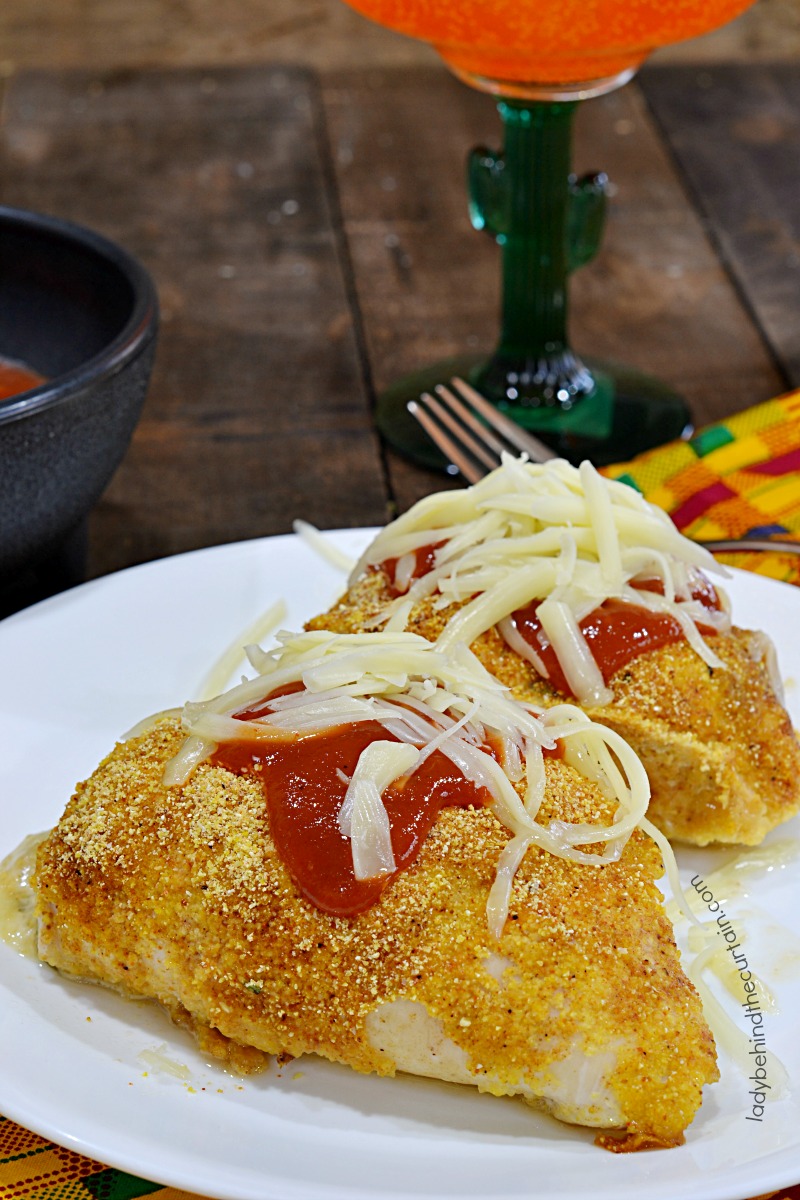
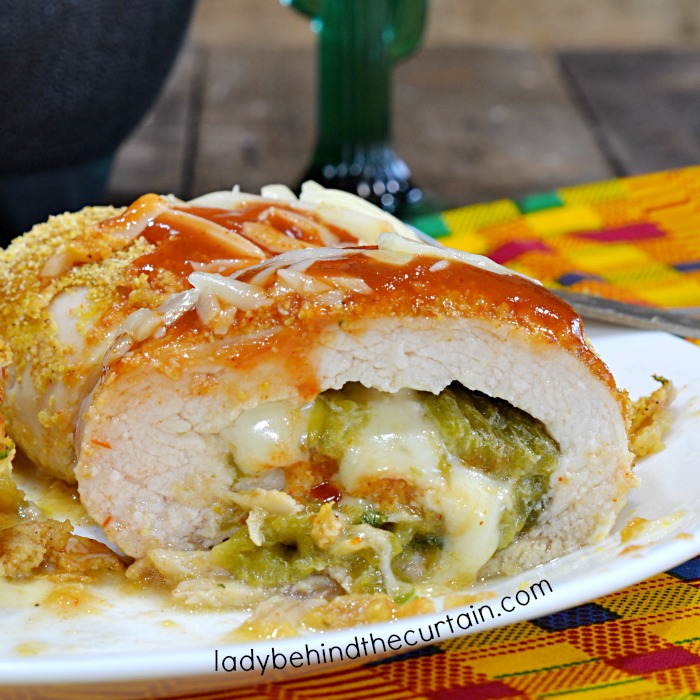
Sanding sugar is a versatile decorative ingredient widely used in baking and confectionery for both its aesthetic appeal and textural benefits. Its large, coarse crystals reflect light beautifully, making it ideal for adding sparkle and color to cookies, cupcakes, and cakes. Bakers often sprinkle it on top of dough before baking to create a crisp, sweet crust, especially on sugar cookies, scones, or pie crusts. Sanding sugar also comes in various vibrant colors, making it perfect for themed treats and festive occasions. Beyond baking, it can be used to rim cocktail glasses for a glittery finish or to decorate holiday crafts and edible gifts. My favorite? Decorated Pretzels and Marshmallows. EXAMPLE: Adding a sprinkle of light purple sanding sugar on top of a Lilac flavored scone with a pastel purple glaze drizzle would be beautiful.
If you have a concentrated flavoring with an intense color ( like Ube extract), you only need a small amount of the flavoring. If that’s not the case, add one drop of color with one drop of flavoring (vanilla extract) per 1 cup of sugar. Use a spoon to mix or add to a zip-top bag and knead the color and flavoring into the sugar. Continue until you have reached the desired flavor and color. Be careful, you don’t want to add too much moisture. Below is a photo of the ube-flavored colored sugar sprinkled on top of an Ube Cookie.

Elevate your baking game and impress your friends and family with homemade flavored sugar treats. Imagine the possibilities – maybe sugar can be sprinkled on popcorn, coconut sugar can add a tropical touch to your tea, strawberry sugar can be used to make whipped cream, or maple sugar can be used for pancake batter. Customize flavored sugar using extracts, adding a unique touch to your dishes and drinks. Prepare to add some flavor to your pantry and wow your taste buds. CLICK HERE FOR THE RECIPE→FLAVORED SUGAR USING EXTRACTS

In conclusion, making homemade sanding sugar is a wonderfully easy and fun way to add a personal, creative touch to your baked goods. With just a few simple ingredients and a dash of imagination, you can transform ordinary sugar into vibrant, sparkling toppings that make your treats truly stand out. Whether you’re decorating cookies, cupcakes, or festive desserts, homemade sanding sugar brings color, charm, and a bit of magic to every creation.❤️Sheryl
TIPS FOR MAKING HOMEMADE COLORED SUGAR

THANKS FOR VISITING♥
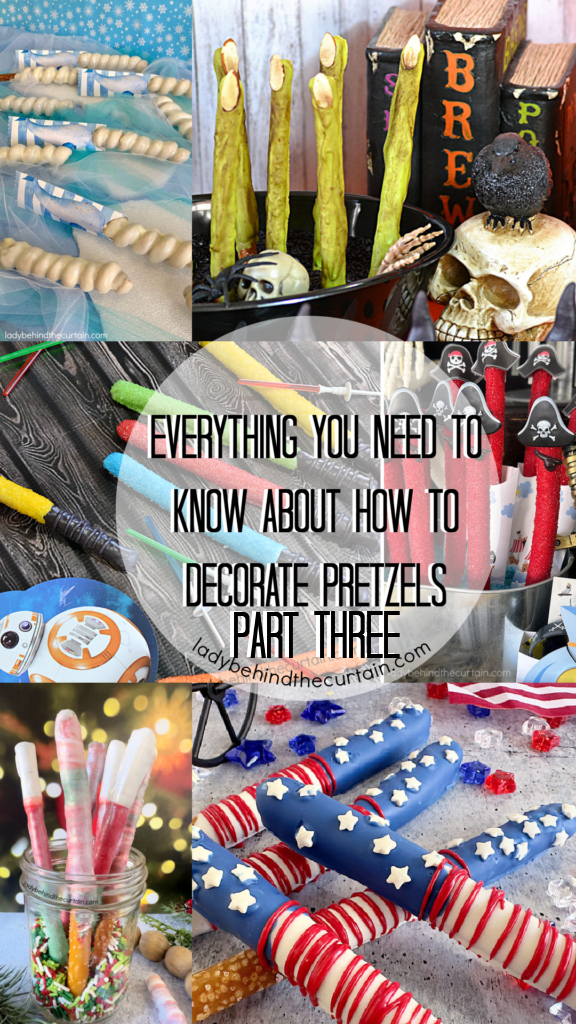
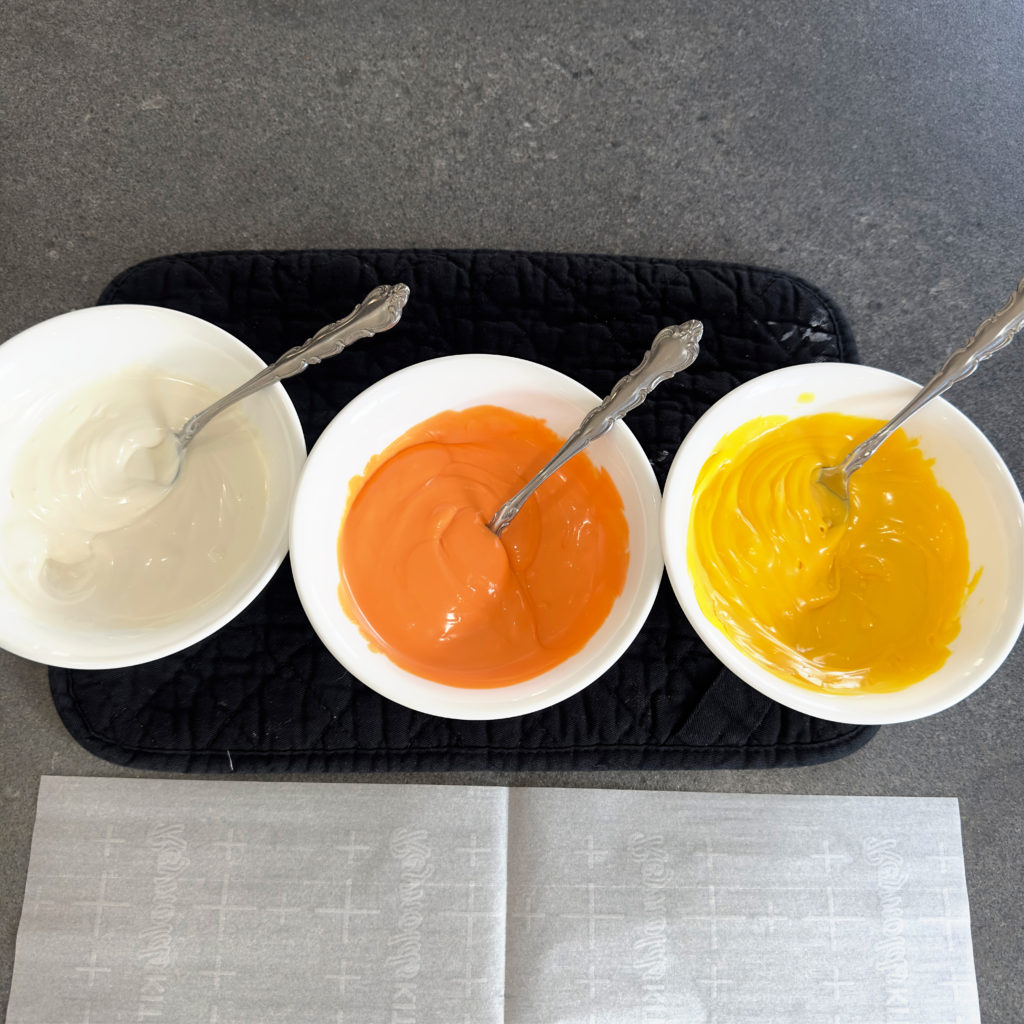
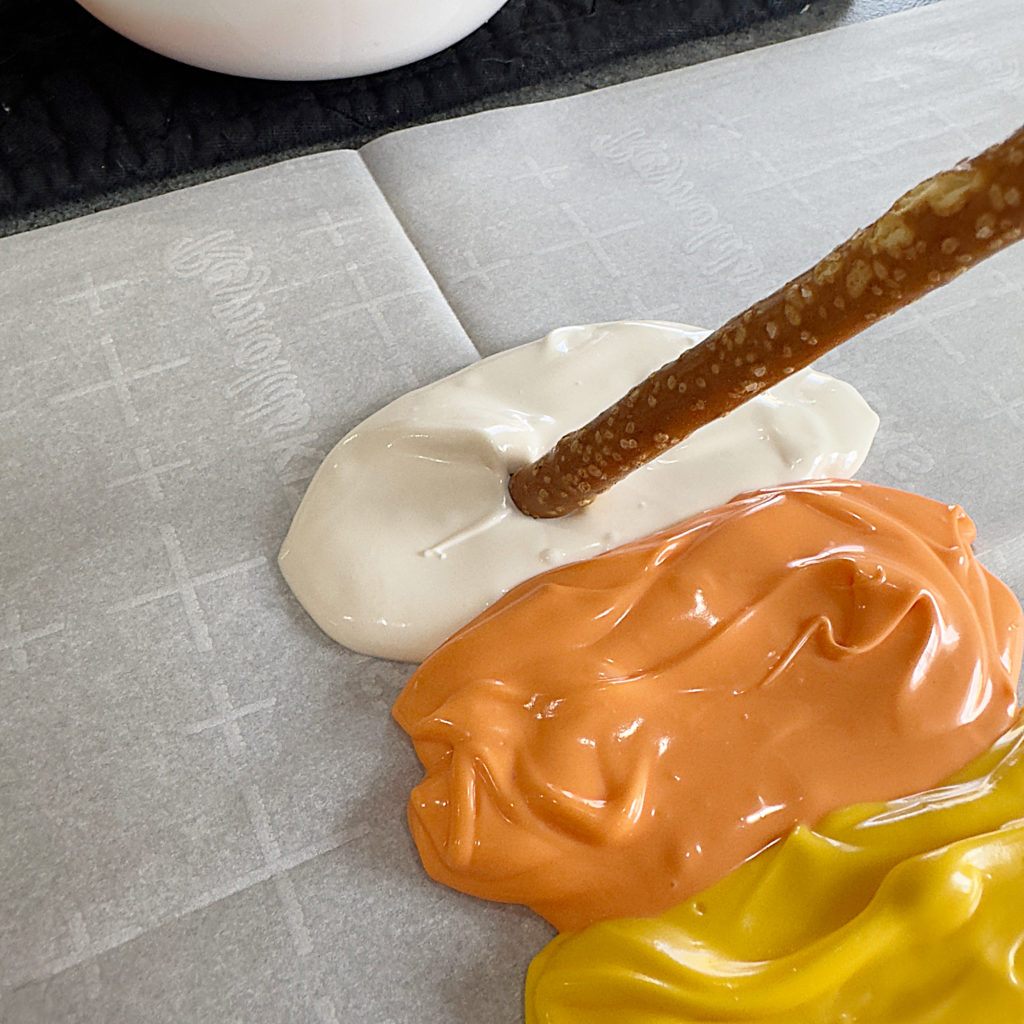
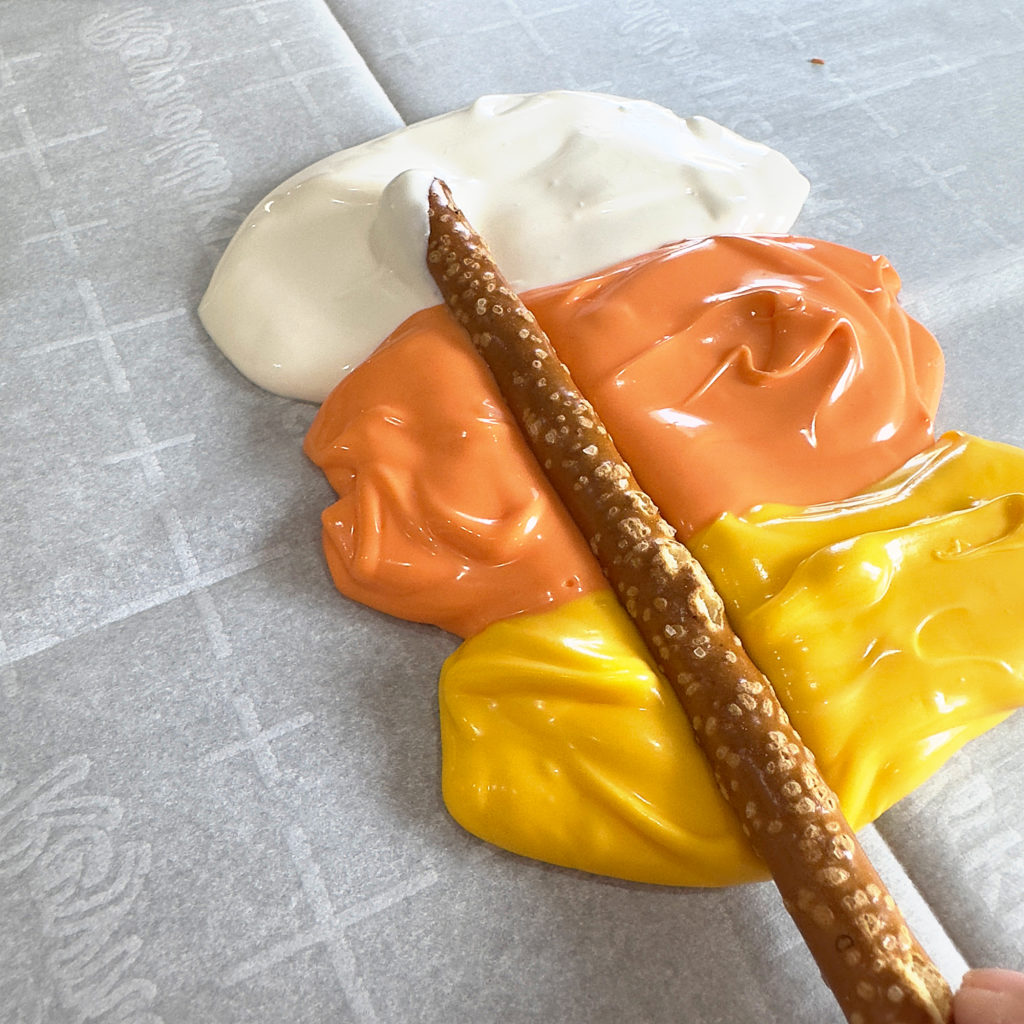
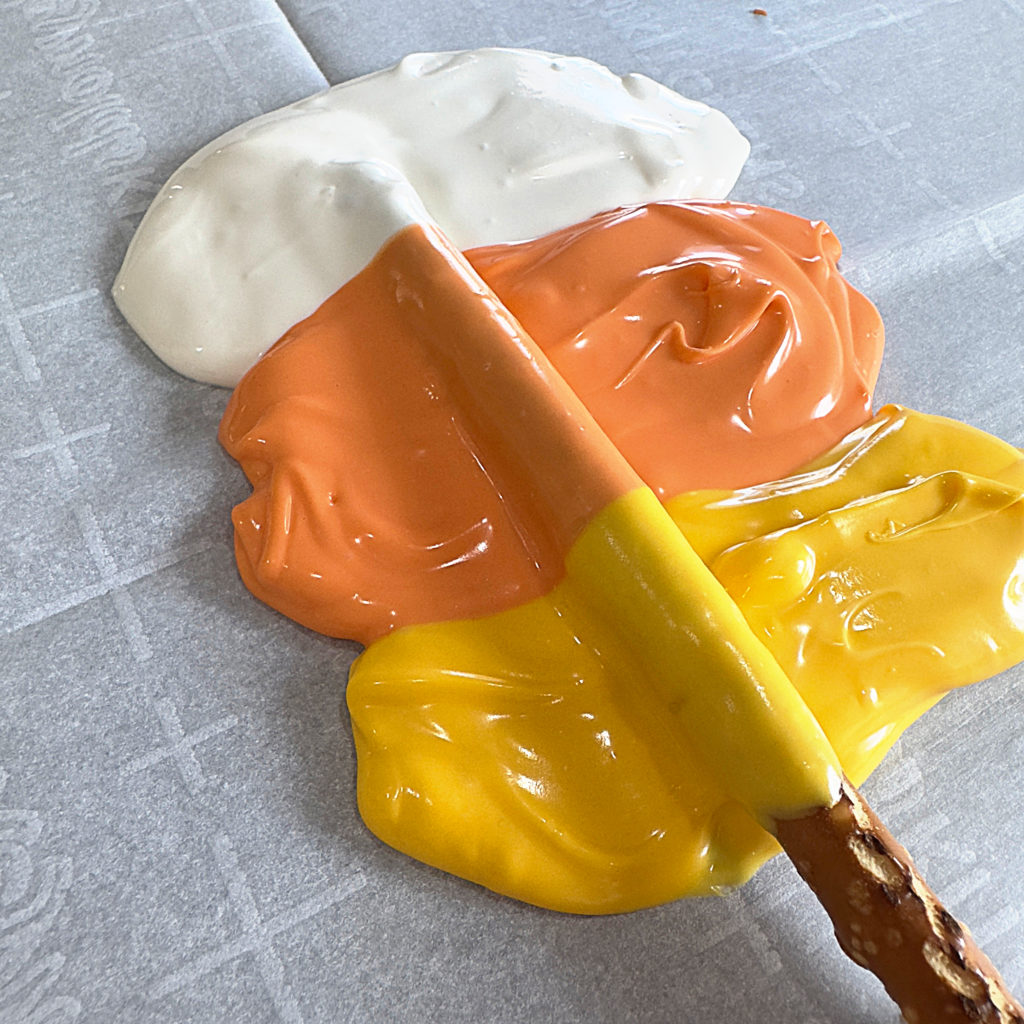
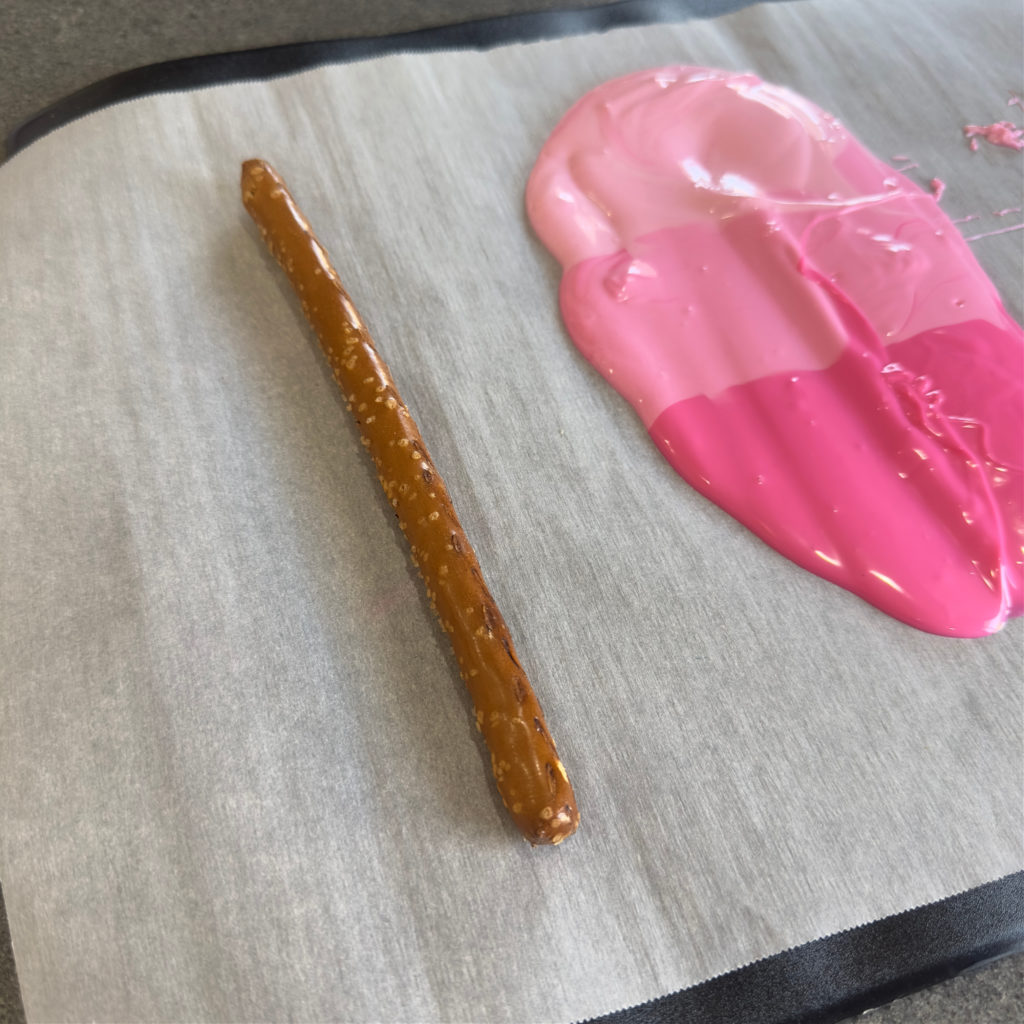
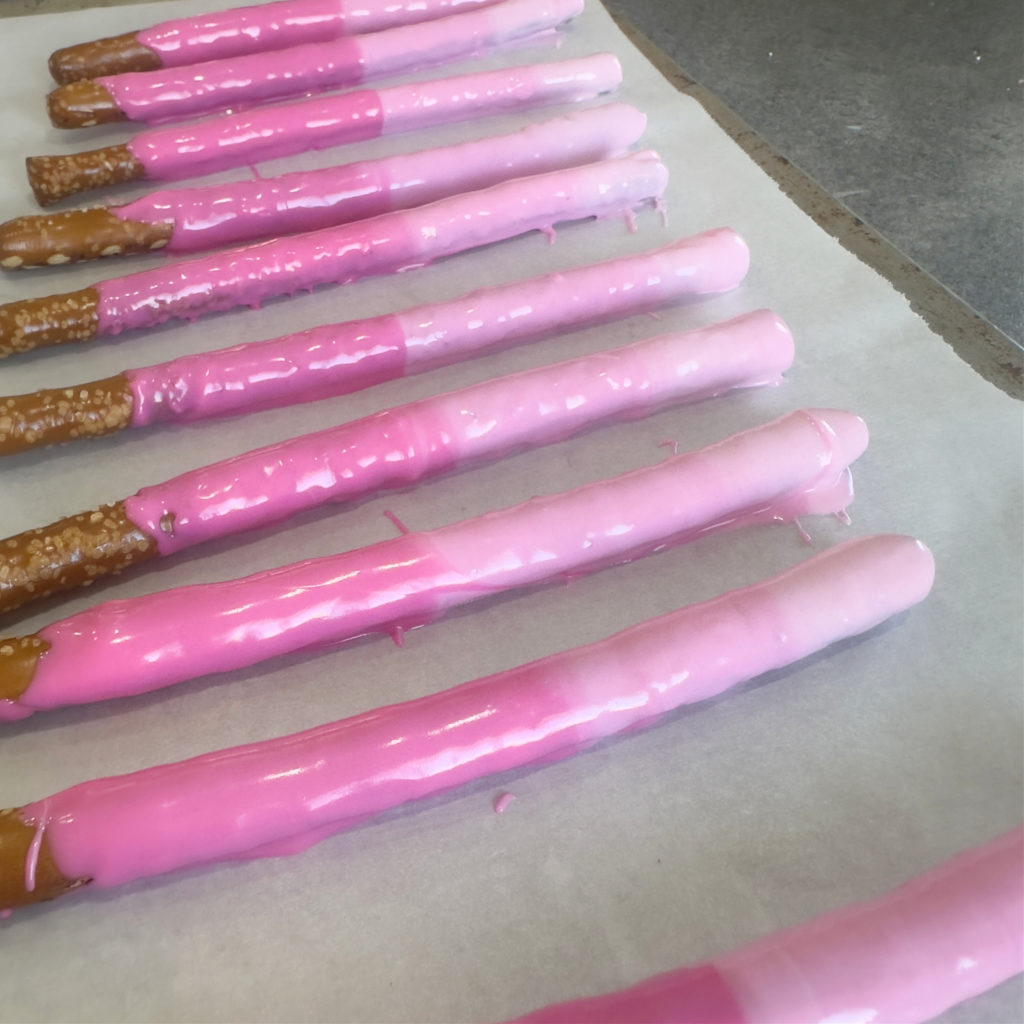
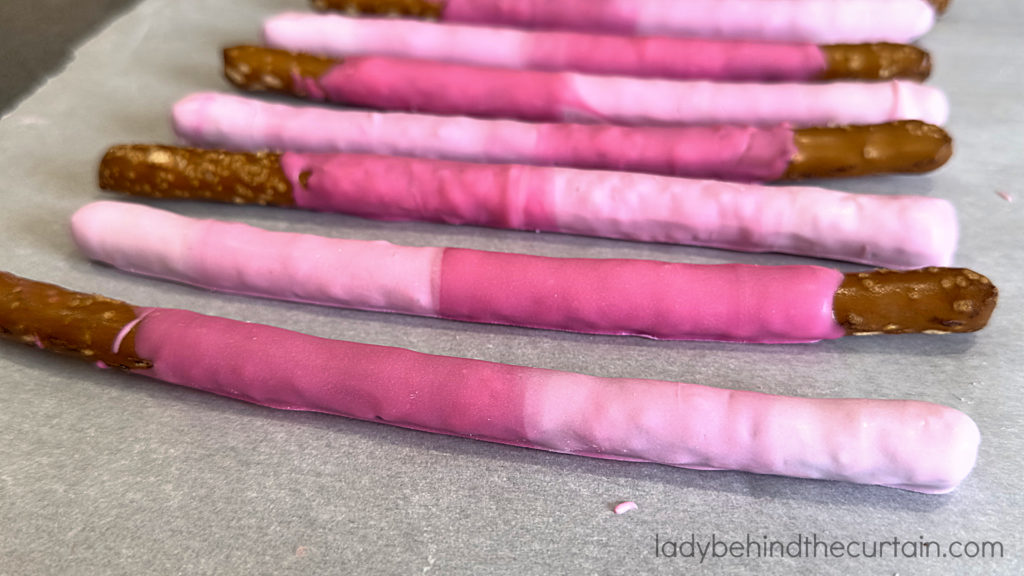
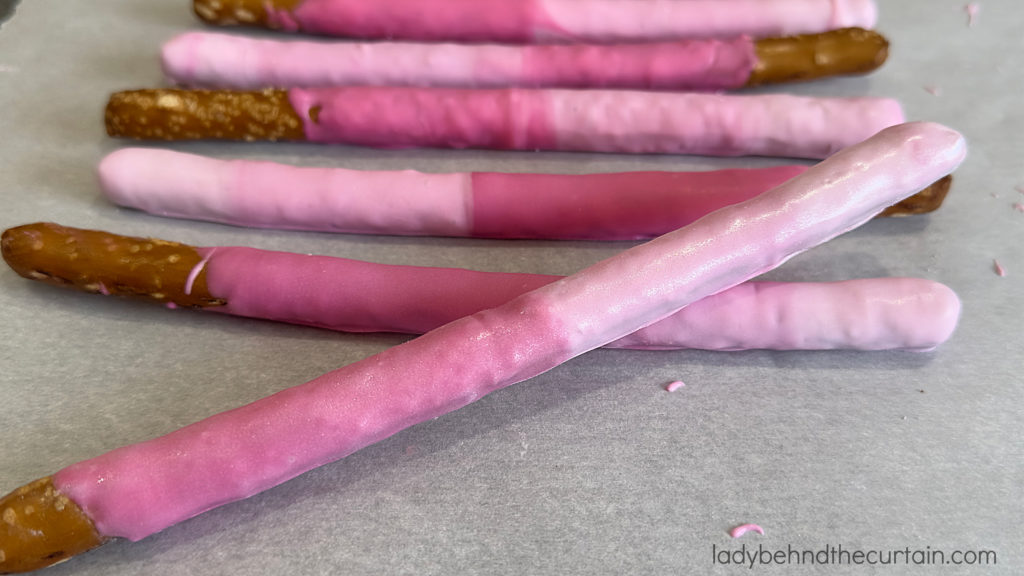
Welcome to part three of our pretzel decorating series! In this post, we’re diving into more advanced techniques like working with caramel, creating stunning tri-color designs, achieving a beautiful marble effect, and more. If you haven’t read parts one and two yet, we strongly encourage you to check those out first, especially if you’re new to pretzel decorating. Part one covers the essential basics, while part two builds on those skills with fun, themed creations. Each post lays the groundwork for the next, so make sure you’re caught up before jumping into these more challenging (but totally doable!) techniques.

CREATE A PRETZEL WITH A SURPRISE INSIDE…CARAMEL!
After experimenting with four different caramel options, here are my findings. You can decide which one is your favorite. Some of the caramel options are easier than others. Please scroll down for all the details and find my favorite.
CARAMEL BITS

CARAMEL BITS: Heat the caramel bits for 1 minute, stir, and heat for an additional 30 seconds. Set aside for 5 minutes. Dip the pretzels and place them on a cookie sheet lined with parchment paper. I wasn’t too impressed with the caramel bits. They were very messy, and I had to dip them twice to get enough caramel coating.
MELTABLES
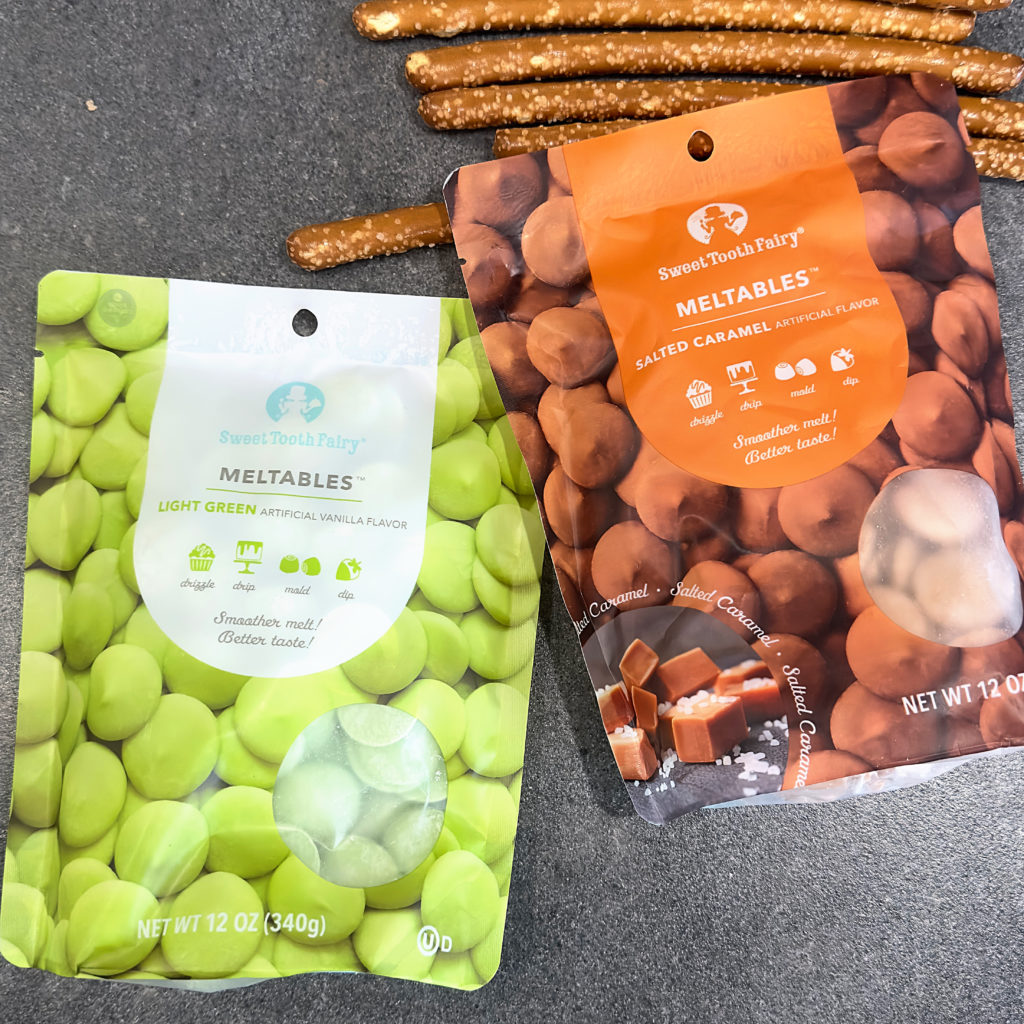
SALTED CARAMEL MELTING CANDY: I found this melting candy at Michael’s. The brand is Sweet Tooth Fairy Meltables Salted Caramel. If you use the melting candy, pour it into a microwave-safe container ( I used a tall glass cup) and add one tablespoon of vegetable shortening. Heat for 1 minute and stir until the candy is melted. Place the dipped pretzels on a cookie sheet lined with parchment paper. To harden, either set them aside on the counter or, for quicker results, place them in the refrigerator (about 10 minutes). The candy had a decent flavor, but I missed the chewy caramel center.
WRAPPLES
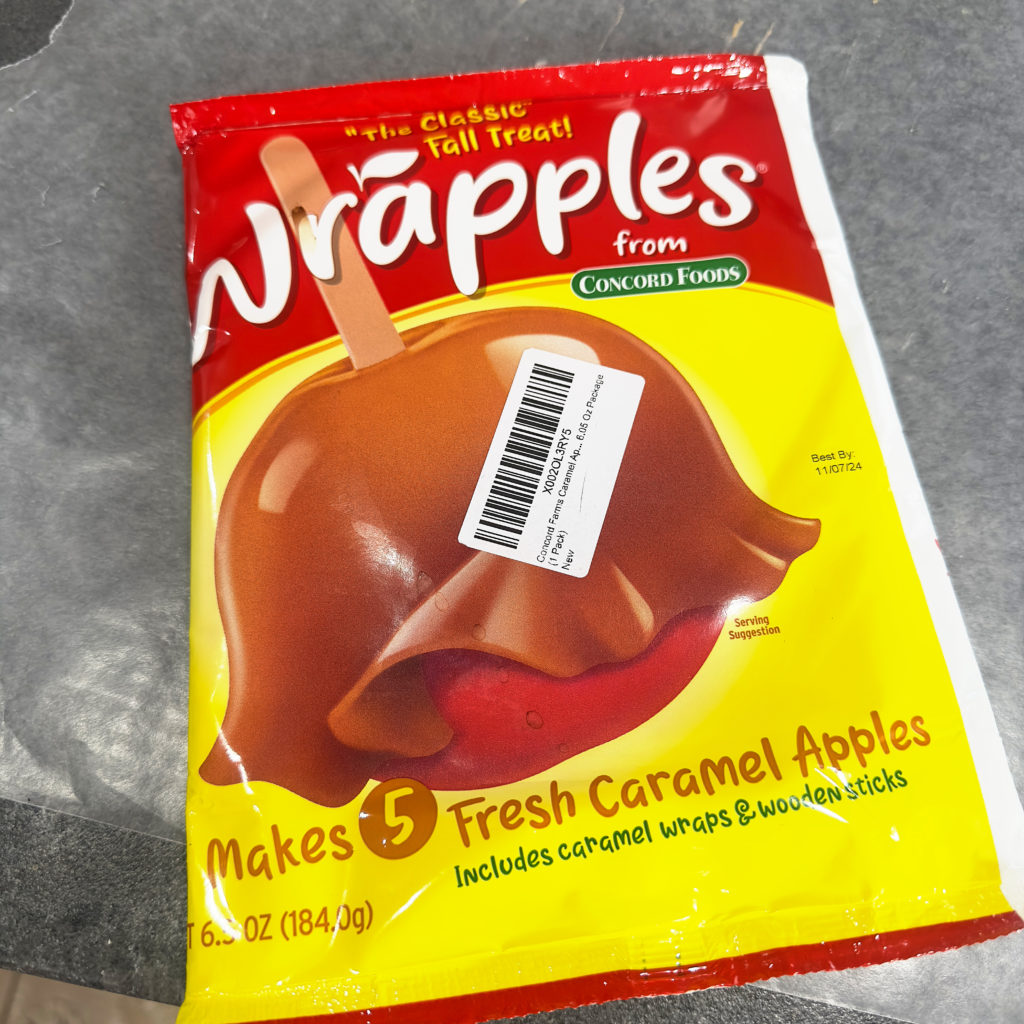
WRAPPLES: A fun seasonal product found in the Fall months in the produce department of most grocery stores. If you happen to find some, GRAB THEM! The Wrapples have a nice caramel flavor and are super easy to use. One Wrapple will cover THREE pretzel rods. Cut the wrapples into thirds, wrap and mold the caramel disk around the pretzel rod. This one wins for its easy use, and the flavor is tied with the wrapped caramels. The only downfall is that they are seasonal. Look below to see how I solve that problem.
WRAPPED CARAMELS


KRAFT WRAPPED CARAMELS: If you can’t find the Wrapples caramel wraps, this is the next good option. Use 2-3 caramels per pretzel. Unwrap four caramels, microwave them for 10 seconds, and mold them around the pretzel. Only cover one pretzel at a time; repeat until all the pretzels are covered.
WERTHER’S ORIGINAL SOFT CARAMELS: These caramels are softer and a little smaller than the Kraft Caramels. The flavor is about the same as the Kraft brand. For a pretzel rod, you will need four caramels. Remove the wrapper, combine them into a ball, and microwave for 6 seconds. Lay the softened caramel on a piece of parchment paper and roll it into a 4-inch disk, mold it around the pretzel, and pull and shape it to the desired length.
TWO-TONE DECORATED PRETZELS
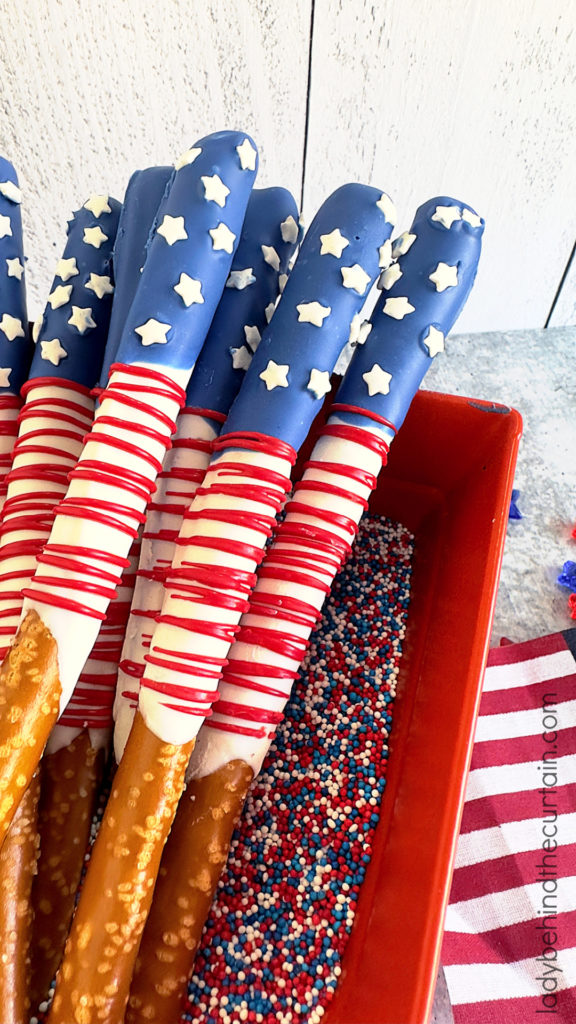
Learn how easy it is to add two colors to a pretzel rod and create these unforgettable Stars and Stripes Flag Pretzels. CLICK HERE TO GET THE STEP-BY-STEP INSTRUCTIONS→PATRIOTIC PRETZEL RODS
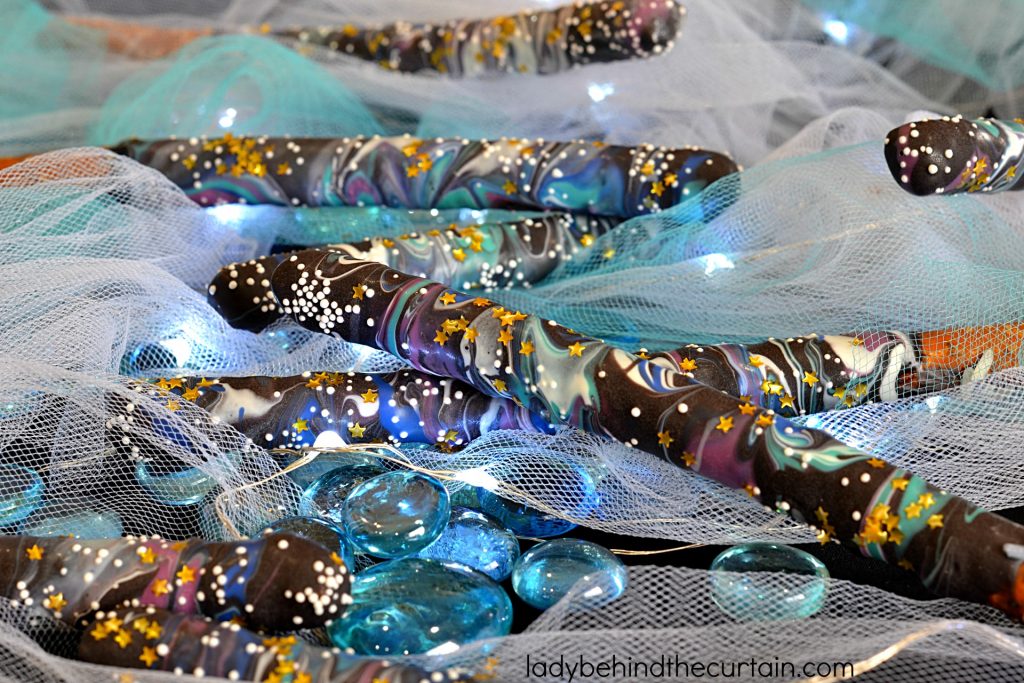
When you look at my technique for the marbling effect, you may see that there is some waste. Remember this…..you will create TWELVE incredible-looking party pretzels for under $10. Most techniques call for a tub of melted candy (the primary color), drizzling the other colors on top, and then dipping the pretzel in through the drizzled colors—it’s hard to keep the colors from becoming muddy looking. I don’t think that technique works as well as the one I do here. View the video below for the full details—and click here for the post—->>>>OUT OF THIS WORLD GALAXY DECORATED PRETZELS
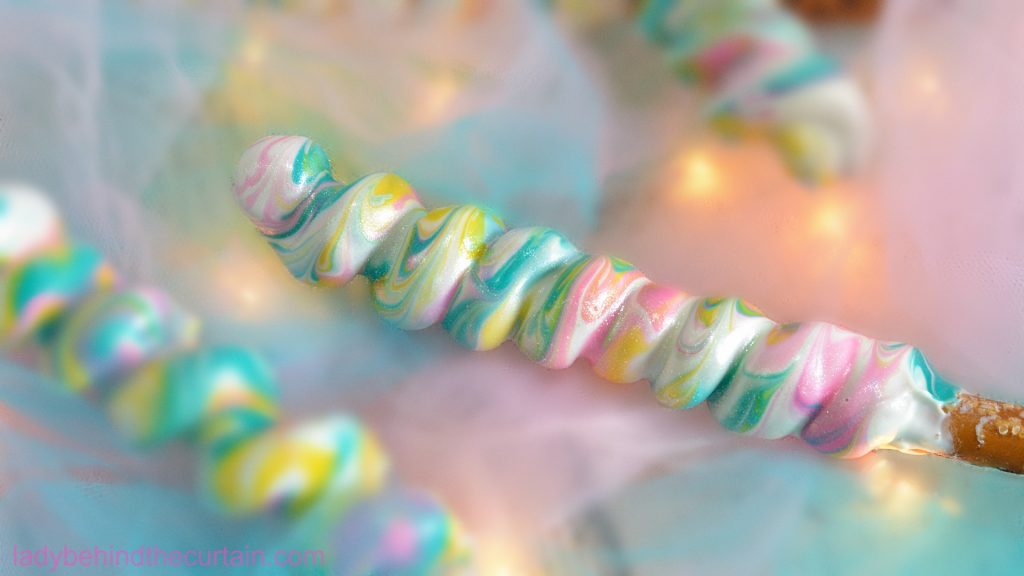
This uses two of my favorite techniques. I love caramel on my pretzels and the look of melted candy when it’s marbled. View the video below for the full details—and click here for the post—->>>> UNICORN PRETZELS
HOW TO GET RID OF CANDY PUDDLES
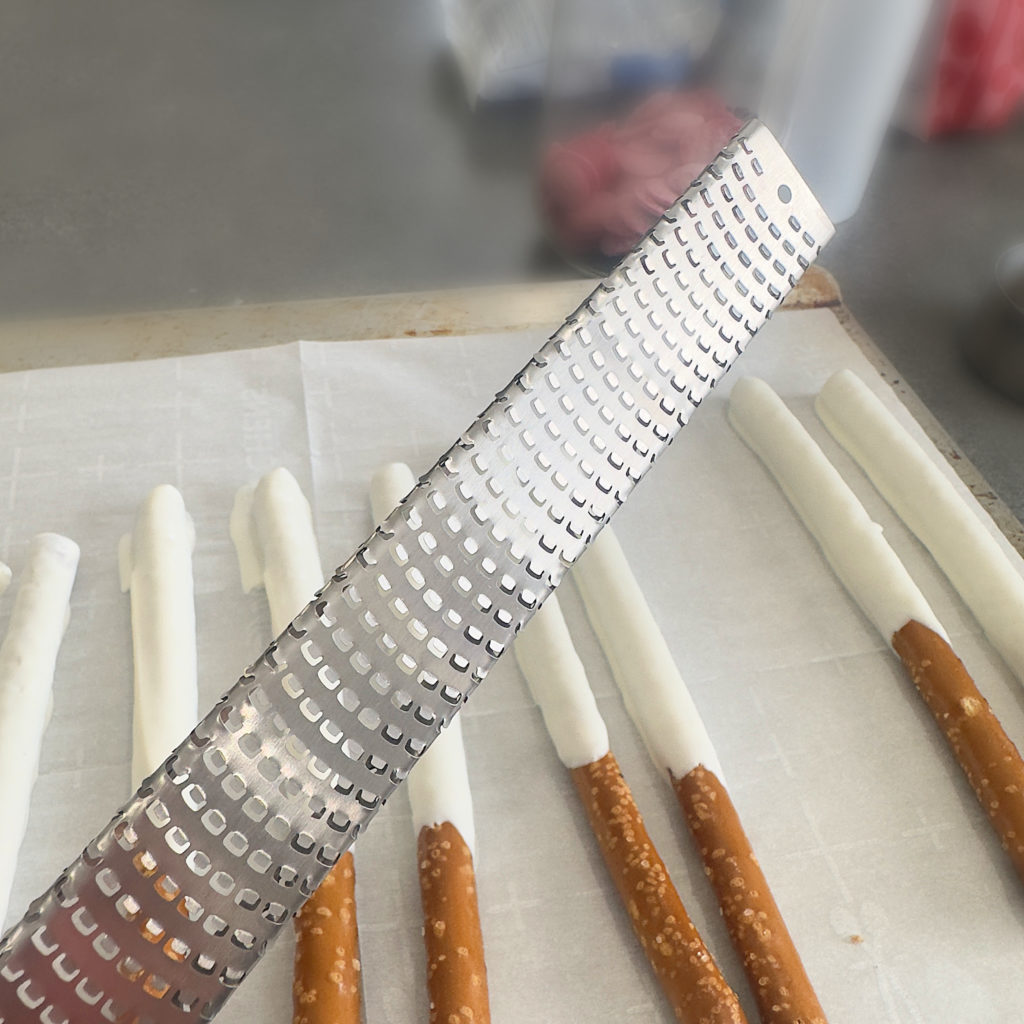
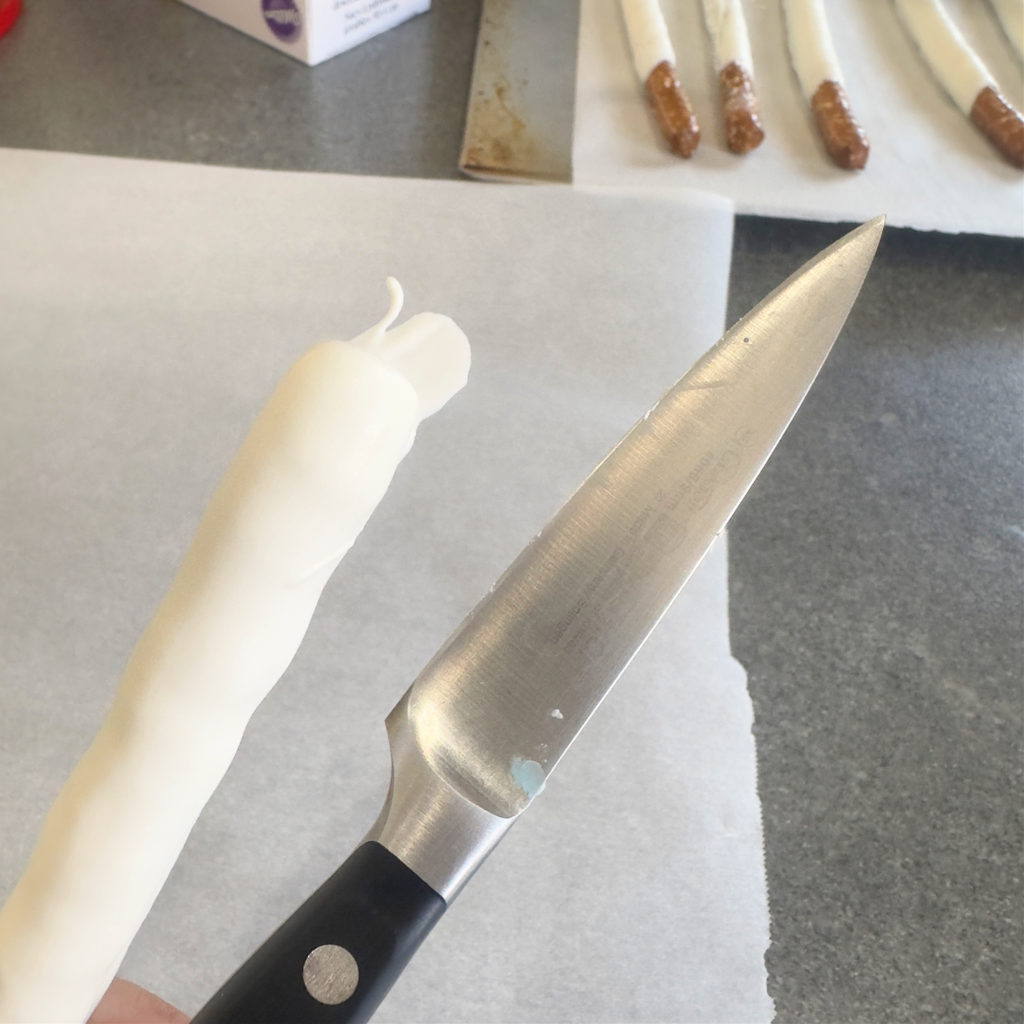
CANDY PUDDLES: HOW TO GET RID OF CANDY PUDDLES. One of my favorite tips when decorating pretzels is using a microplane tool for the edges that have puddled under the pretzel. I’ve used the micro plane for years and recently switched to a paring knife. Regardless of your chosen tool, they will both get the job done. Carefully scrape off the excess melted candy. NOTE: CANDY MUST BE HARD FOR THIS TO WORK
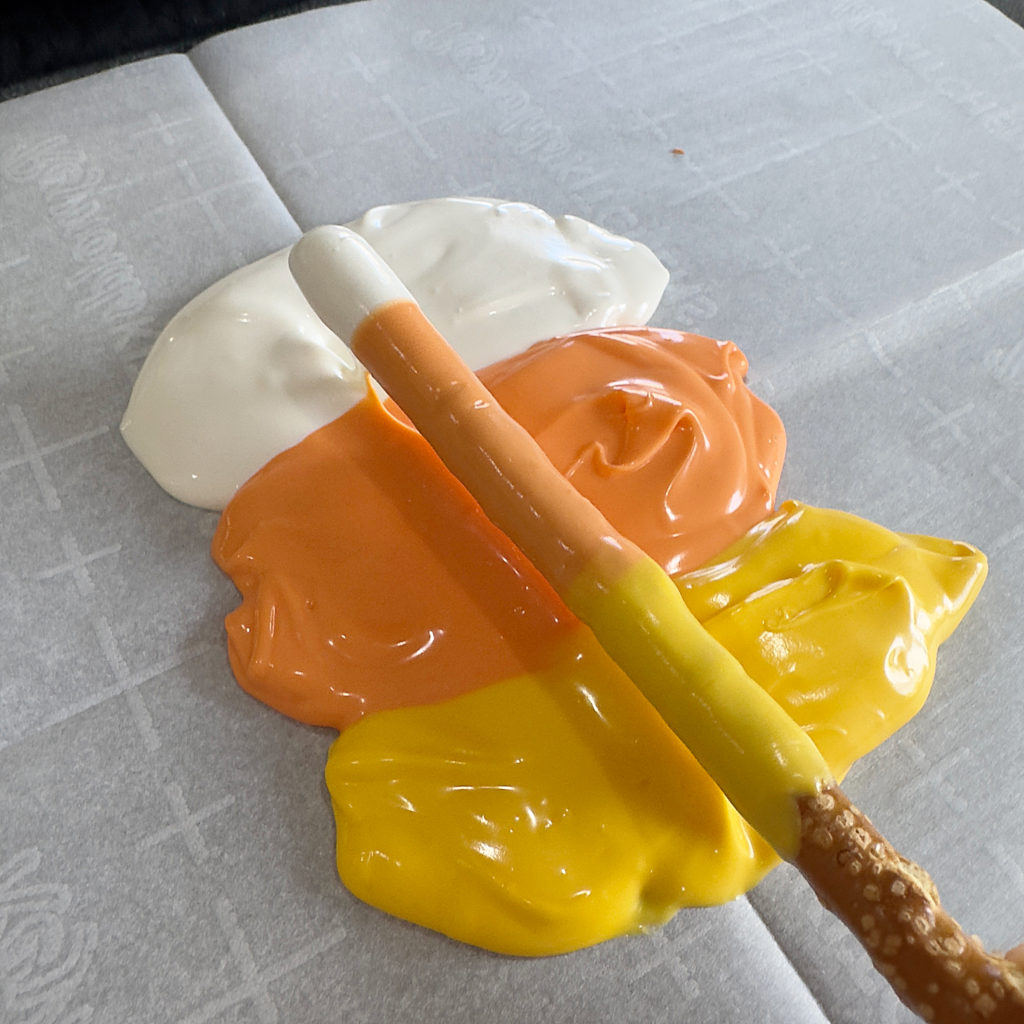
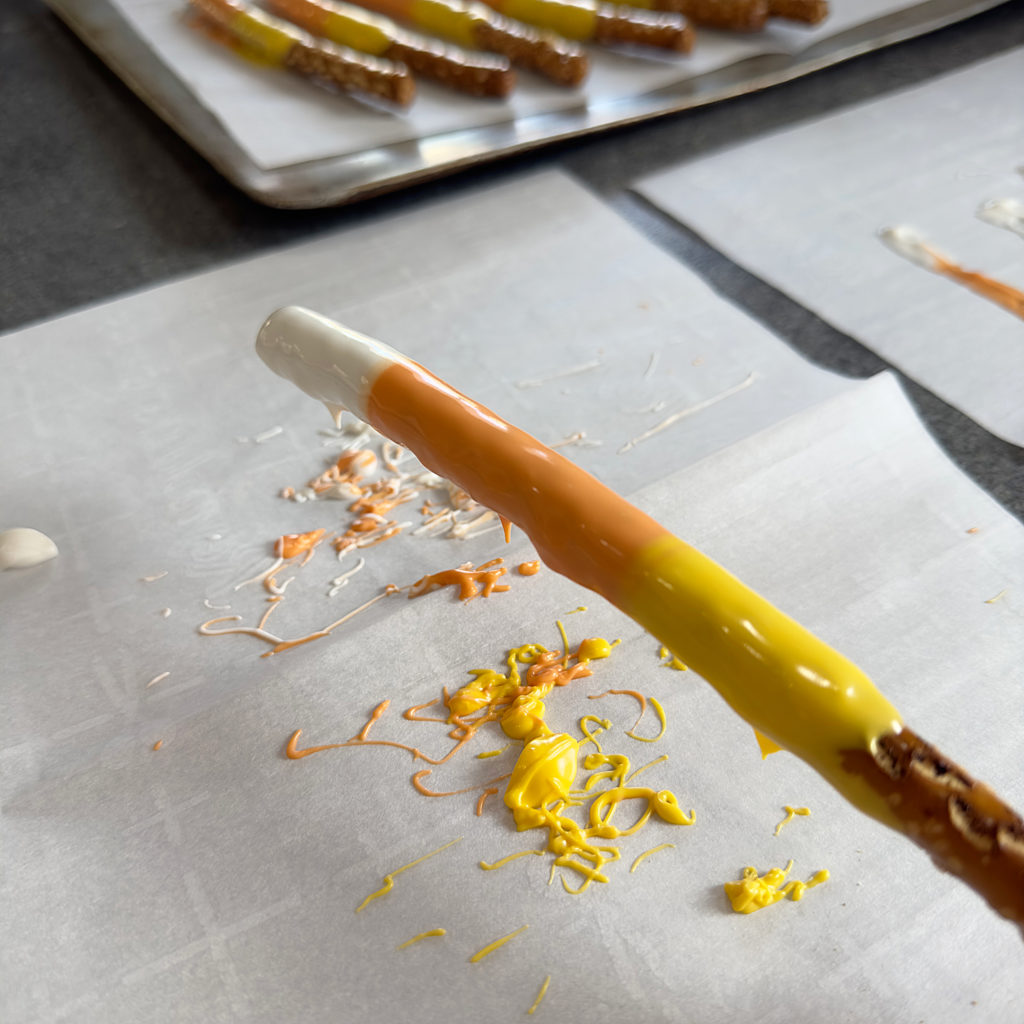
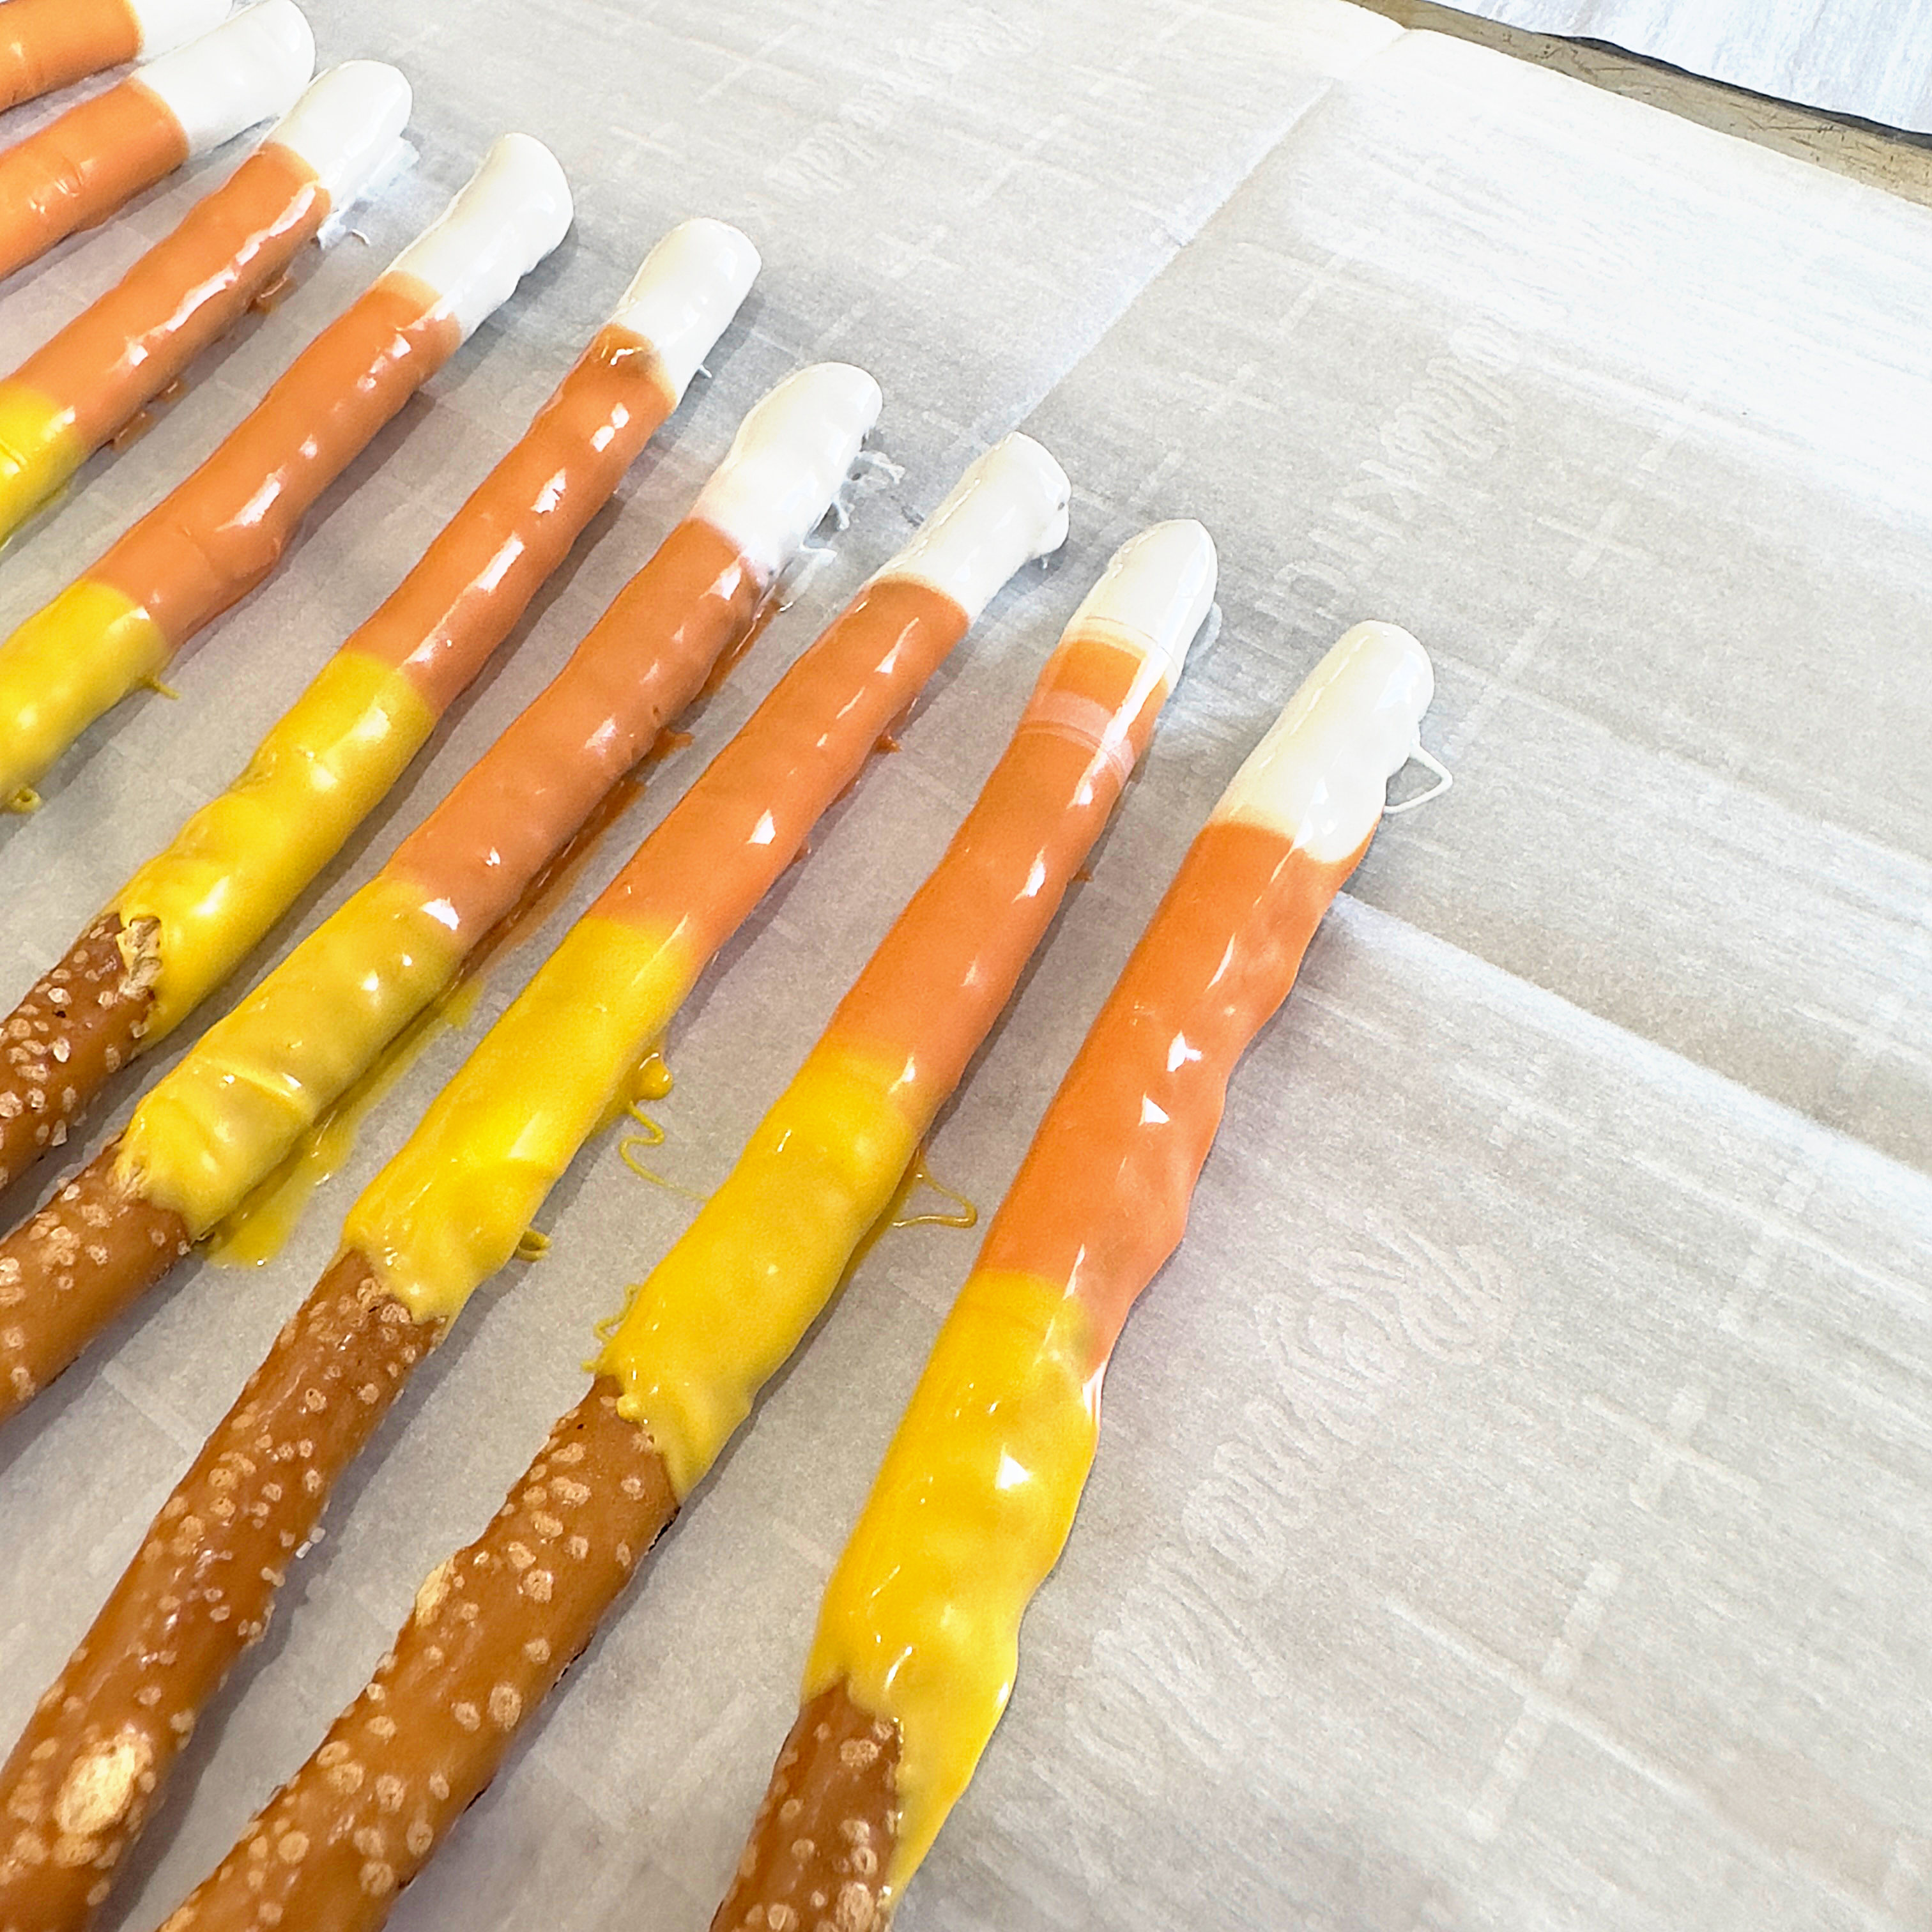
TRIPLE COLOR TECHNIQUE
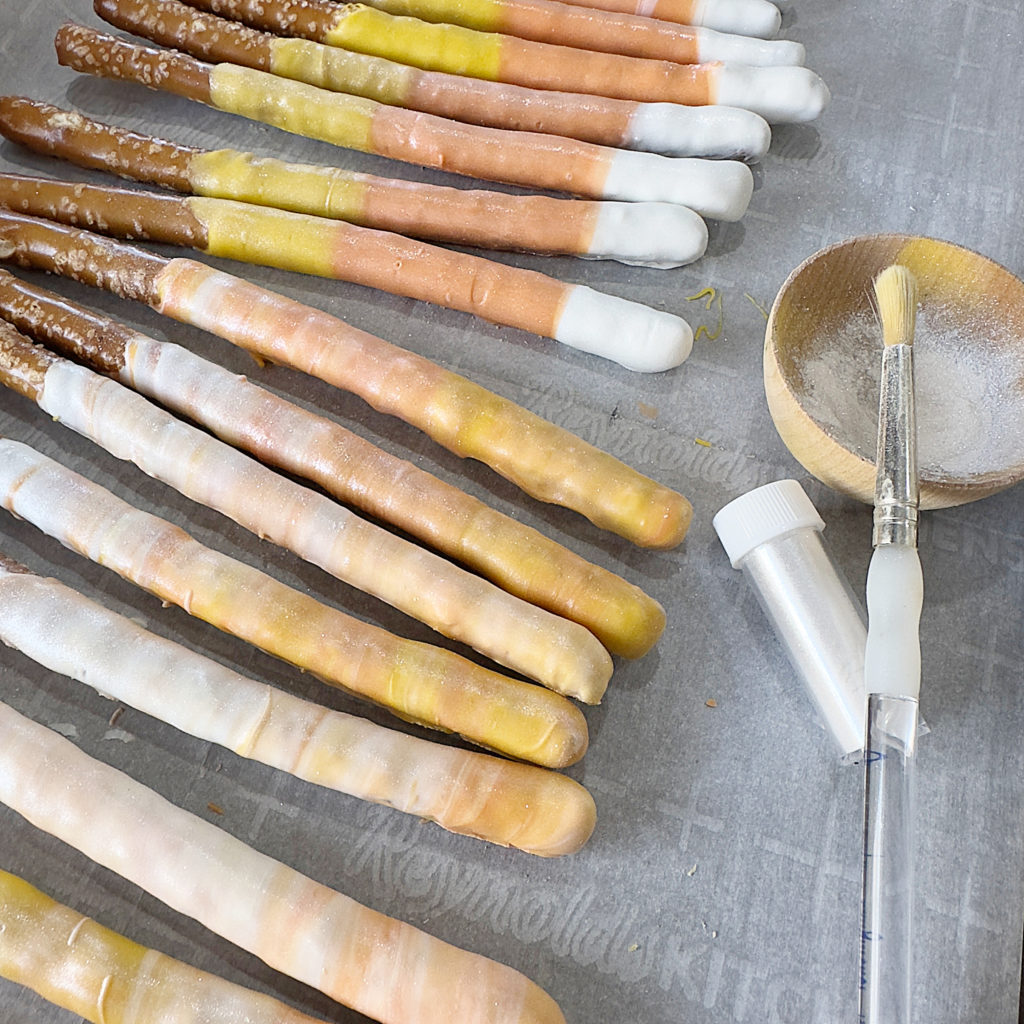

ADDING LUSTER DUST-BEAUTIFUL!
Scroll down to number four to see what every hostess wants to hear. To keep your decorated pretzels fresh and looking great, follow these simple storage tips:
1. Let them set completely:
Before storing, ensure the chocolate or coating is fully hardened to prevent smudging or sticking.
2. Use an airtight container:
Place the pretzels in a single layer in an airtight container. If stacking, separate layers with wax or parchment paper to avoid sticking.
3. Store in a cool, dry place:
Keep the container in a cool, dry spot away from direct sunlight or heat. A pantry or cupboard works well. Avoid the refrigerator, as it can cause condensation that makes the pretzels soggy.
4. Shelf life:
Properly stored, decorated pretzels can last up to 2–3 weeks at room temperature.
Optional for gifting:
You can also individually wrap pretzels in clear treat bags and tie with ribbon for a cute and practical way to keep them fresh and ready to go!

Spread melted candy on parchment paper and let it sit until hardened. Break the candy into small pieces and transfer the candy to an airtight container or zip-top bag. Store in a cool area like a pantry or cabinet. When ready to use again, add the candy to a microwave-safe bowl and melt it. NOTE: BECAUSE THE CANDY HAS BEEN MELTED ONCE, IT WILL NOT TAKE AS LONG TO MELT IT AGAIN, SO KEEP A CLOSE EYE ON IT.
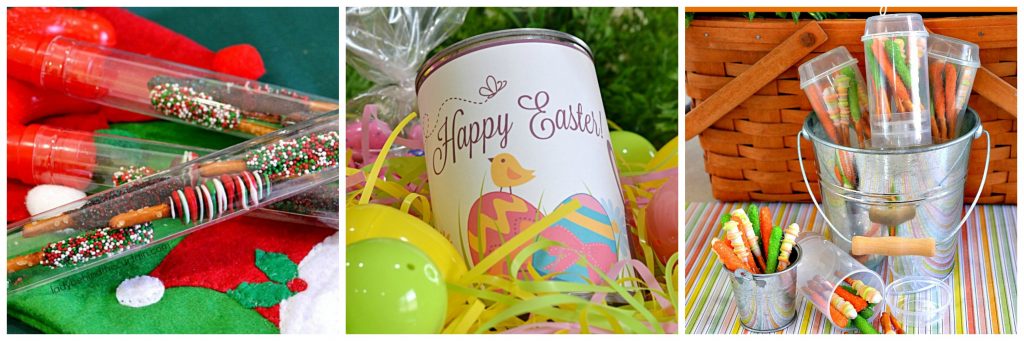
WHAT IS A PRETZEL POCKET? Take your decorated pretzels a step further and drop them in a decorated pocket! Placing the pretzels in a pocket allows for easy handling…NO MESSY HANDS! Click the link below for FREE Pretzel Pocket Collections!
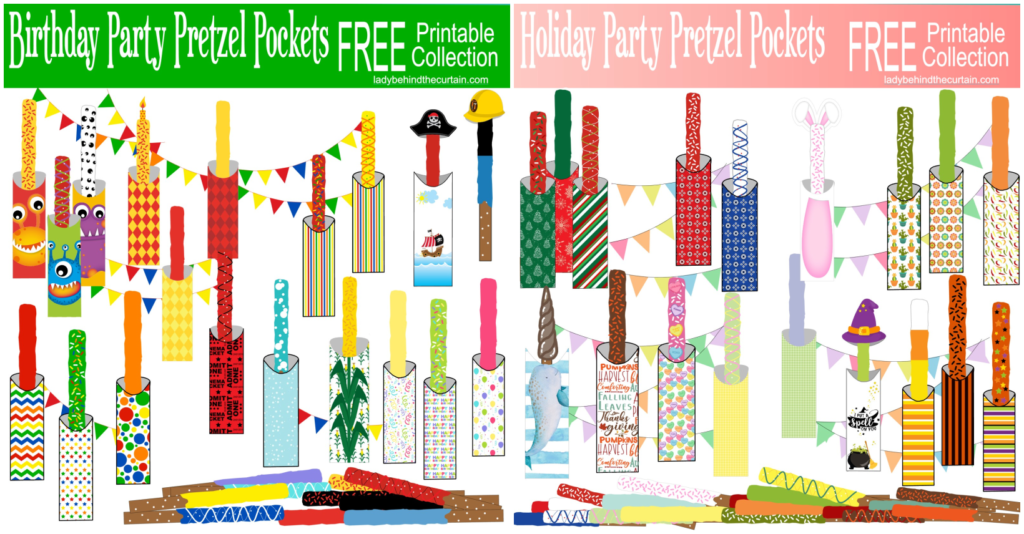
CLICK HERE FOR YOUR FREE COLLECTIONS→PRETZEL POCKET FREE PRINTABLE COLLECTIONS

THANKS FOR VISITING♥
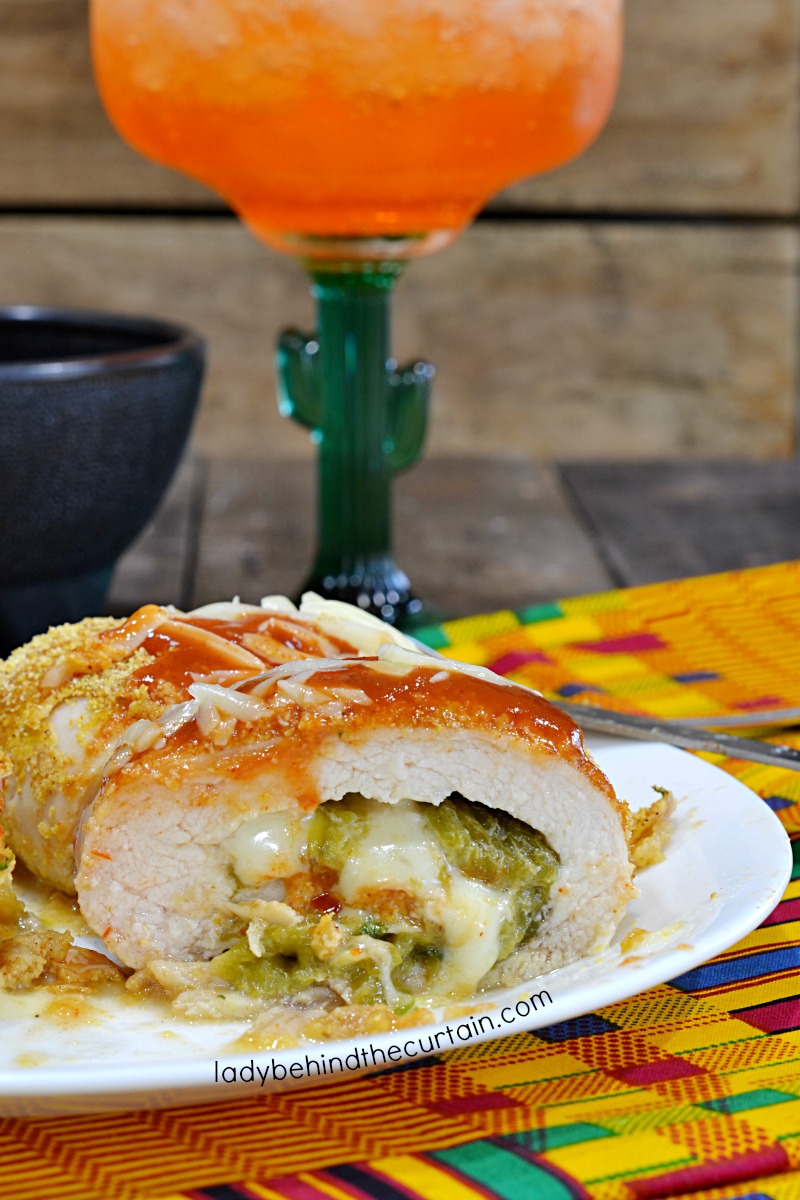
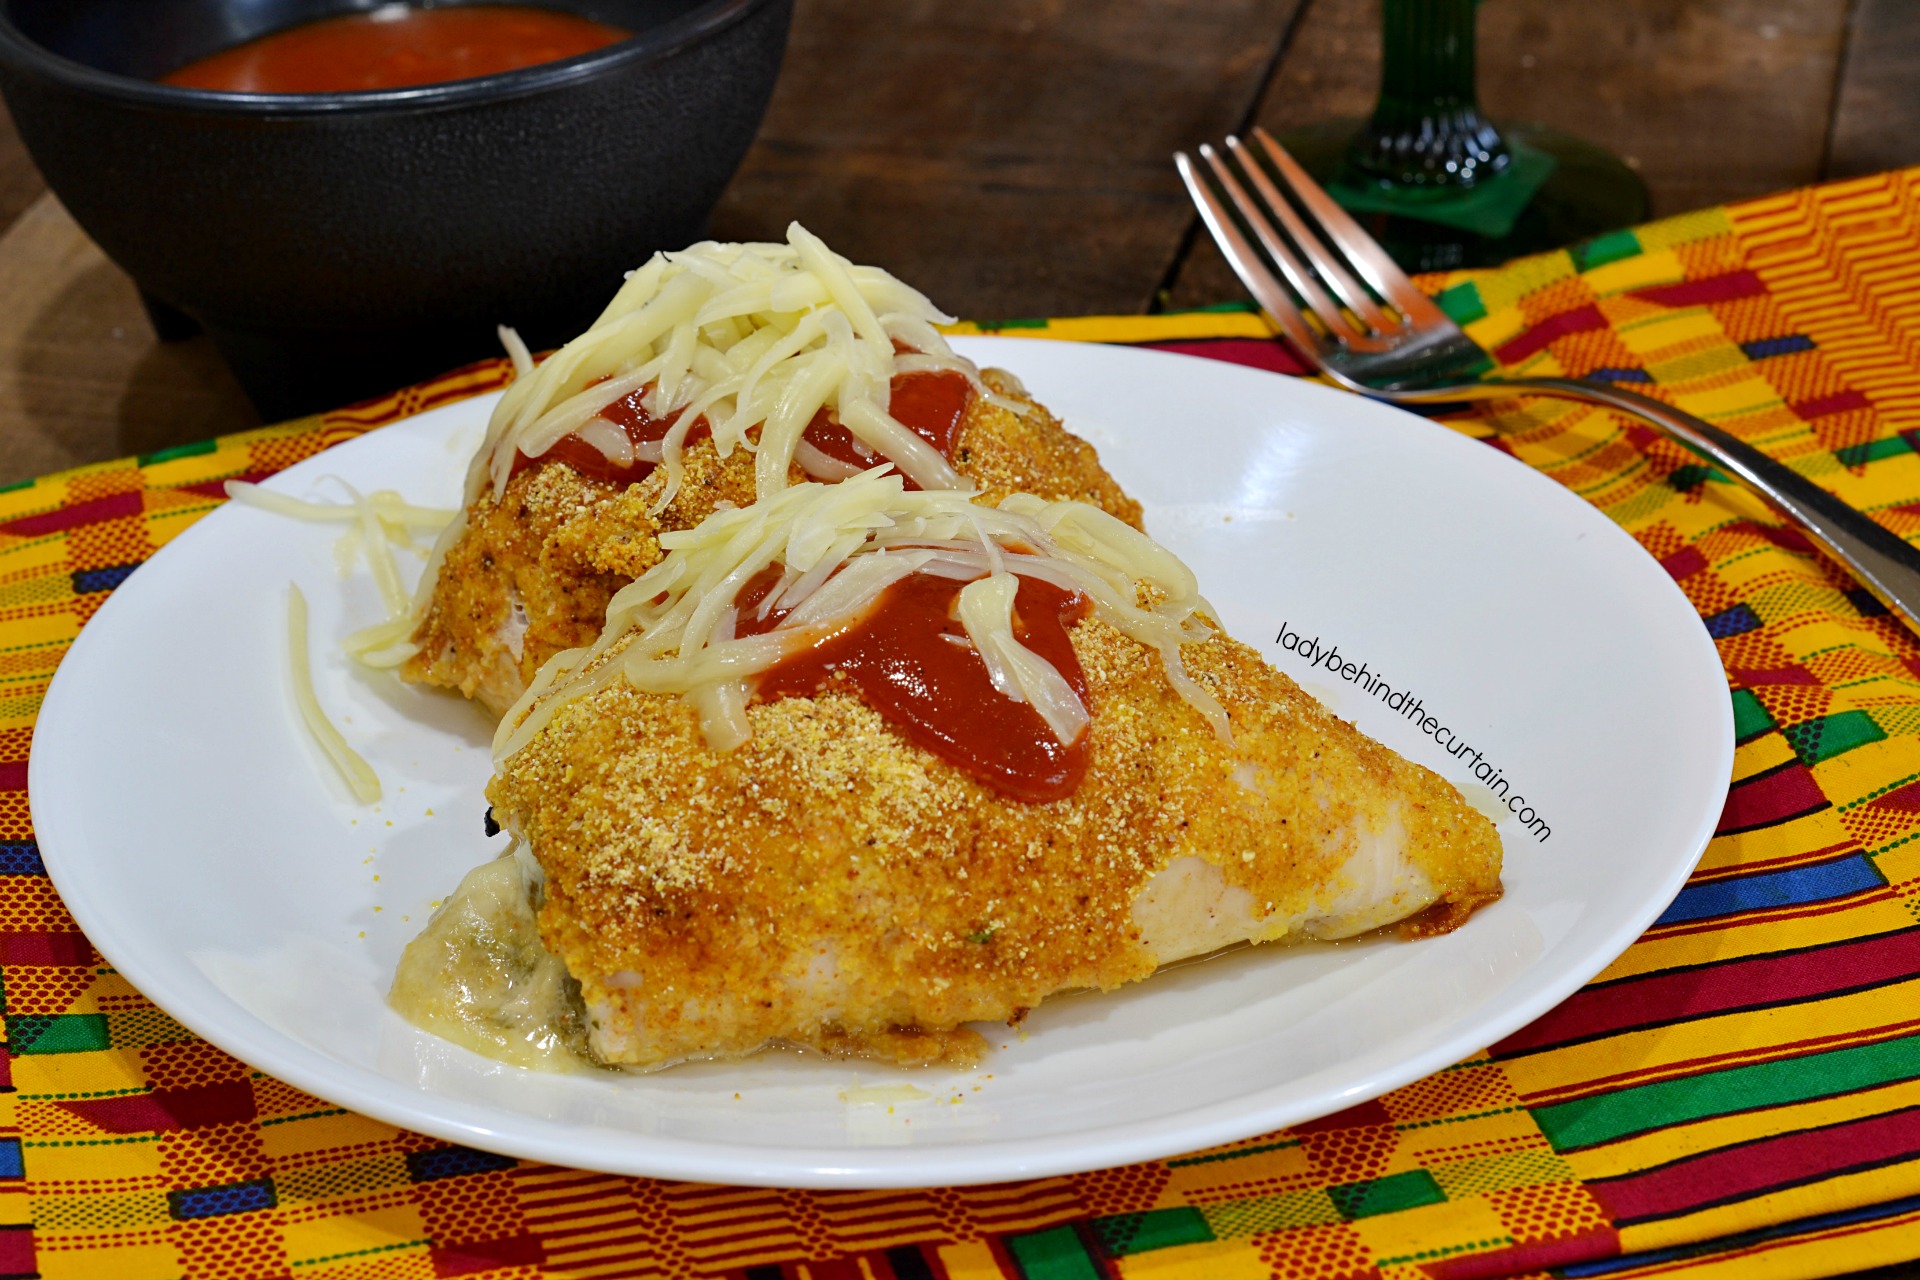
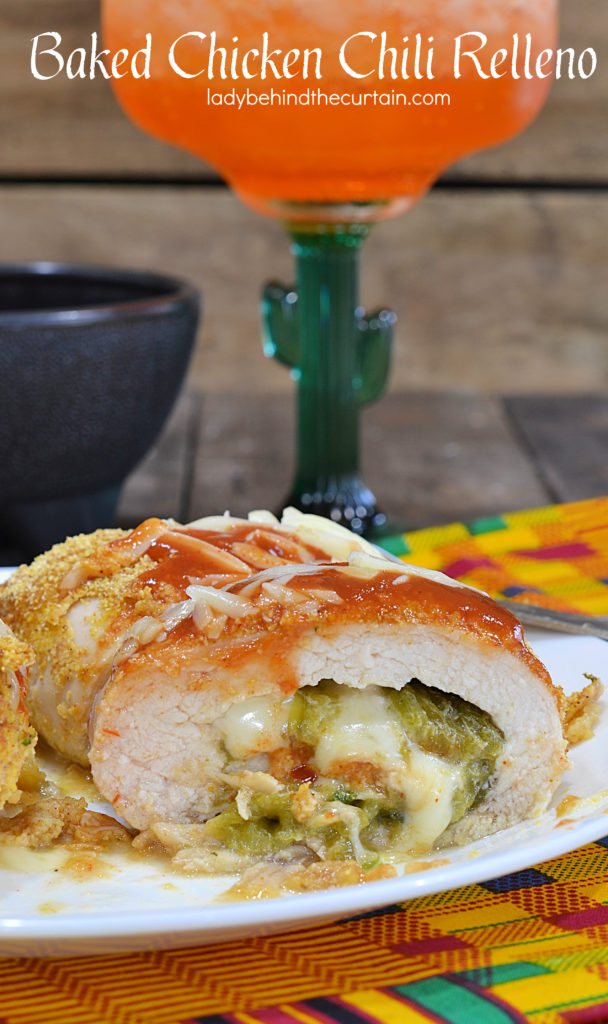
Baked Chicken Chili Relleno Recipe: Are you tired of the same old chicken recipes? Looking for a flavorful and unique twist on a classic dish? Look no further than this baked chicken chili relleno recipe. Combining the savory flavors of chicken, cheese, and traditional Mexican chilies, this dish is sure to become a staple in your weekly meal rotation. Get your taste buds ready for a mouthwatering experience as you learn the simple steps to creating this delicious dish. Whether you’re a seasoned chef or a beginner in the kitchen, this recipe is perfect for anyone looking to spice up their dinner routine.

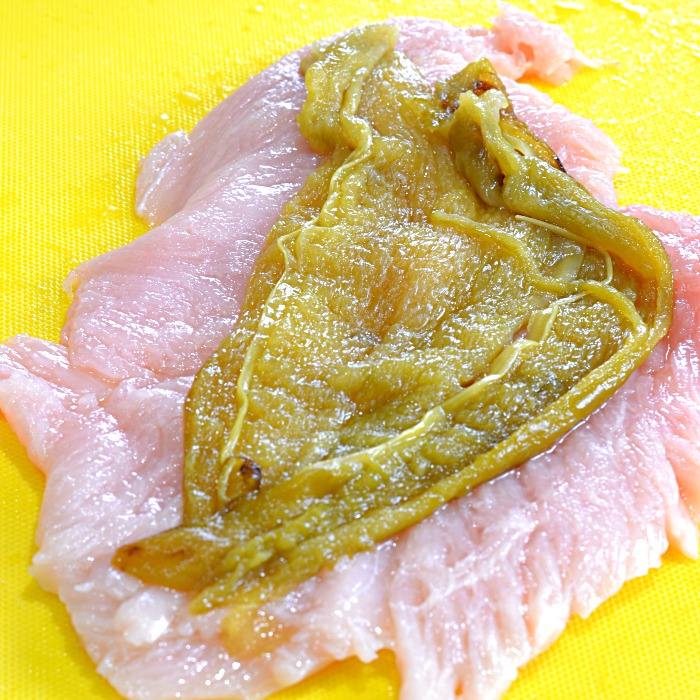
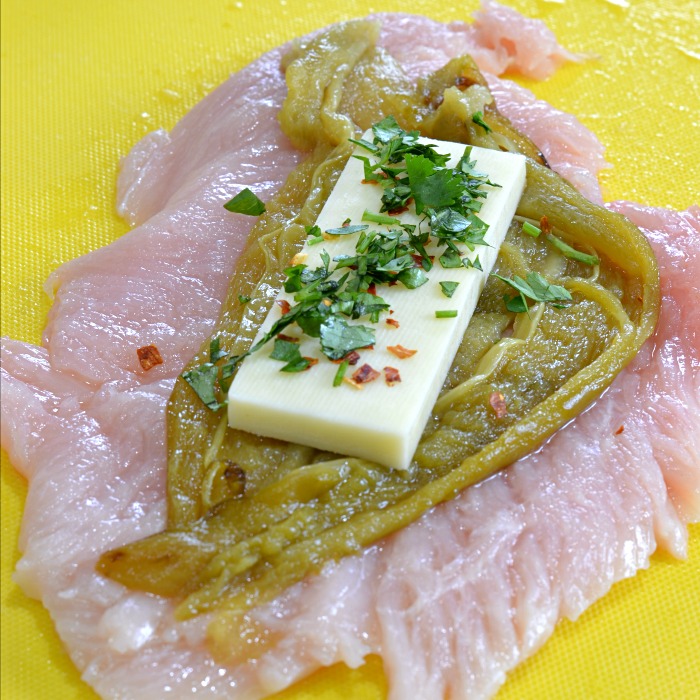
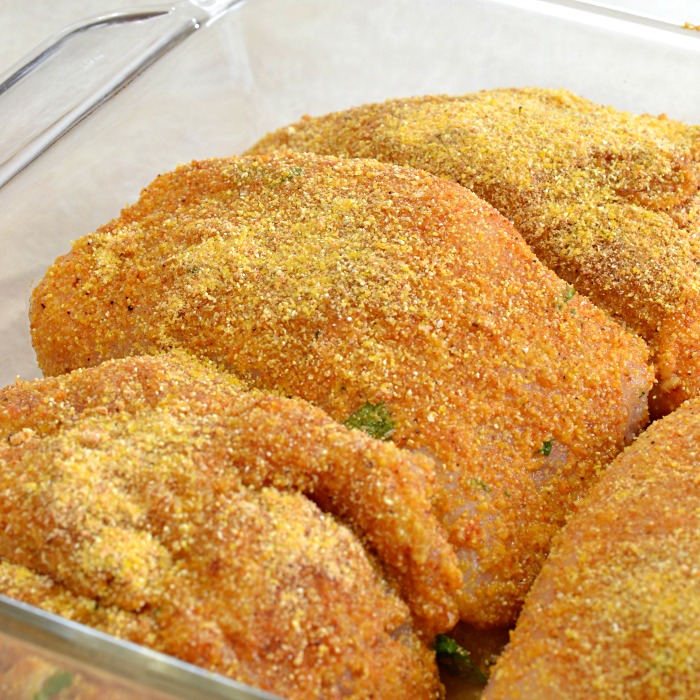
BAKED CHICKEN CHILI RELLENO RECIPE INGREDIENTS LIST-full printable recipe below in recipe card
BAKED CHICKEN CHILI RELLENO RECIPE INSTRUCTIONS
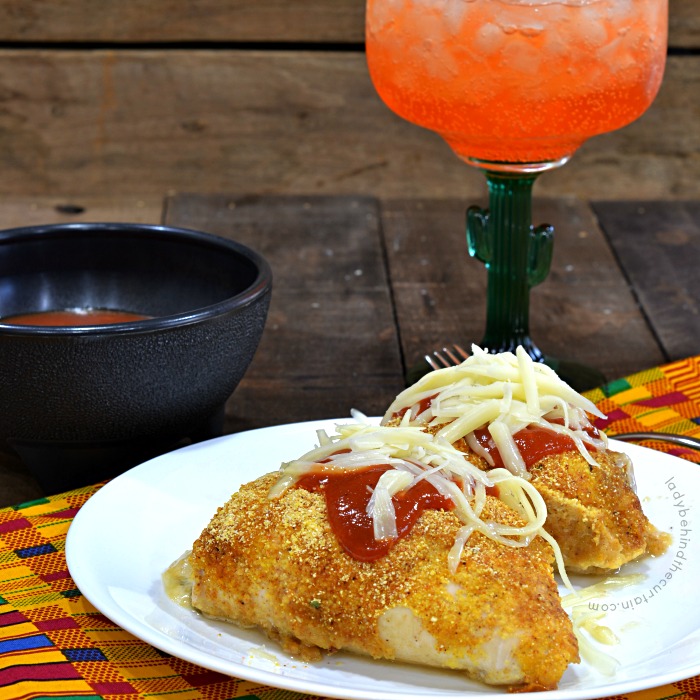
Not a fan of store bought taco sauce? Below are a few other sauce options that can be easily found at the grocery store. CLICK HERE FOR HOMEMADE SALSA RECIPES→SALSA
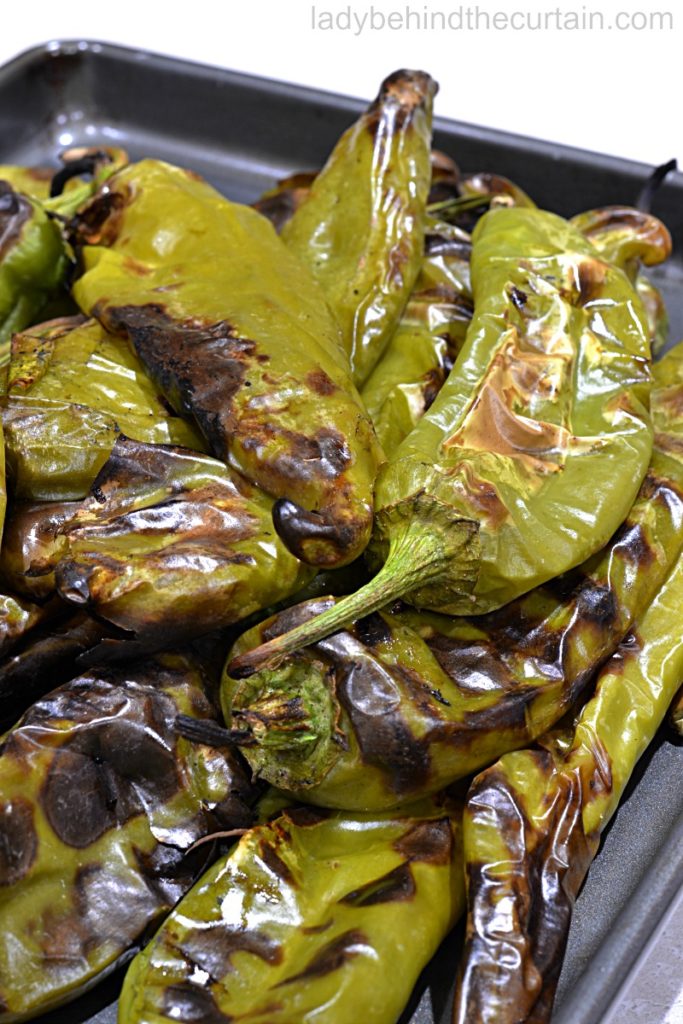
This technique works for any chili peppers or bell peppers. In the summer the farmer’s market is a great place to find different types of peppers. Pasilla peppers, hatch peppers are a great find. The poblano pepper is what’s used in the traditional Mexican dish.
Traditional chile rellenos are fresh peppers, roasted, stuffed with cheese, dipped in a fluffy egg batter, and fried until golden brown. This Baked Chicken Chile Rellenos Recipe is on the lighter side. Not as much cheese and baked instead of fried. Plus the added bonus of more protein.
Yes, Since pepper jack already has red pepper flakes you won’t need to add them separately.
Yes, Anaheim chile is a mild, medium-sized, slightly sweet pepper often used in Mexican and Southwestern cuisines.
Yes, The poblano is a mild chili pepper originating in the state of Puebla, Mexico. Dried, it is called ancho or chile ancho, from the Spanish word ancho. Stuffed fresh and roasted it is popular in chiles rellenos poblanos
Yes, Preheat the air fryer to 375°. Place the chicken chili relleno seam side down in the air fryer and let cook 6 minutes. Turn over and continue cooking an additional 6 minutes or until internal temperature reads 165°.
Yes, Cream Cheese would be phenomenal in chicken chile rellenos! Replace the Monterey Jack Cheese with the same amount of cream cheese.
THANKS FOR VISITING♥
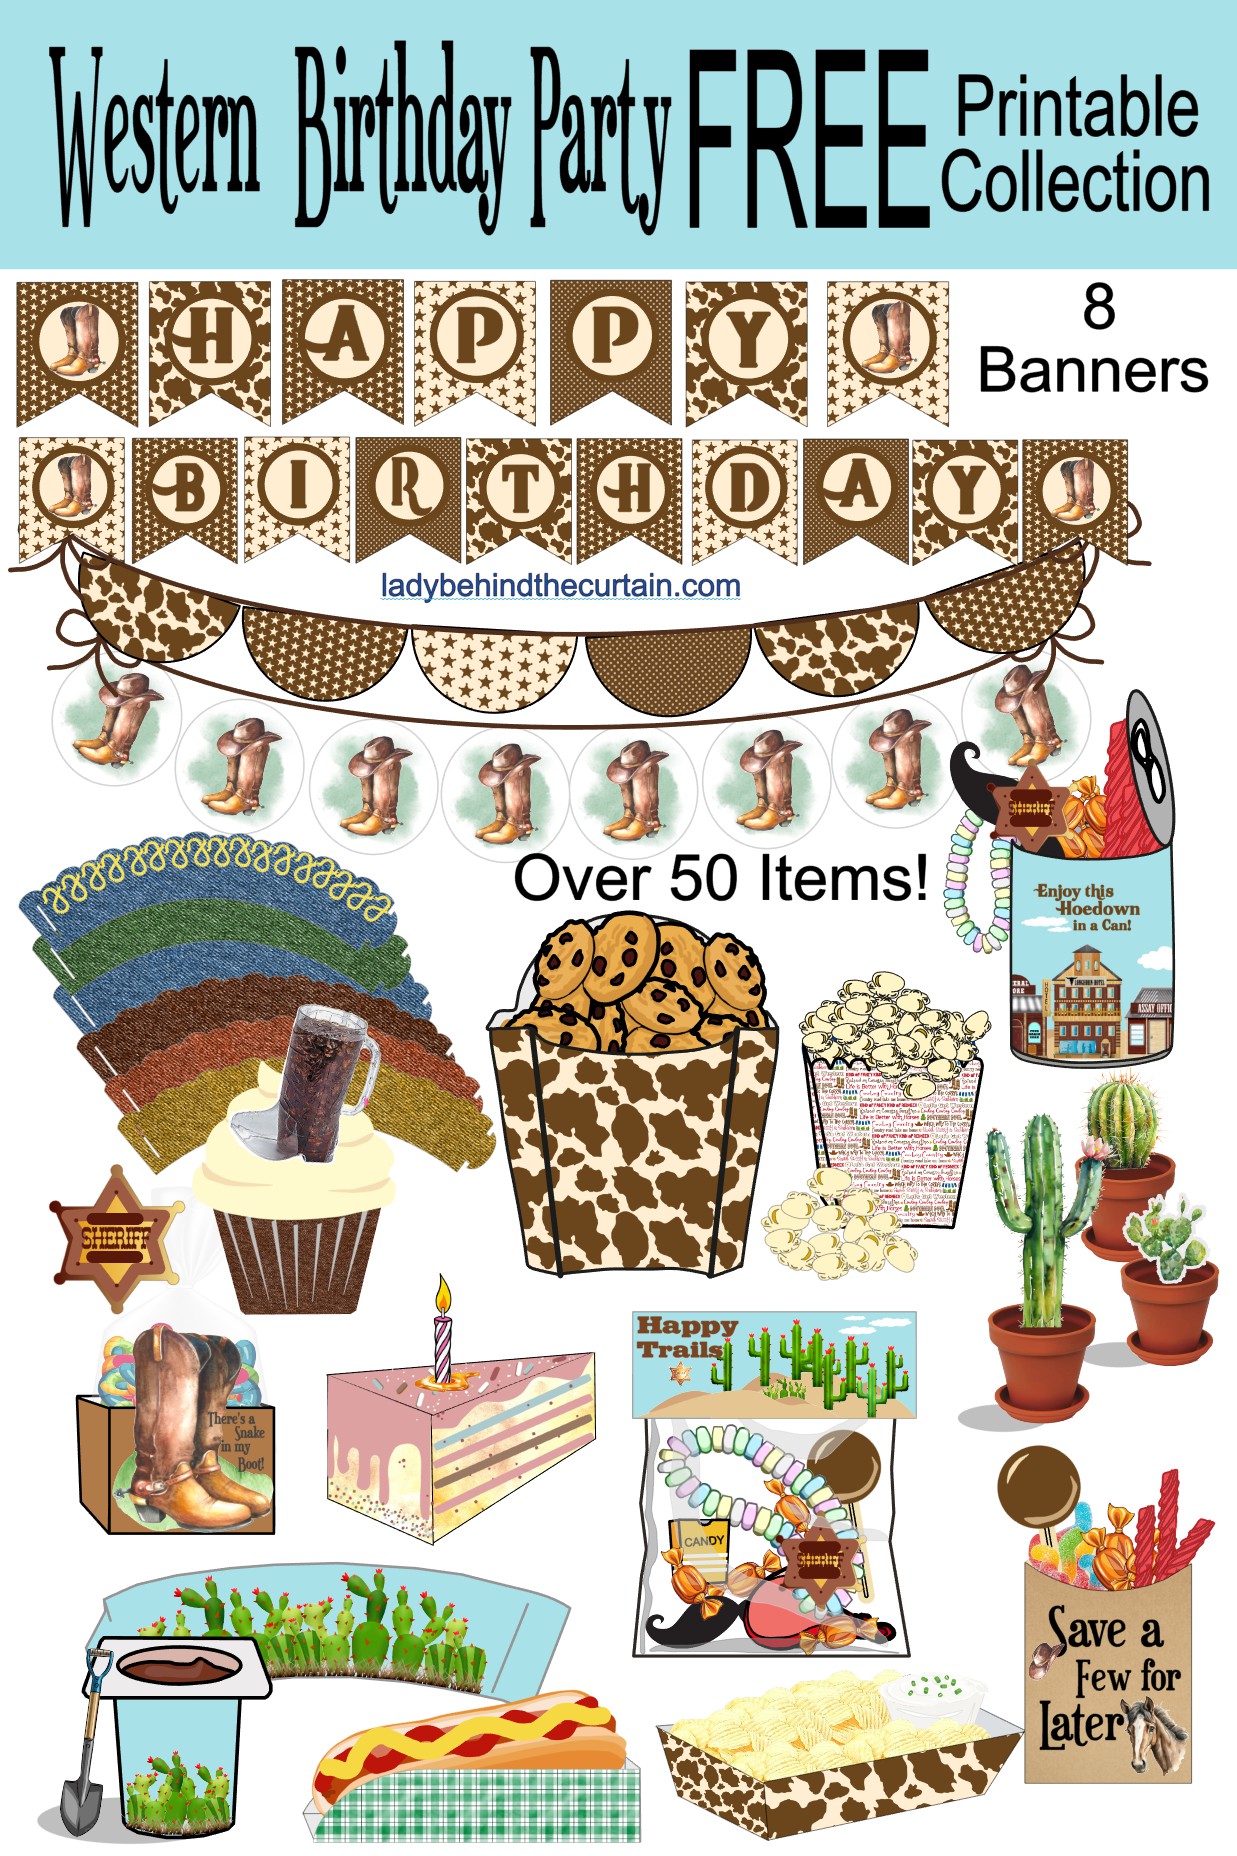
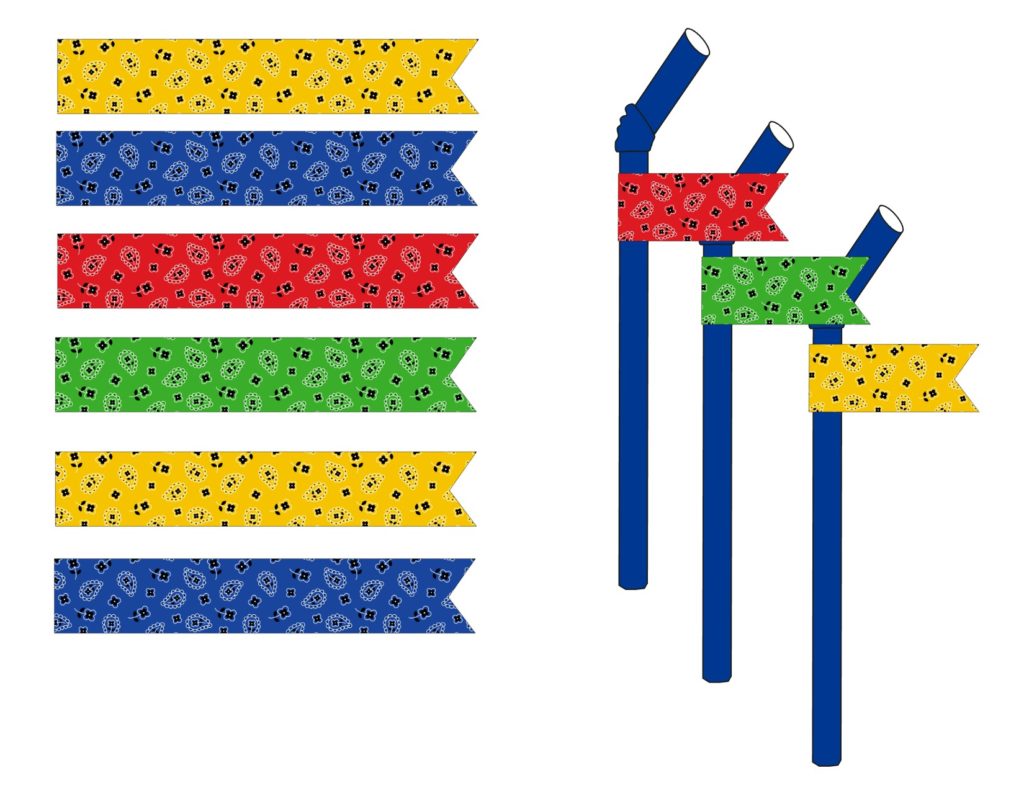
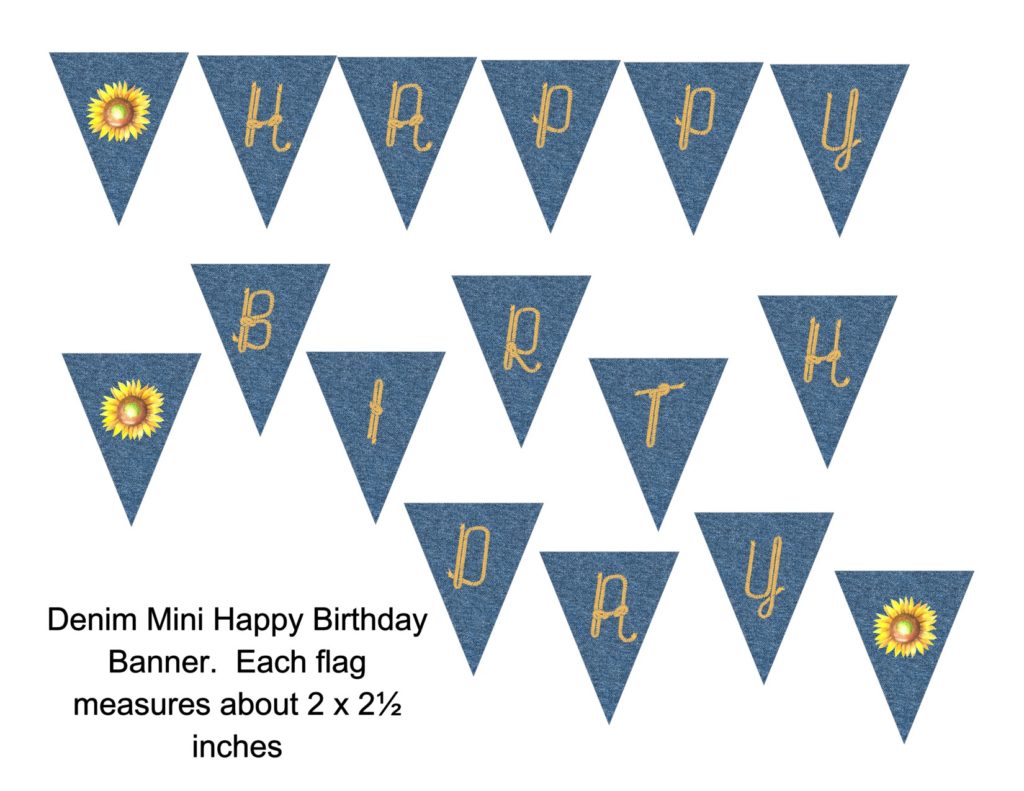
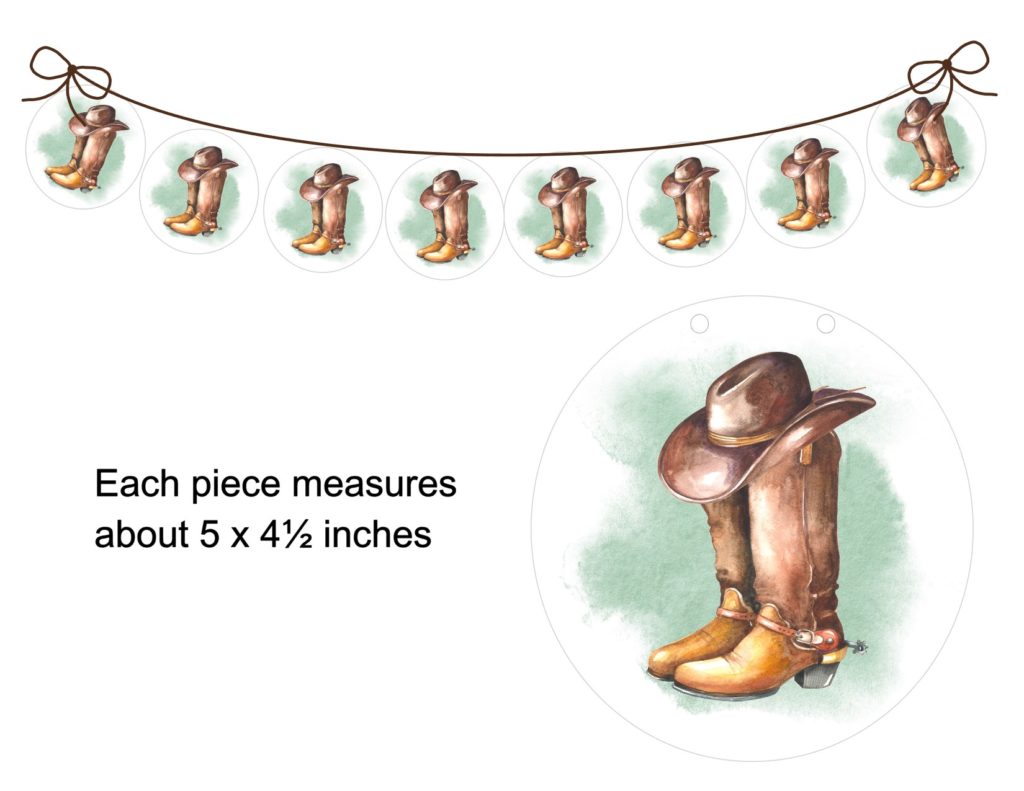
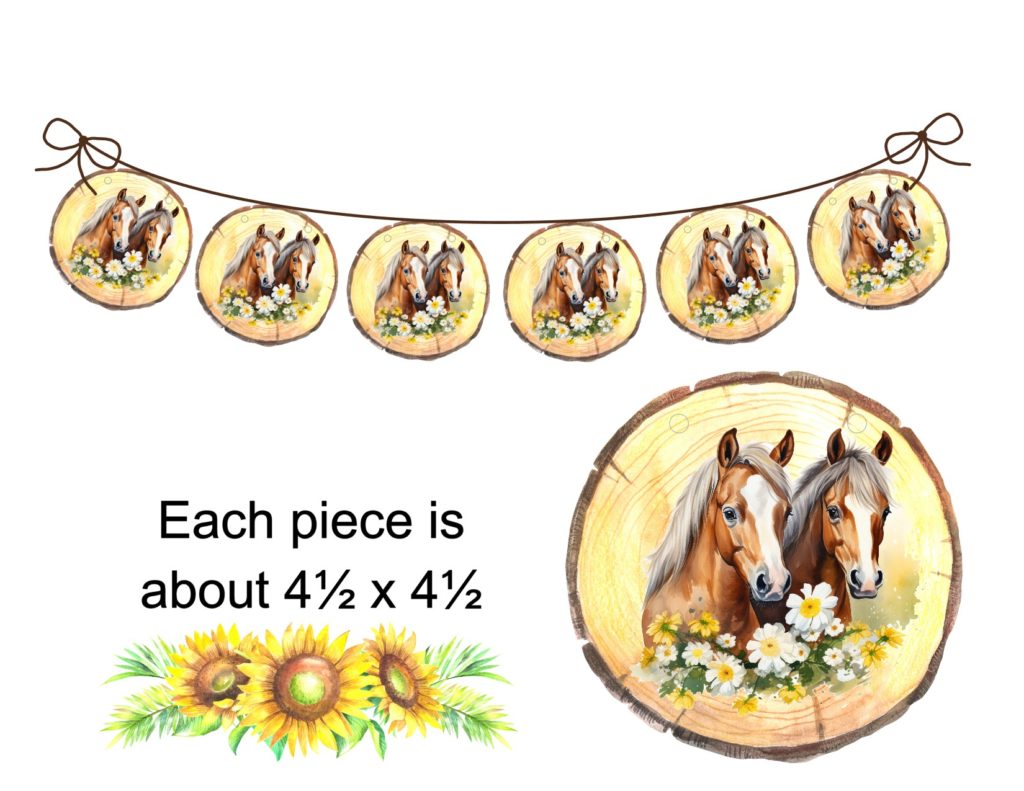
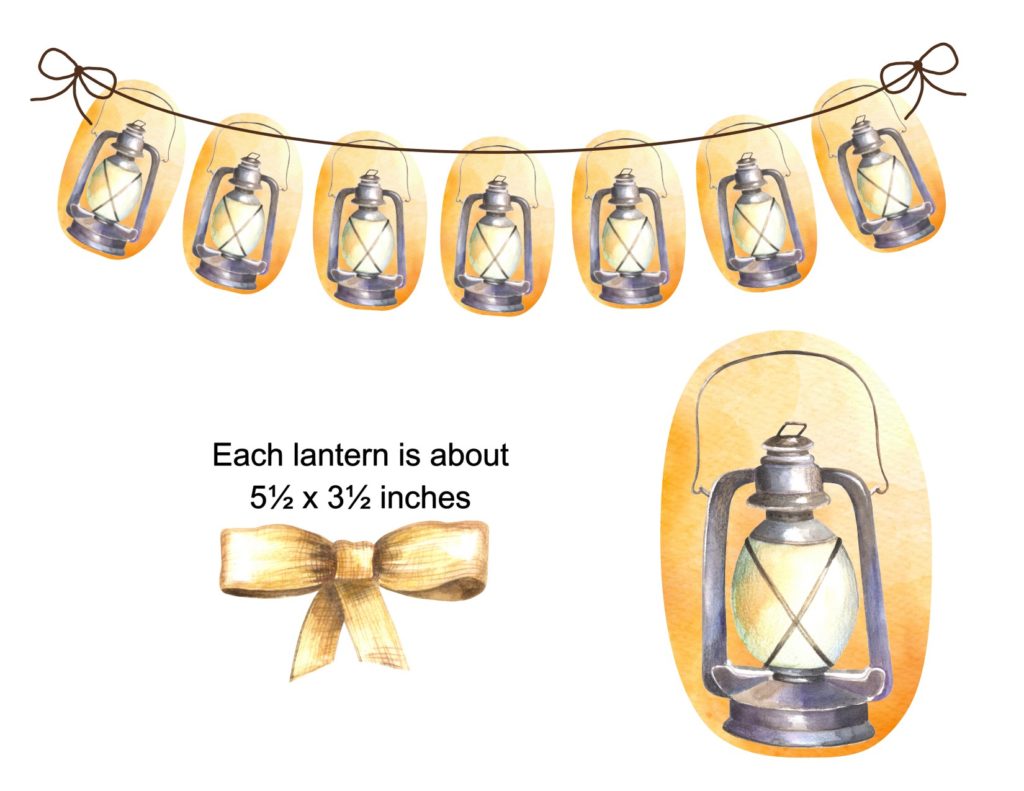
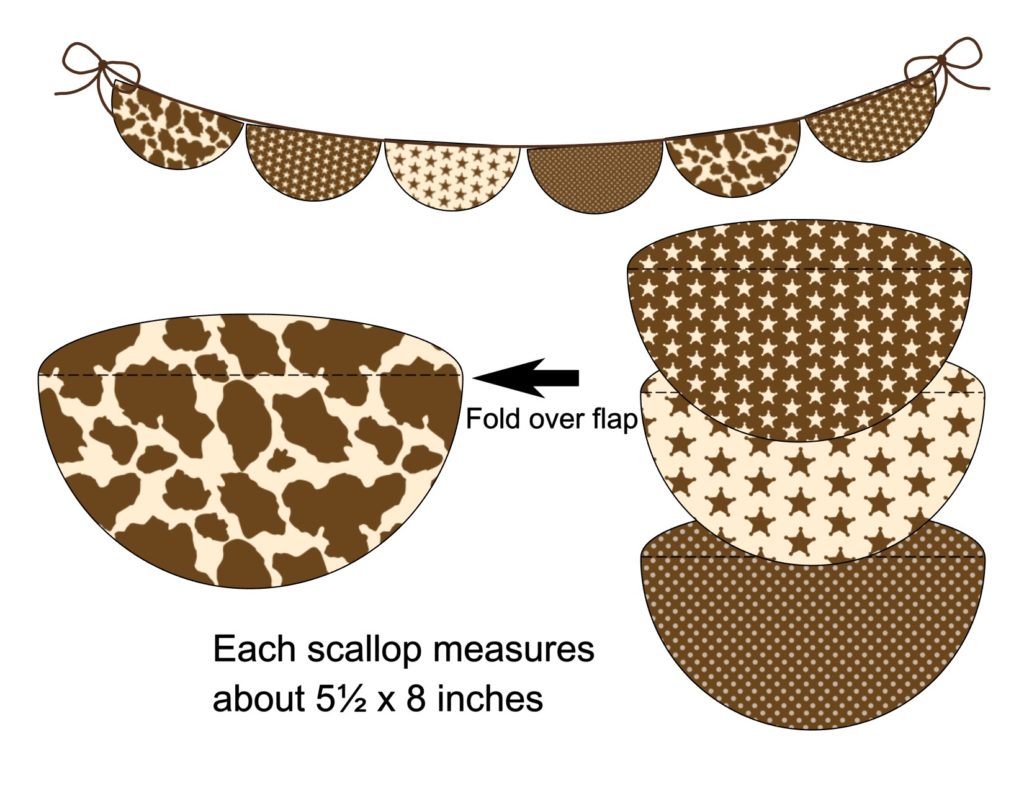
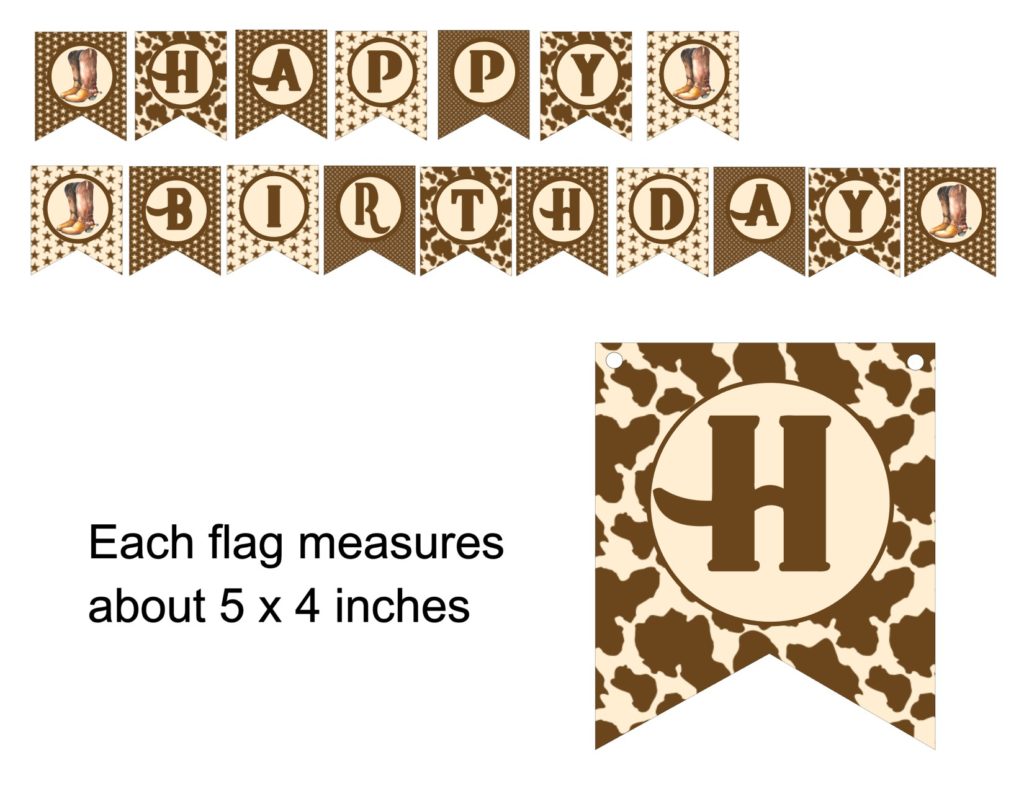
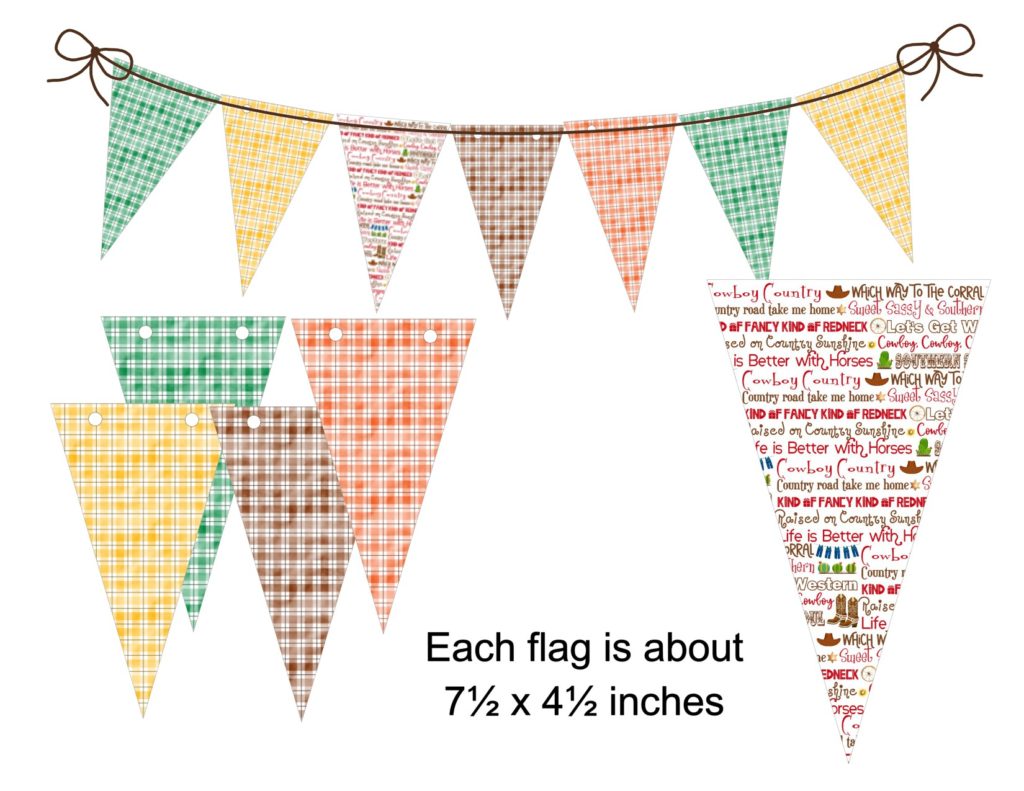
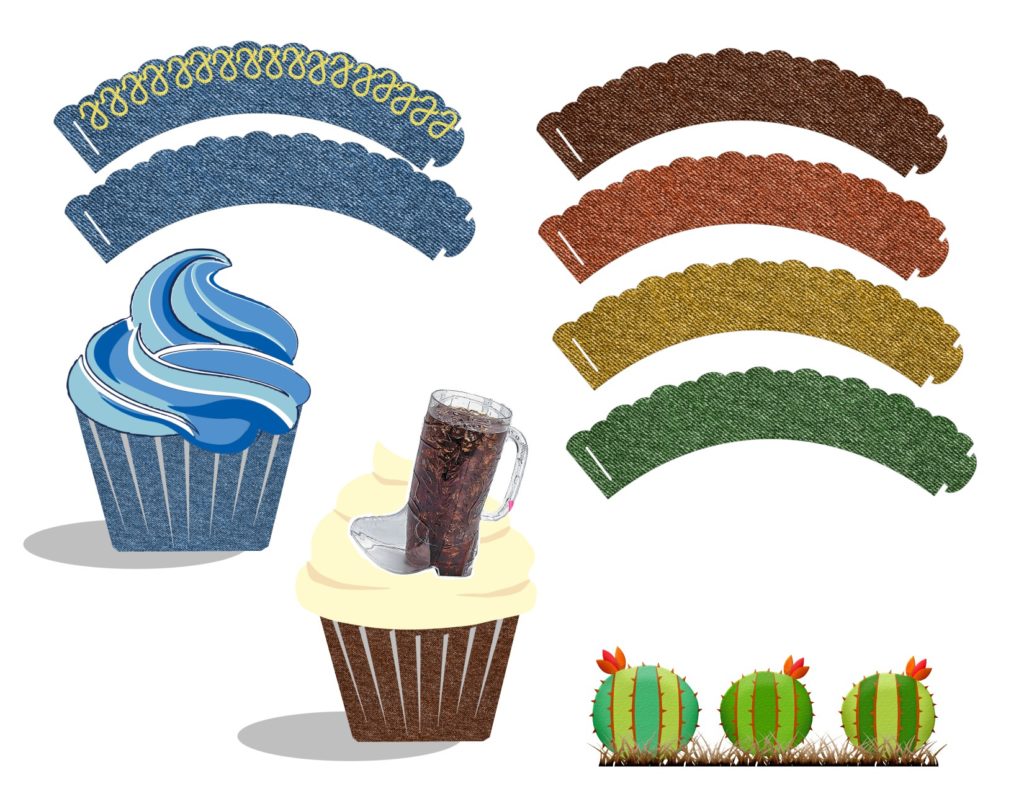
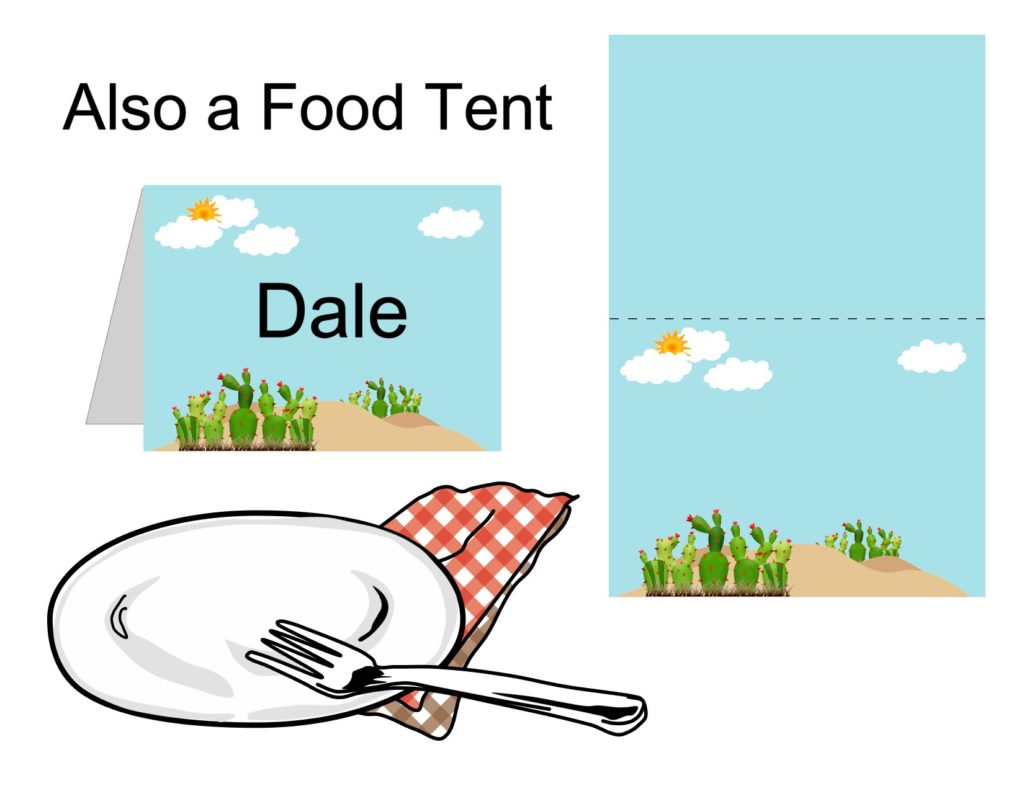
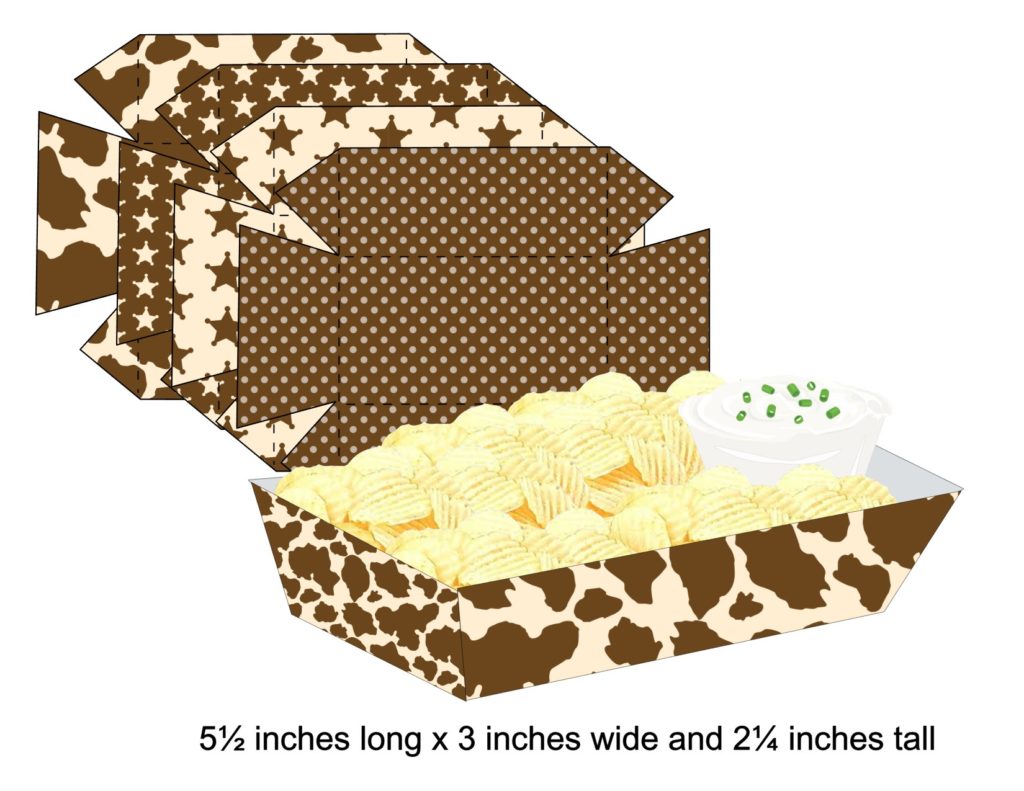
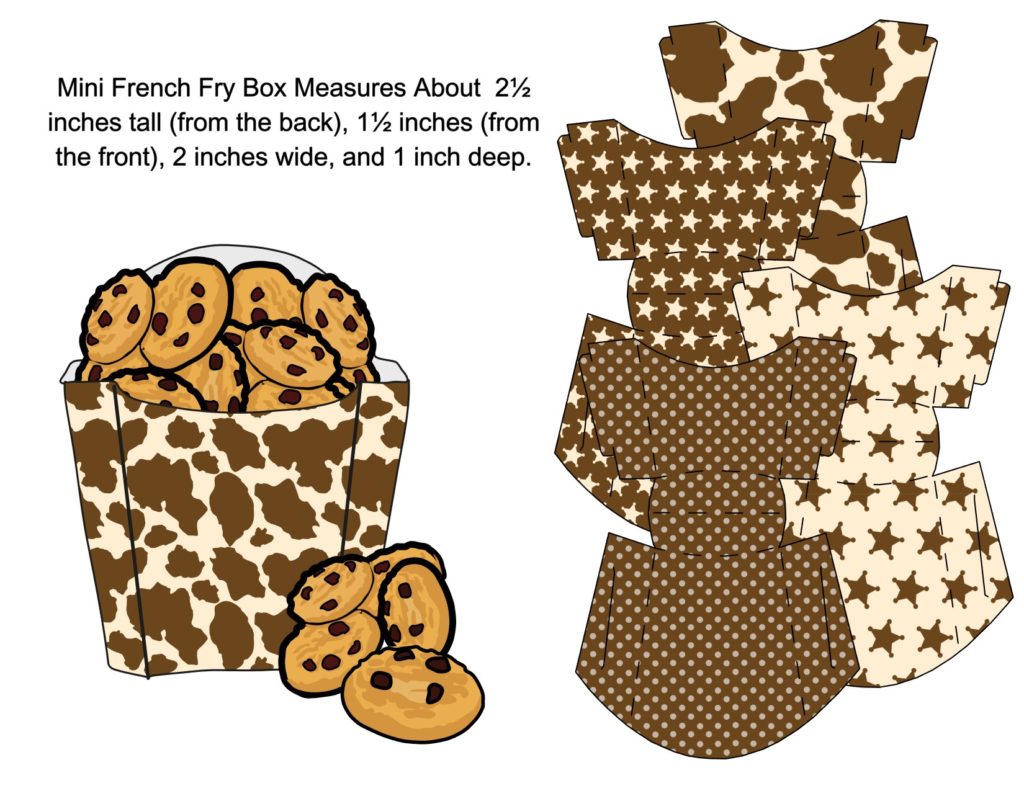
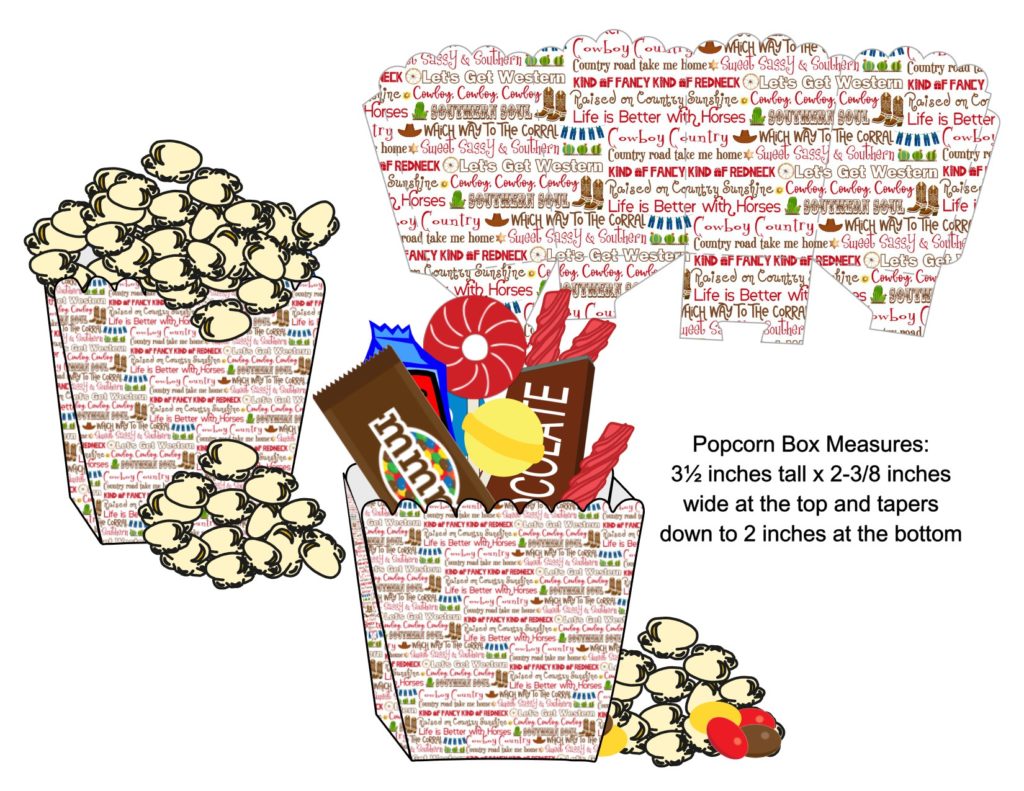
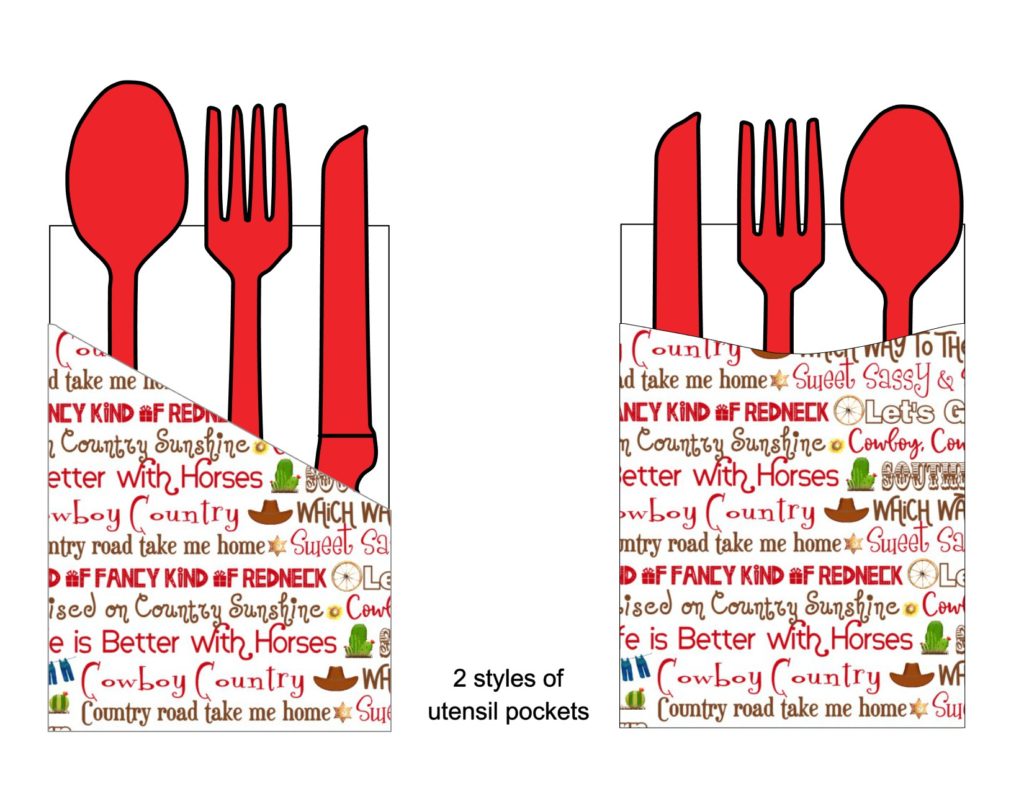
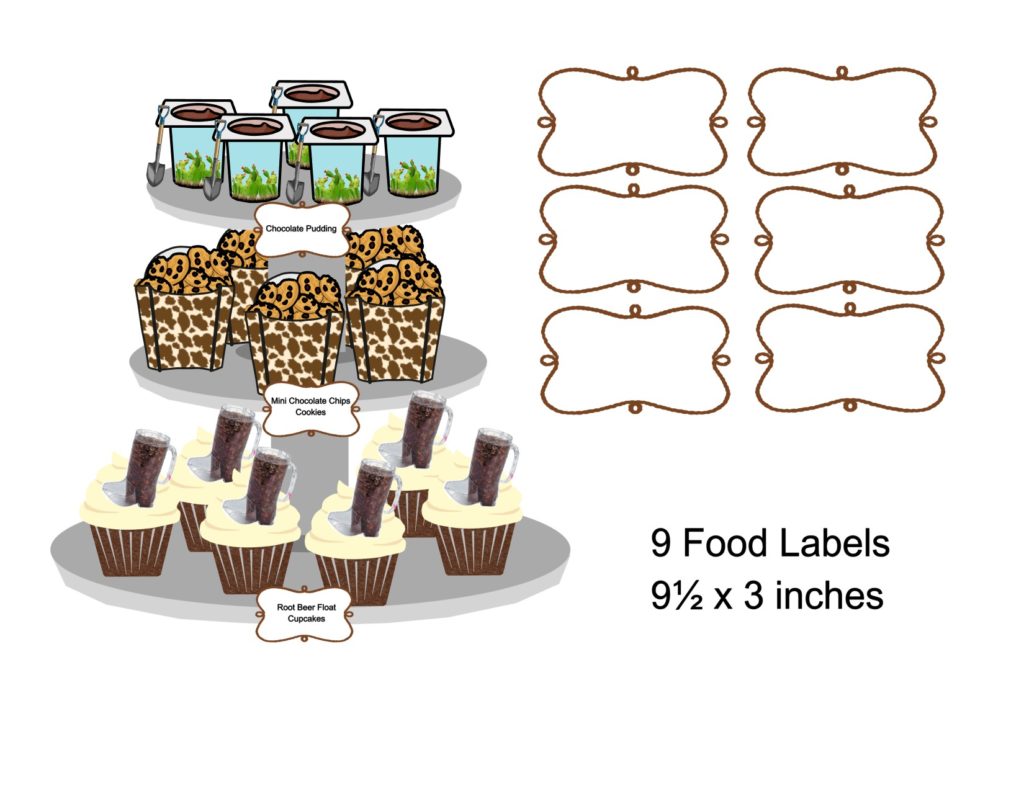
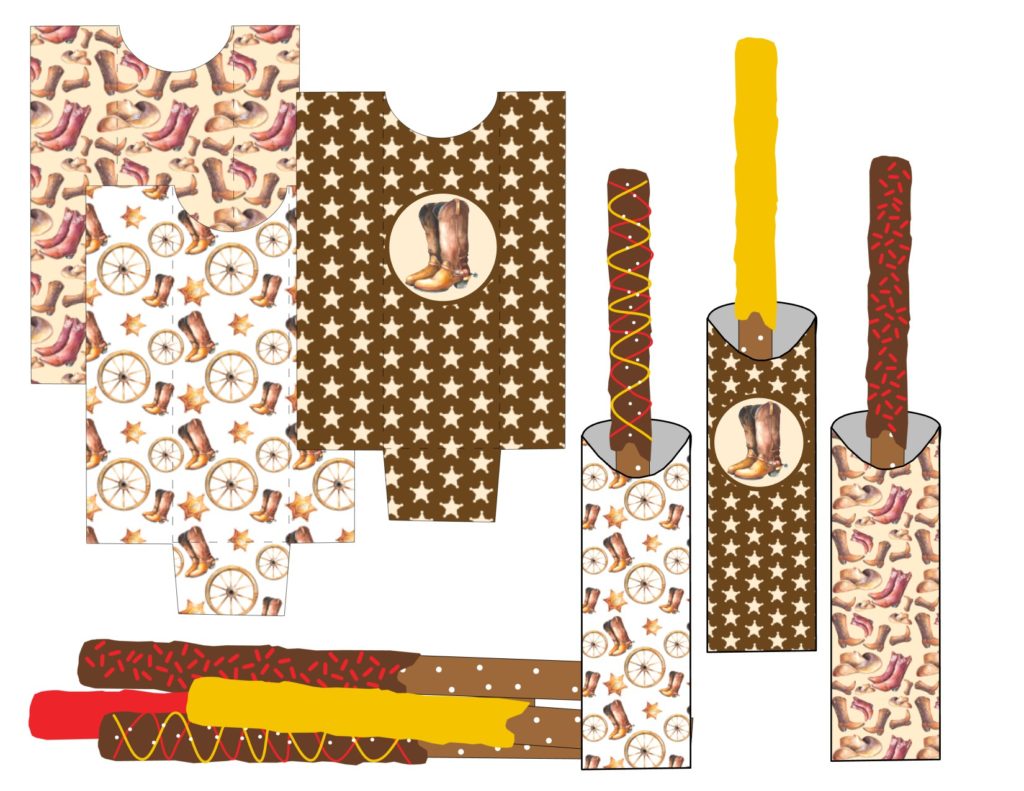
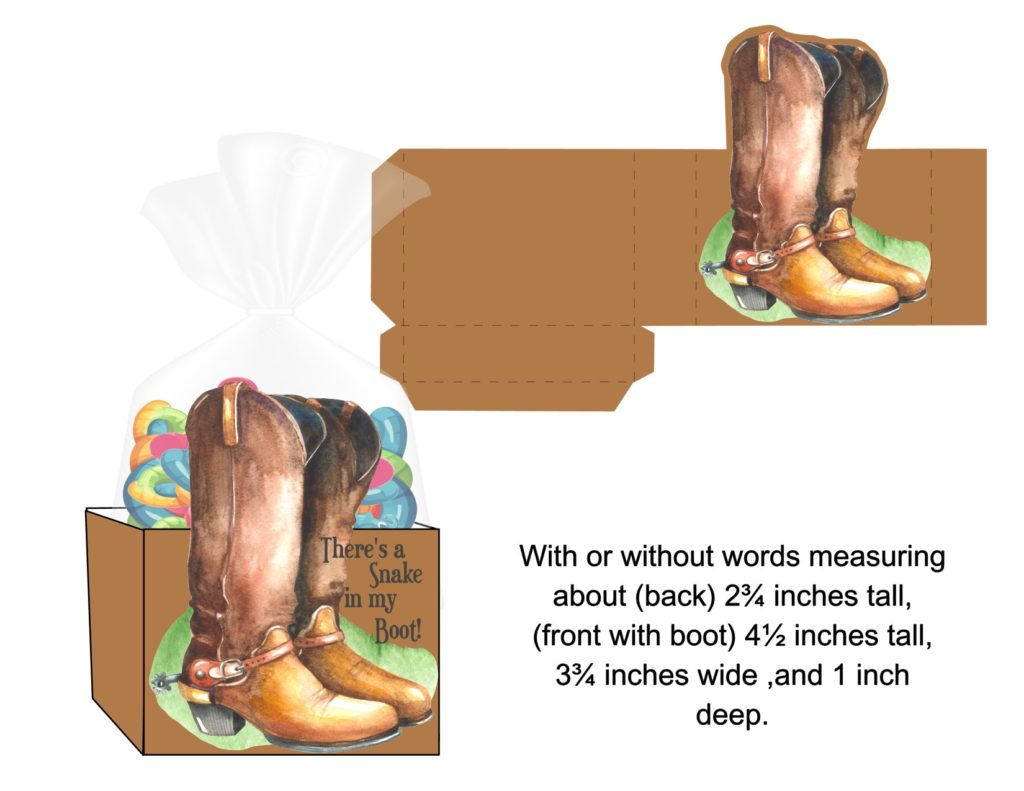
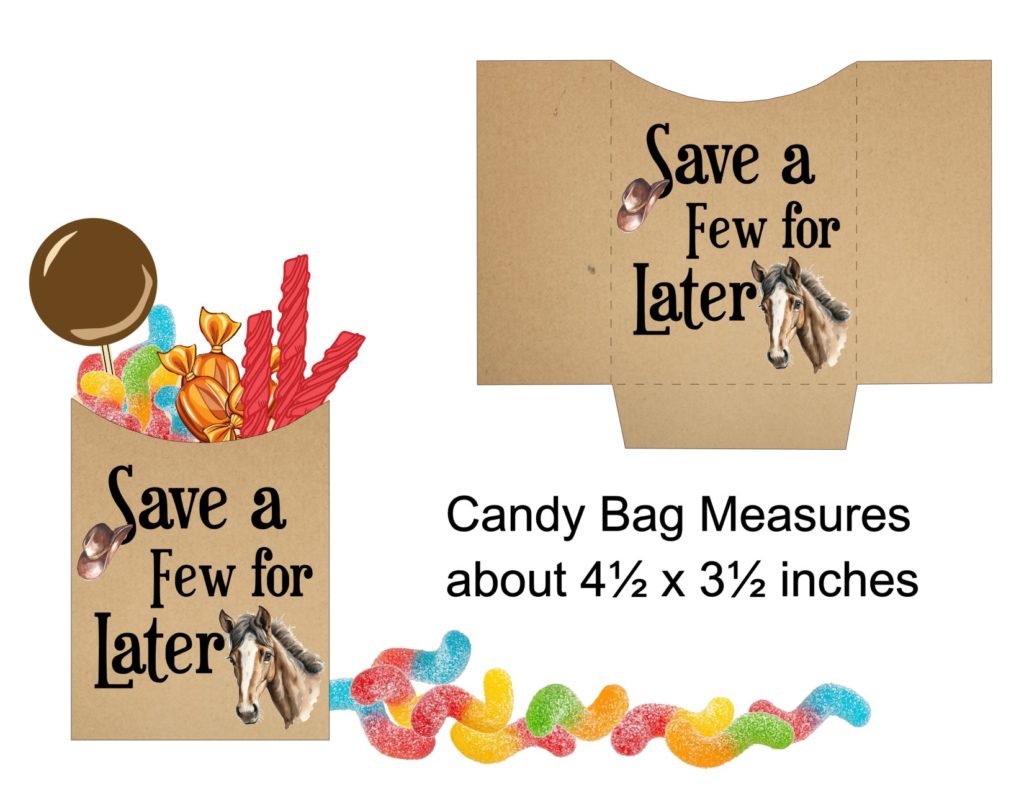
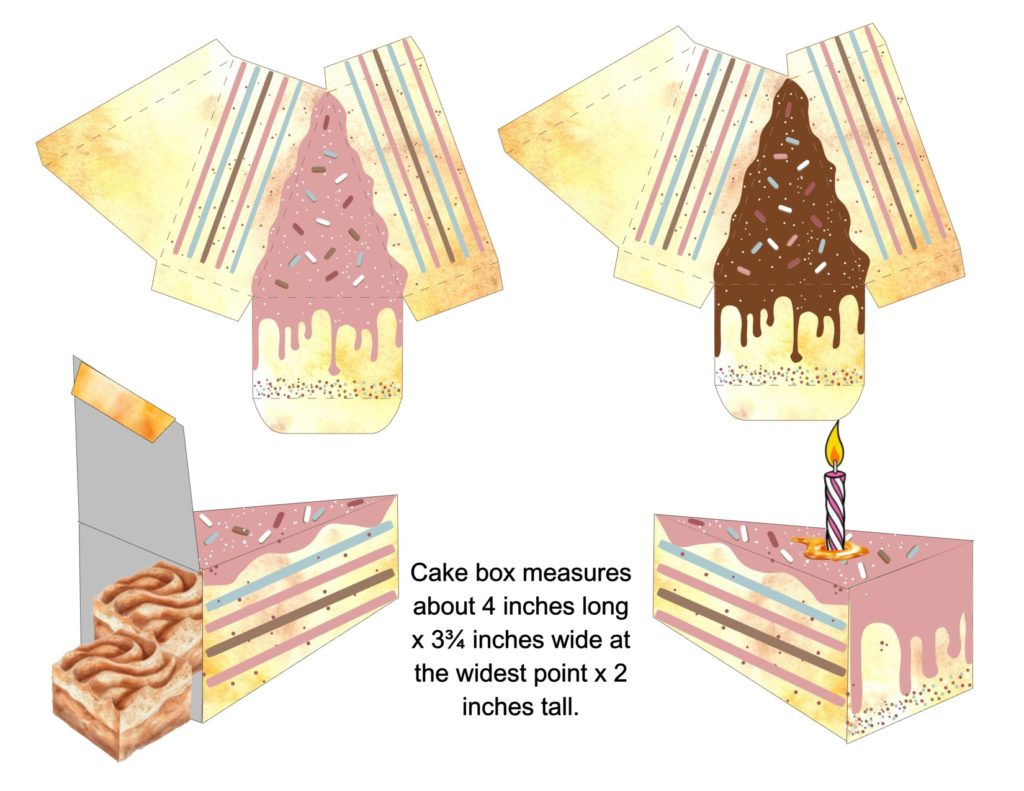
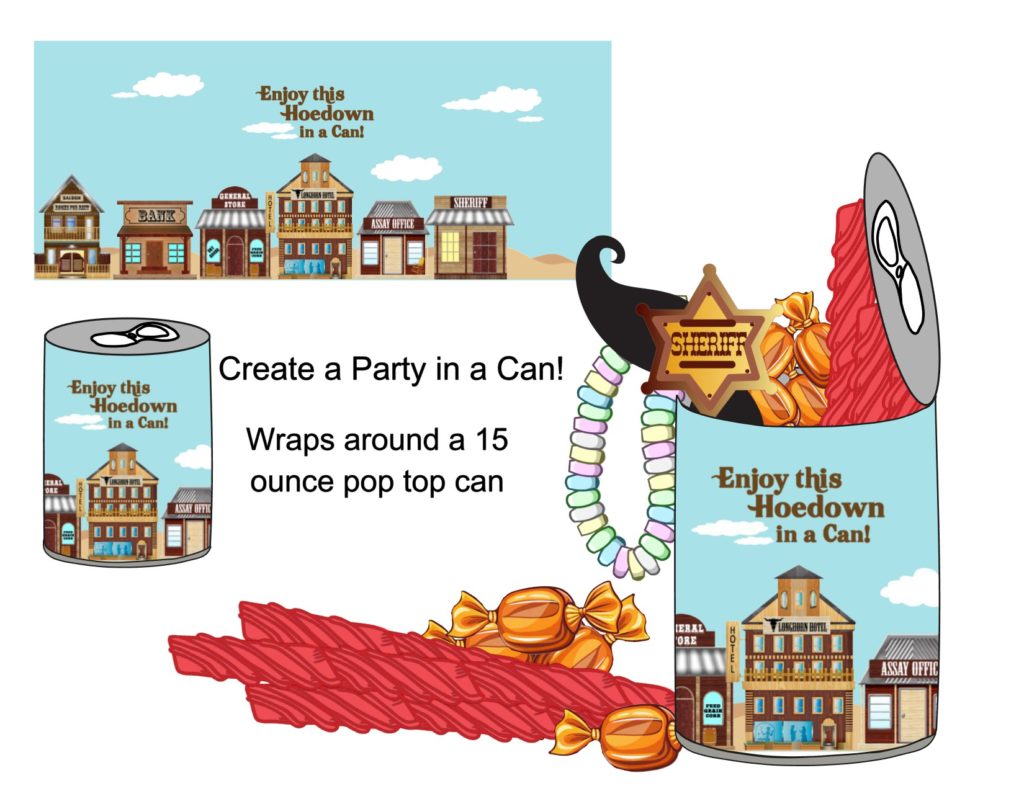
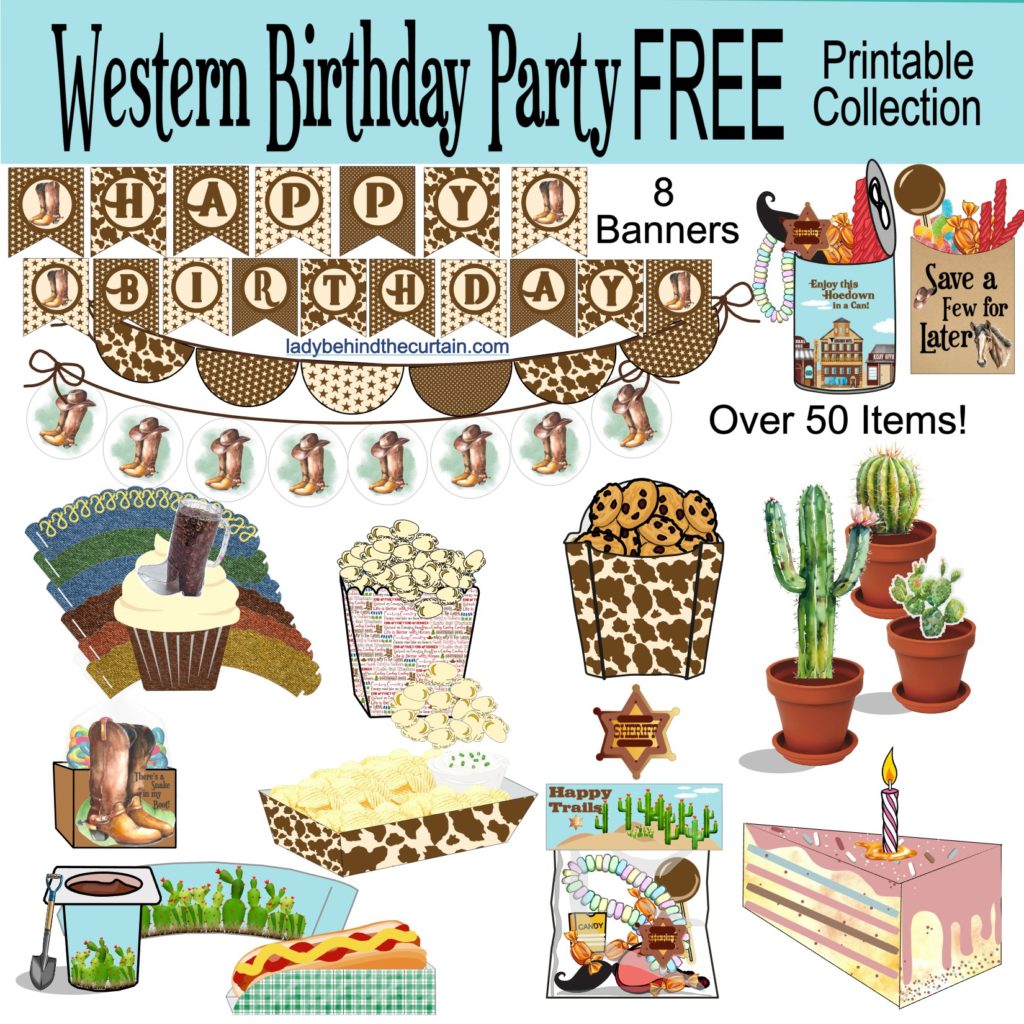
Attention all party planners and DIY enthusiasts! Are you looking for a unique, budget-friendly way to throw a Western-themed birthday bash? Look no further because we have just the thing for you. Introducing the Western Birthday Party FREE Printable Collection – a comprehensive set of downloadable and customizable templates to help you create the ultimate cowboy/cowgirl celebration. With these printables, you can easily transform your space into a Wild West wonderland, complete with everything from invitations to decorations to party favors. Don your cowboy hats and saddle up because, in this article, we’ll show you how to throw the perfect Western birthday party with the help of our free printable Western collection.
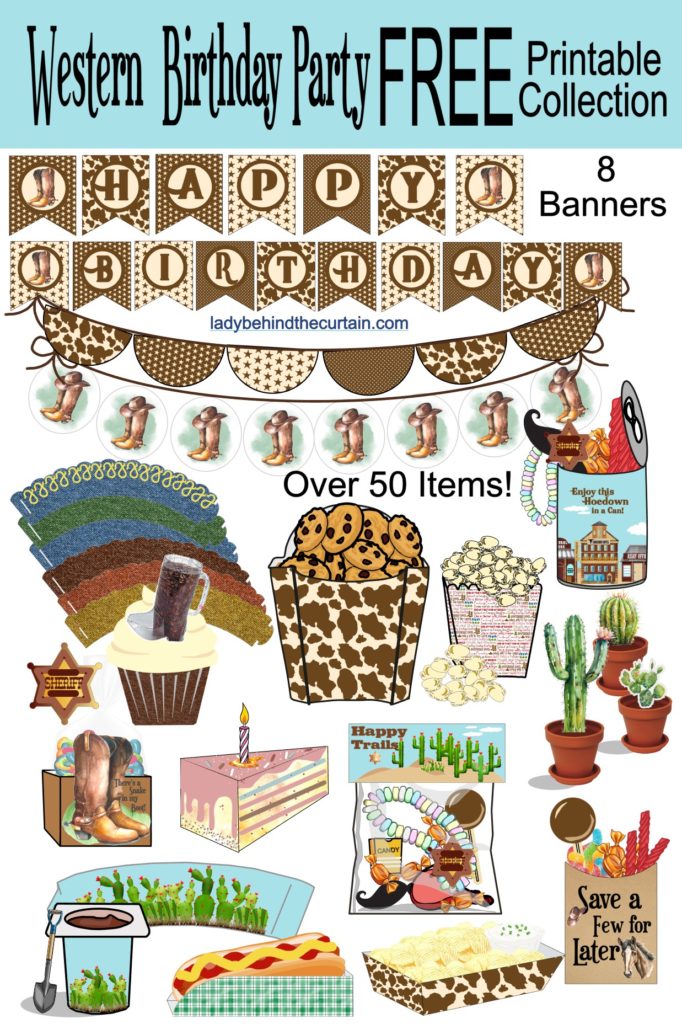
Did you catch it? ALL OF THE WESTERN BIRTHDAY PARTY COLLECTION IS FREE! Perfect for anyone. It features rustic browns, cowhide, denim decorations, and party and food container supplies. Pick and choose which ones to use or use them all.
NOTE: THE SUPPLIES LISTED BELOW ARE FOR ALL PRINTABLE COLLECTIONS, NOT JUST THIS COLLECTION—SOME SUPPLIES WILL APPLY. IN MOST CASES NOT ALL WILL APPLY.
At the end of each bold title are the words. Click here to download. After each bullet point, there will be a download link.

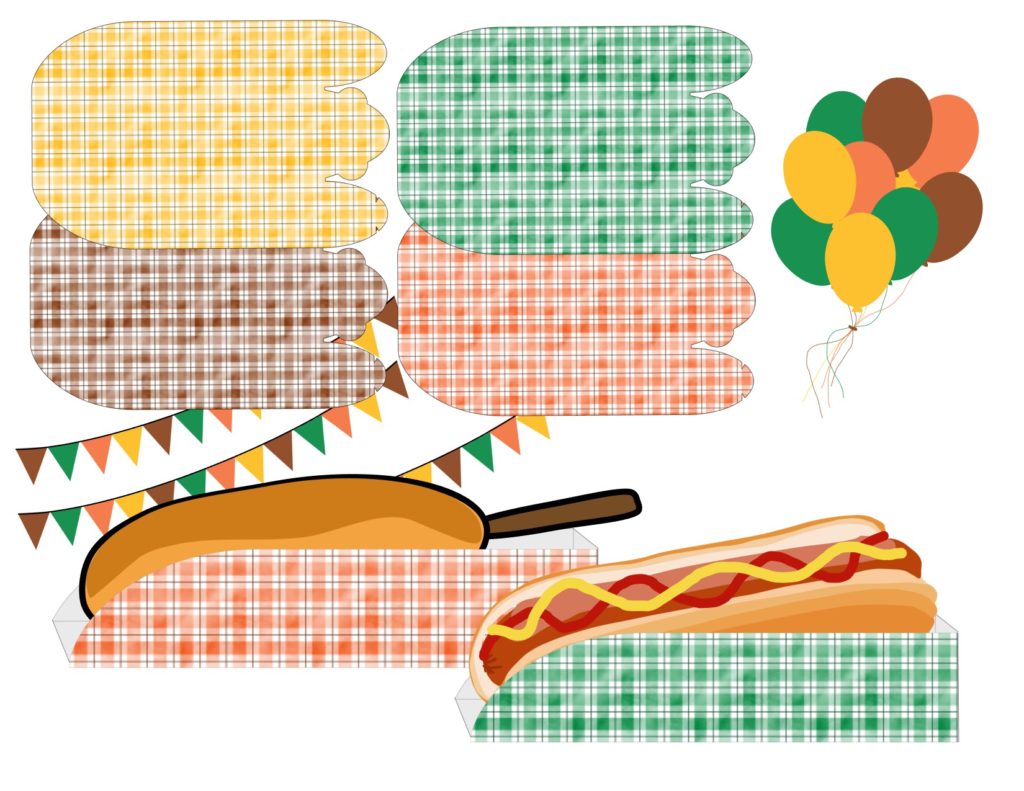
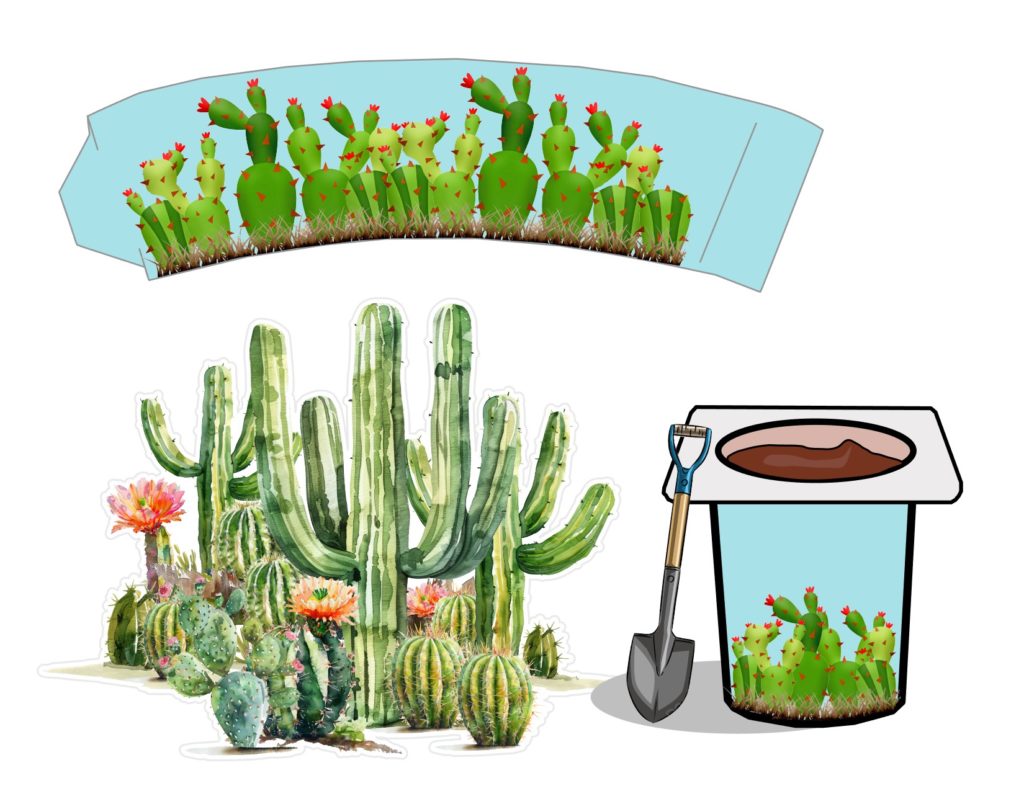
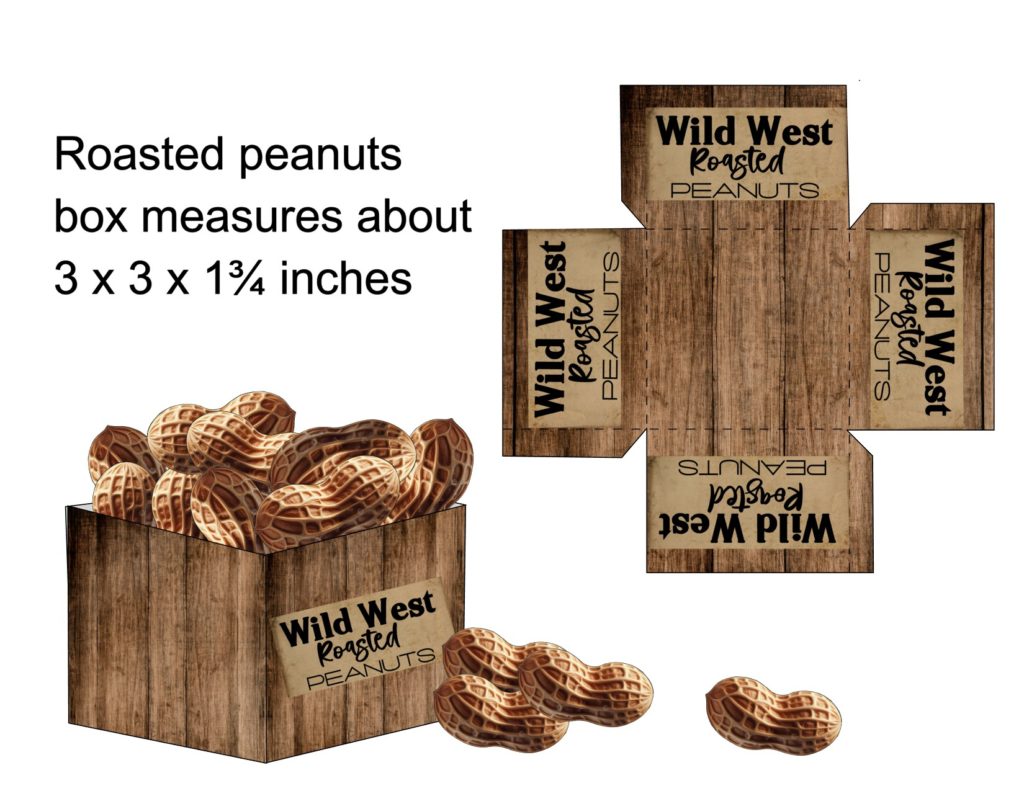
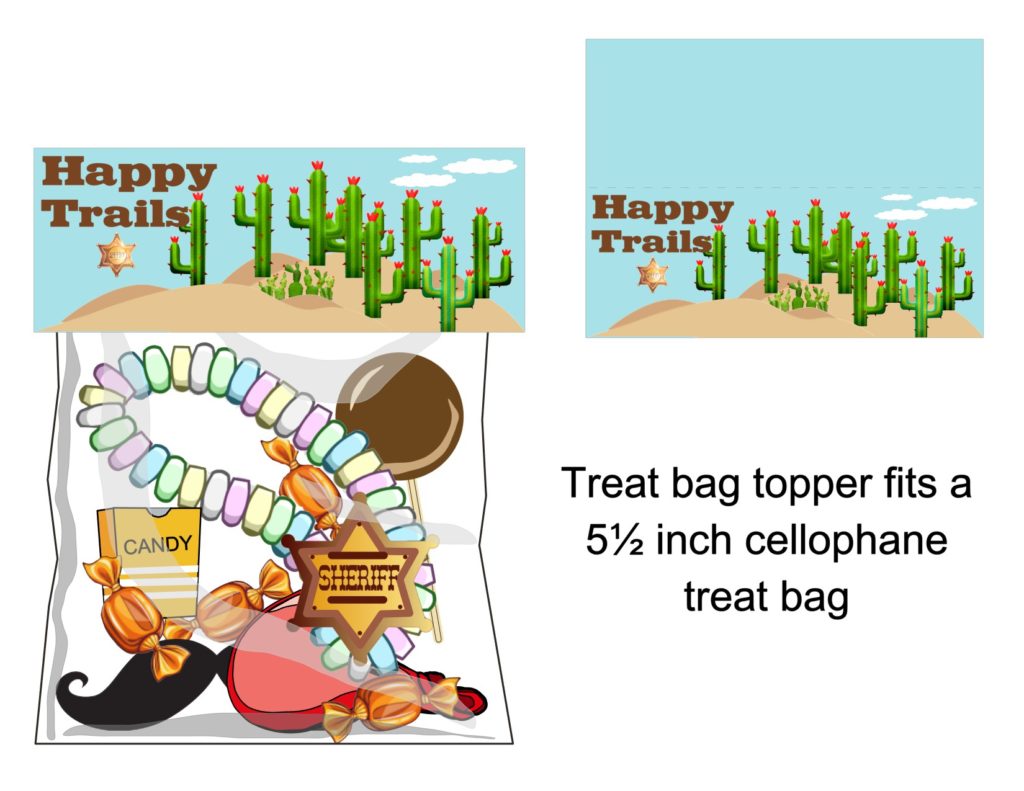
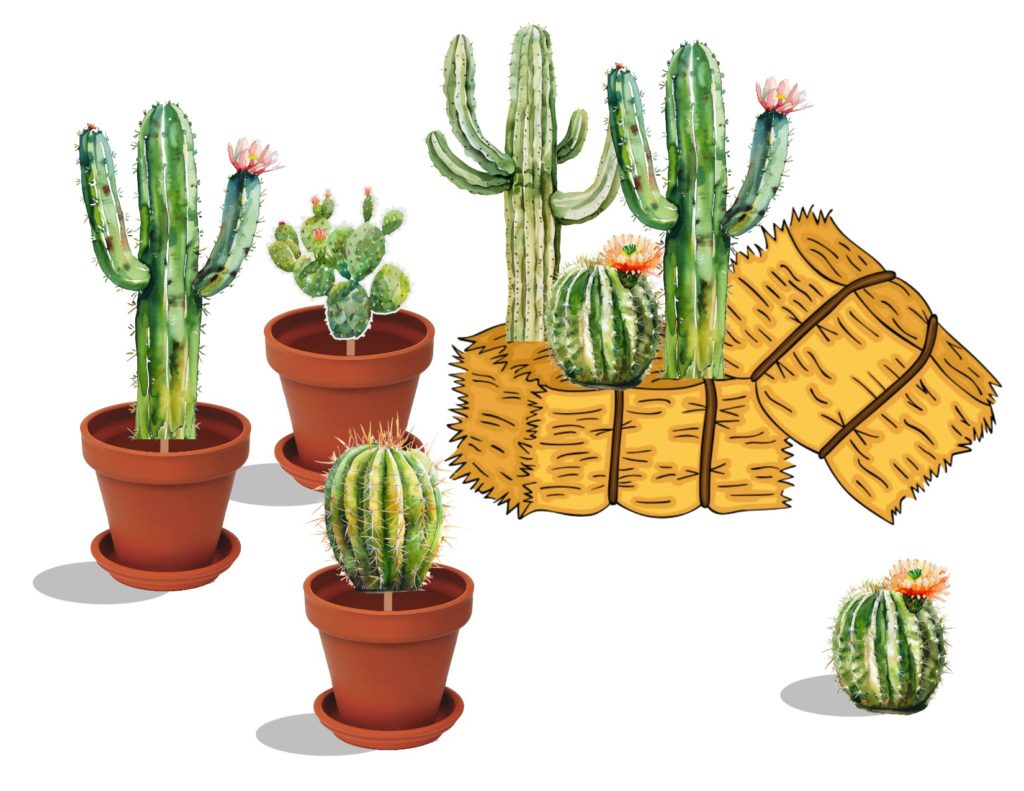
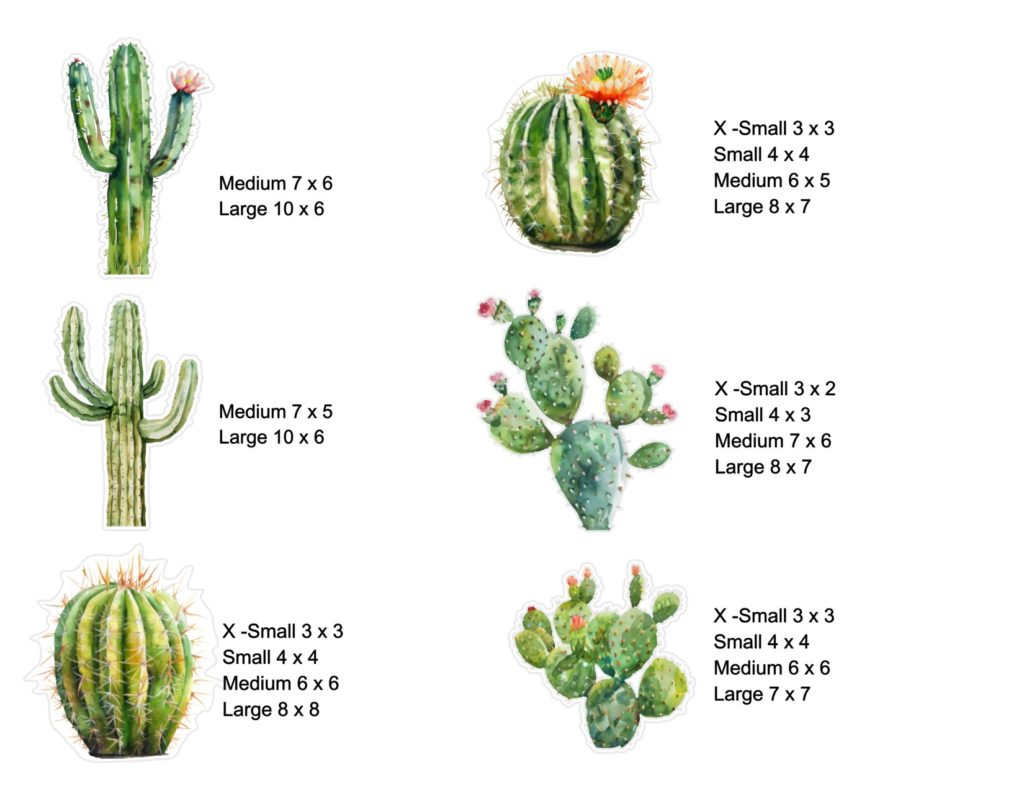
The cactus cutouts come in several sizes. Glue a skewer to the backs and put them in assorted clay pots filled with rafia, or push them into mini bails of hay found at Michaels.

THANKS FOR VISITING♥
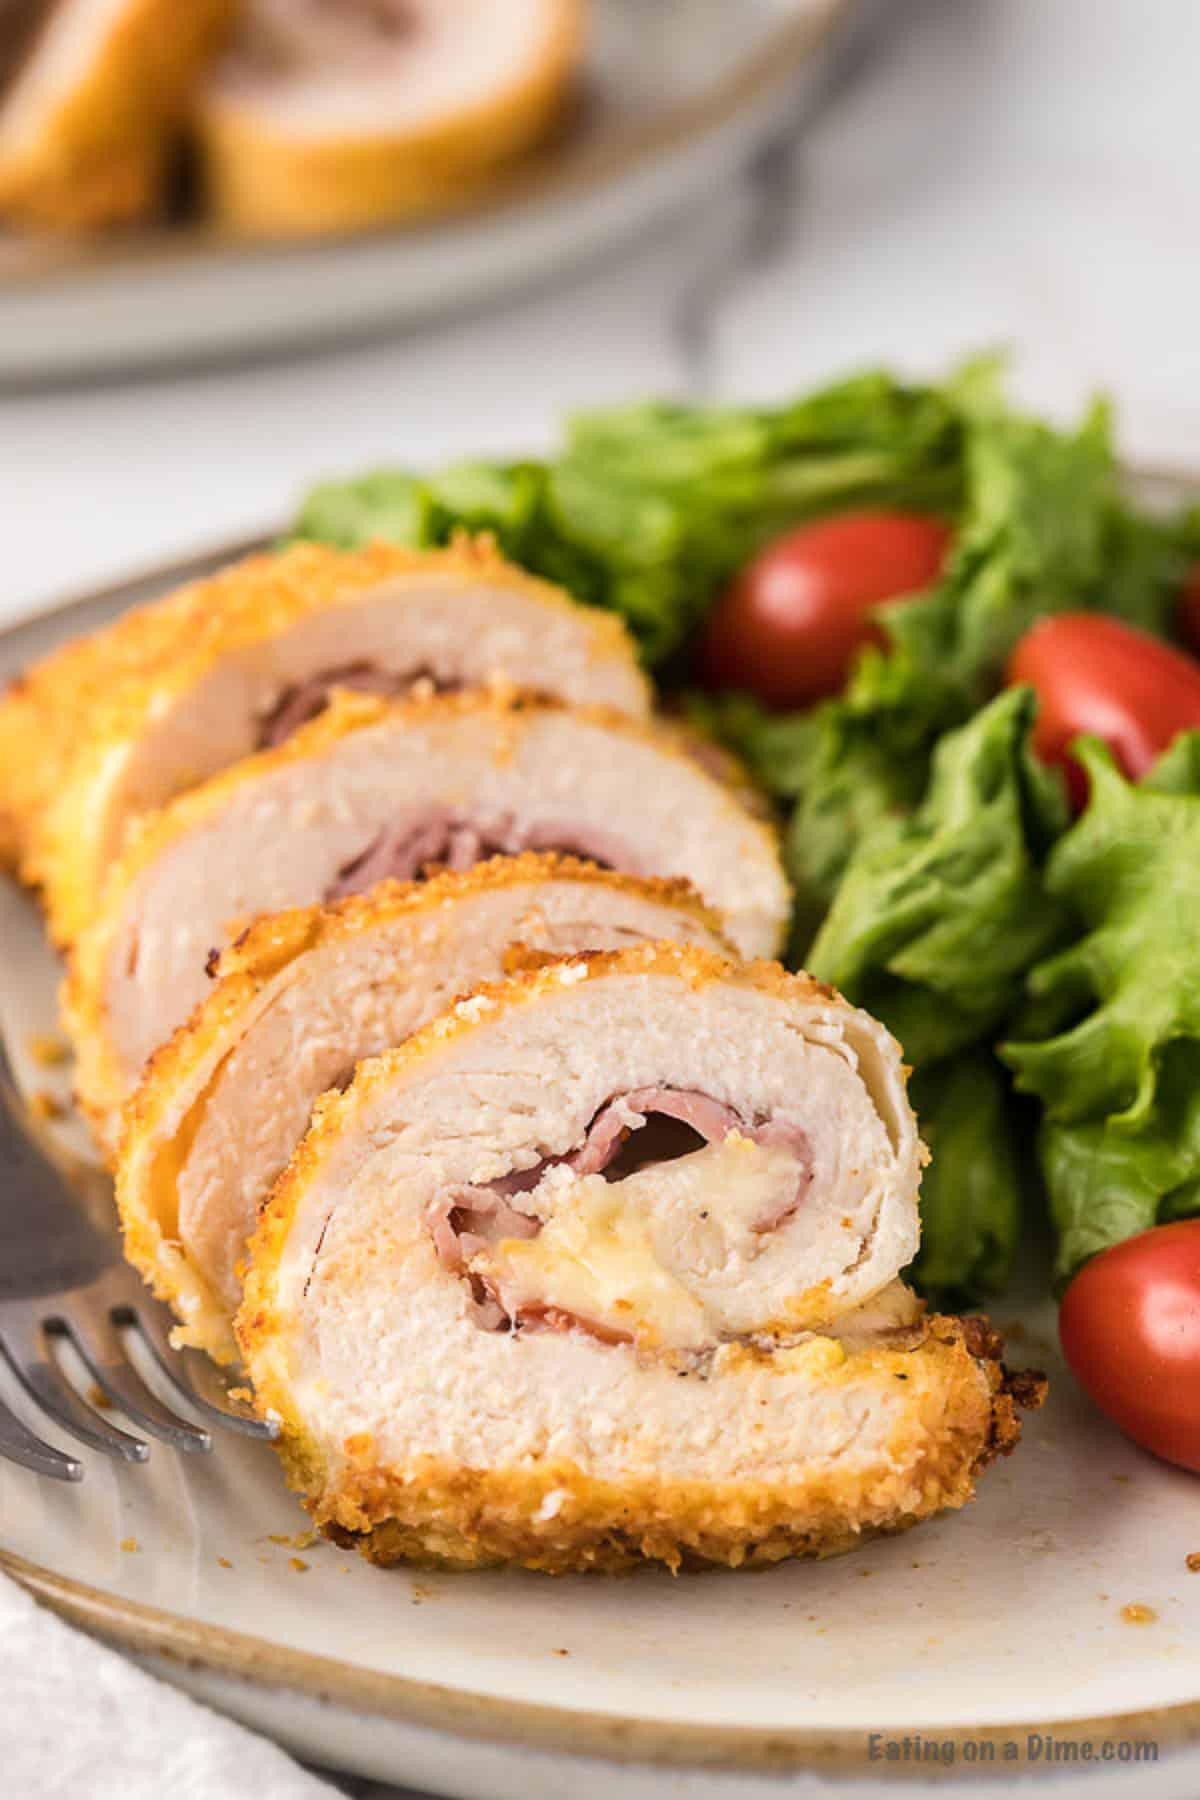
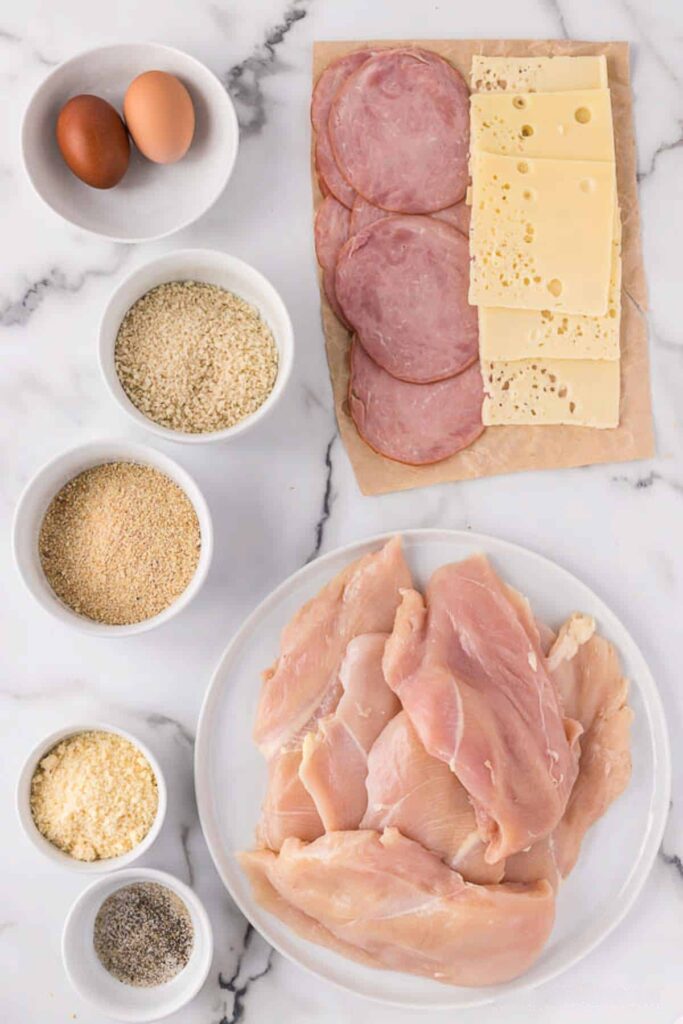
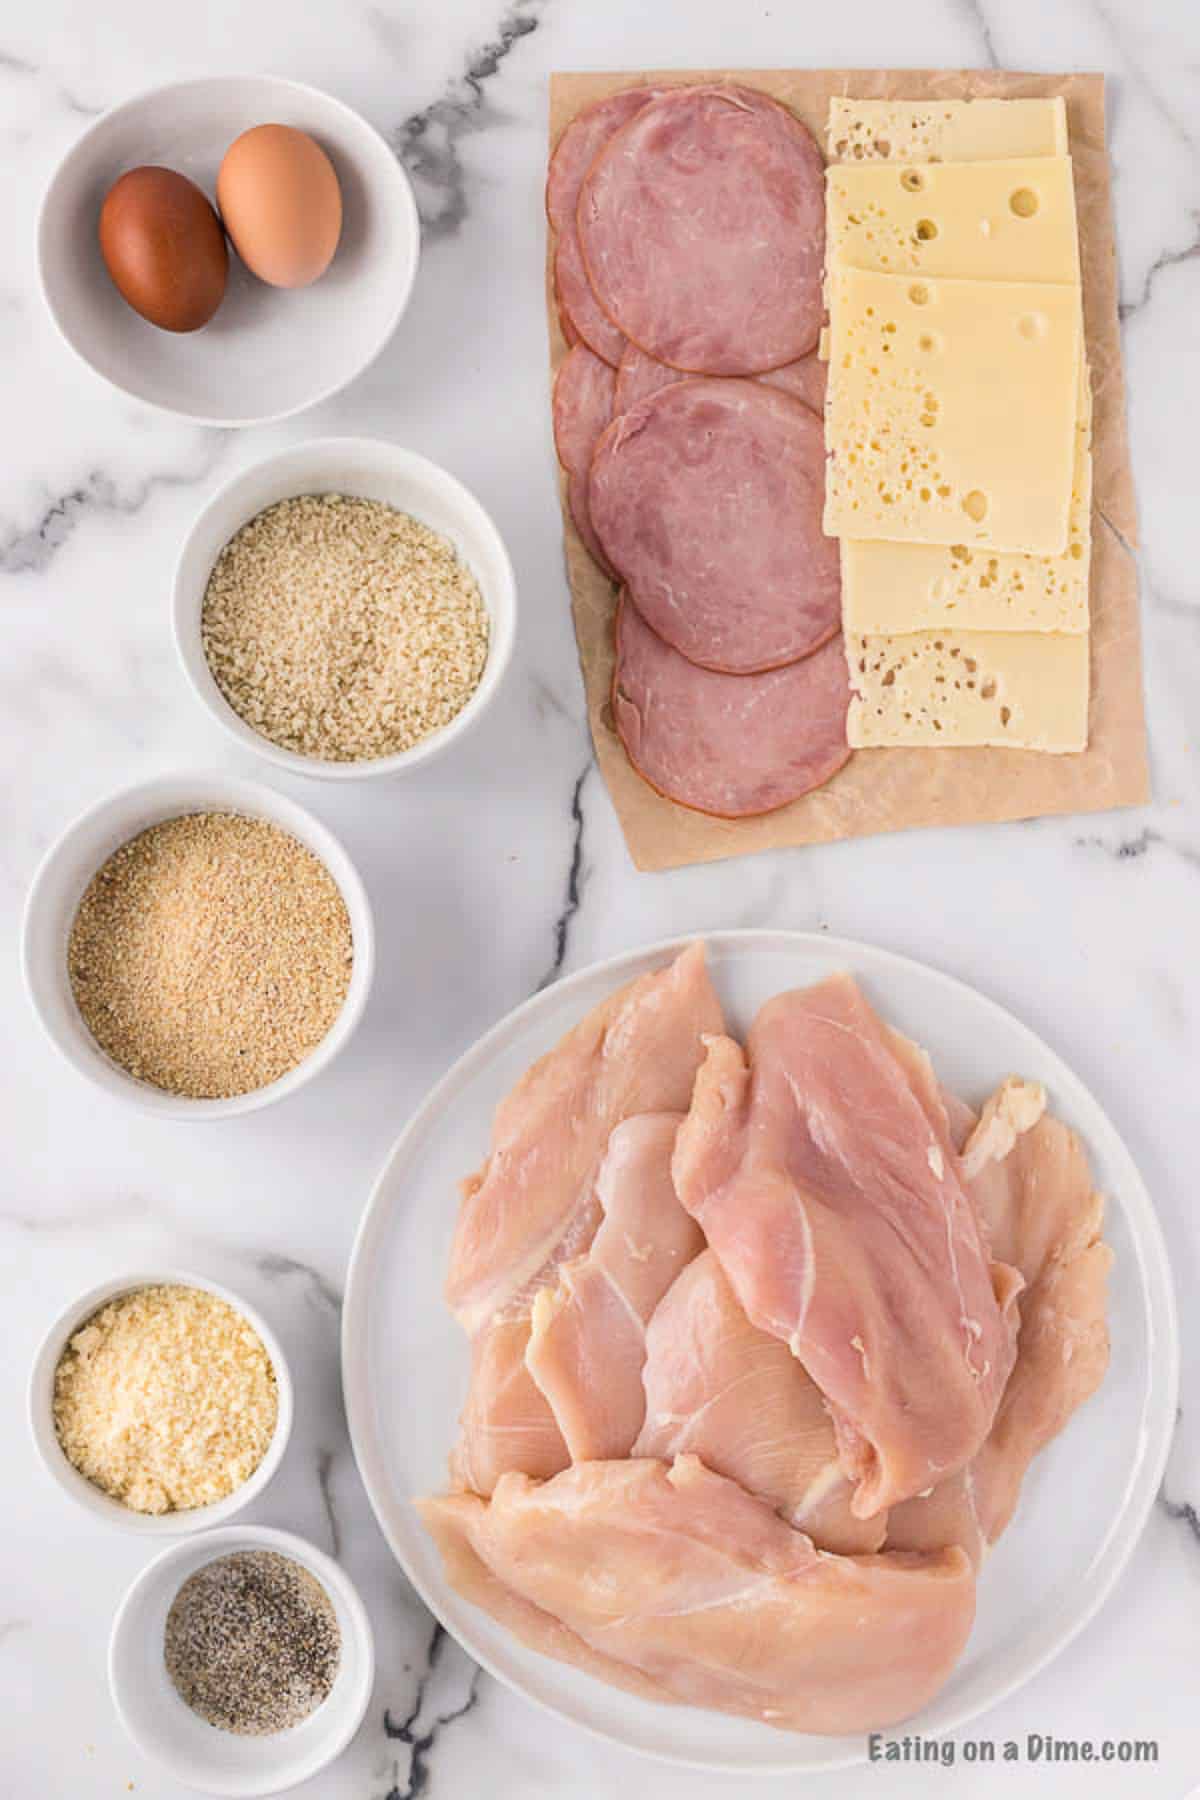
Air Fryer Chicken Cordon Bleu Recipe is a great way to jazz up a chicken breast. The chicken has layers of ham and swiss cheese and is air fried to perfection.
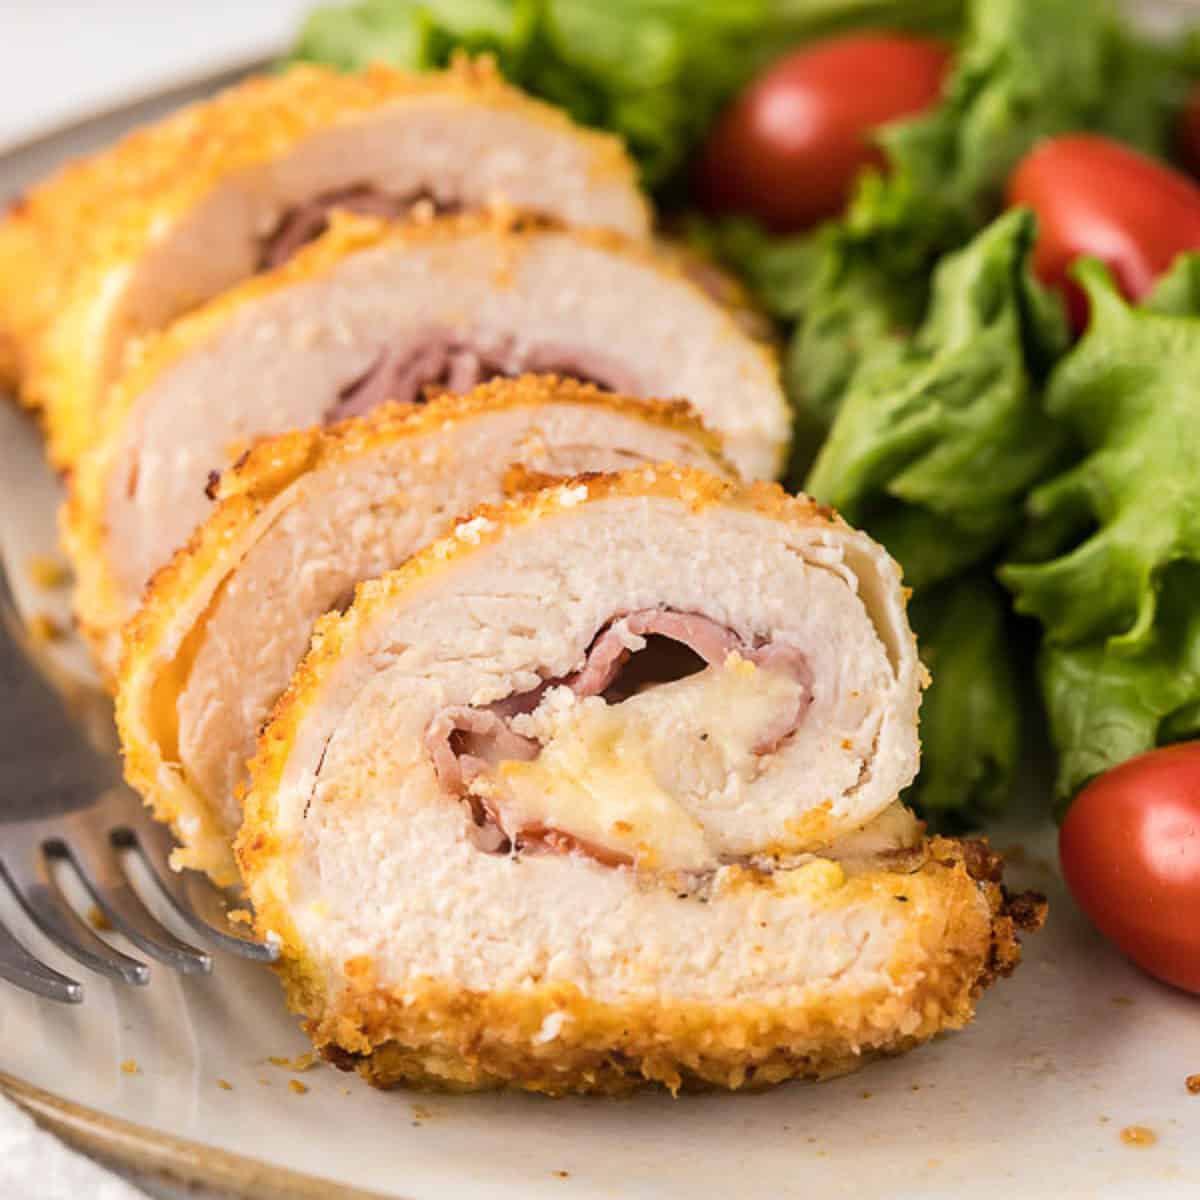
Air Fryer Chicken Cordon Bleu Recipe is a family favorite. It is a great way to take thinly sliced chicken and turn it into an amazing meal. This Blue Ribbon meal is stuffed chicken breast with thinly sliced ham, swiss cheese and topped with bread crumbs.
We love that this meal can be served for as a fancy meal or just a weeknight dinner. My kids love it and served with a side salad makes this meal complete. Makes sure to check out these other chicken cordon blue recipes – Crock Pot Chicken Cordon Bleu and Instant Pot Chicken Cordon Bleu.
The reason that we call Chicken Cordon Bleu because Cordon bleu translate to Blue Ribbon Chicken. We couldn’t agree more. Air Fryer chicken is so tender and come out so flavorful and juicy.
We love that this chicken can be made into your own recipe. It is traditionally made with slice of ham and swiss cheese, but we have gotten creative with this recipe and used different cheeses and seasoning.
Scroll to the bottom of the post for the full recipe in the recipe card.
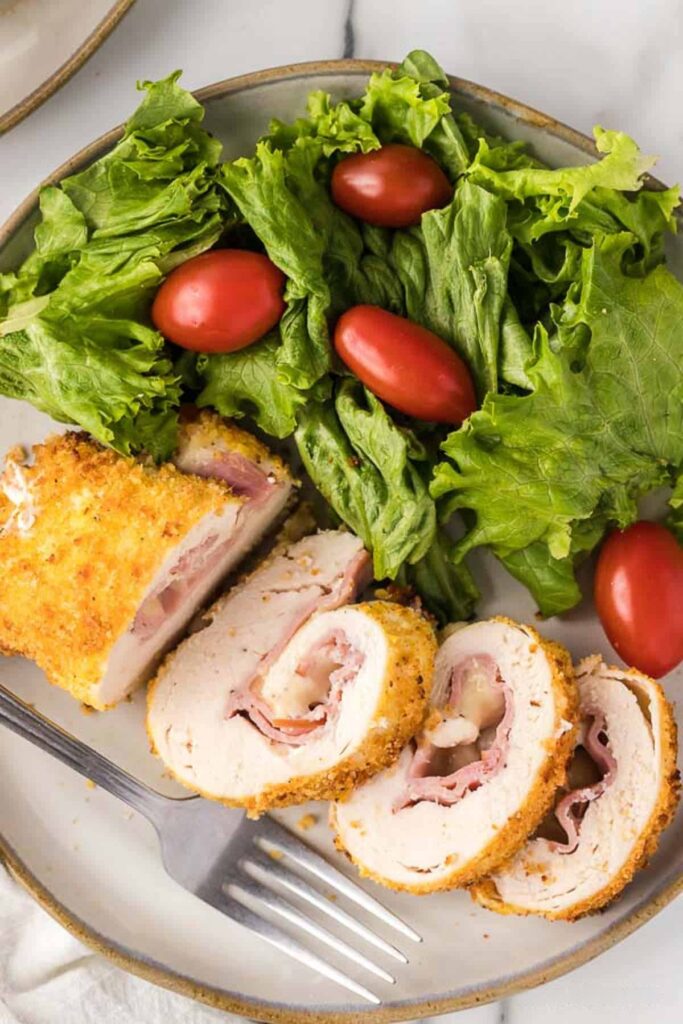

When we serve Chicken Cordon Bleu since it is a hearty full meal, we tried to stick to sides that are light. Here are some of our favorites.

Air Fryer Chicken Cordon Bleu is a great way to jazz up a chicken. It has layers of ham and swiss cheese and is air fried to perfection.
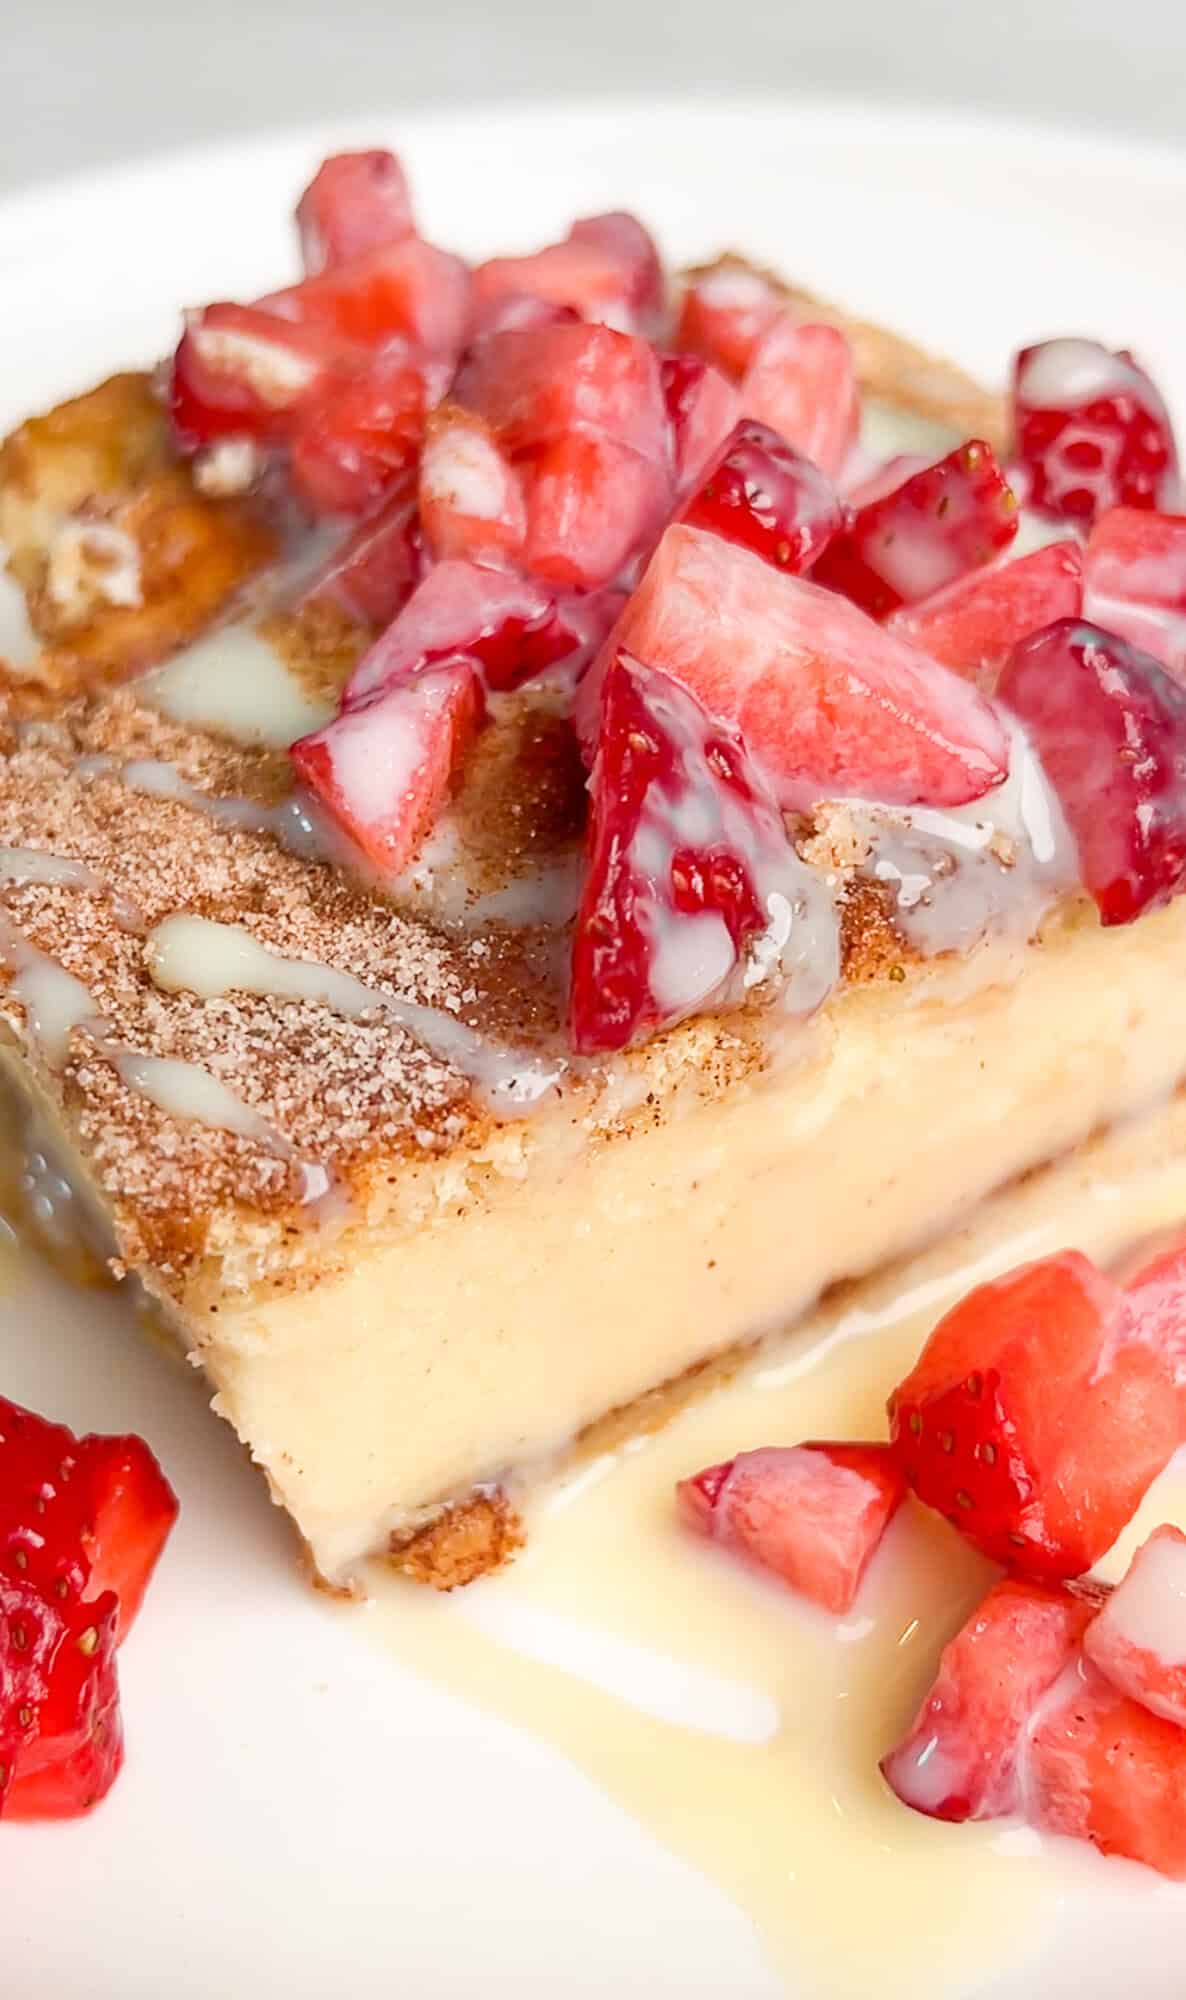

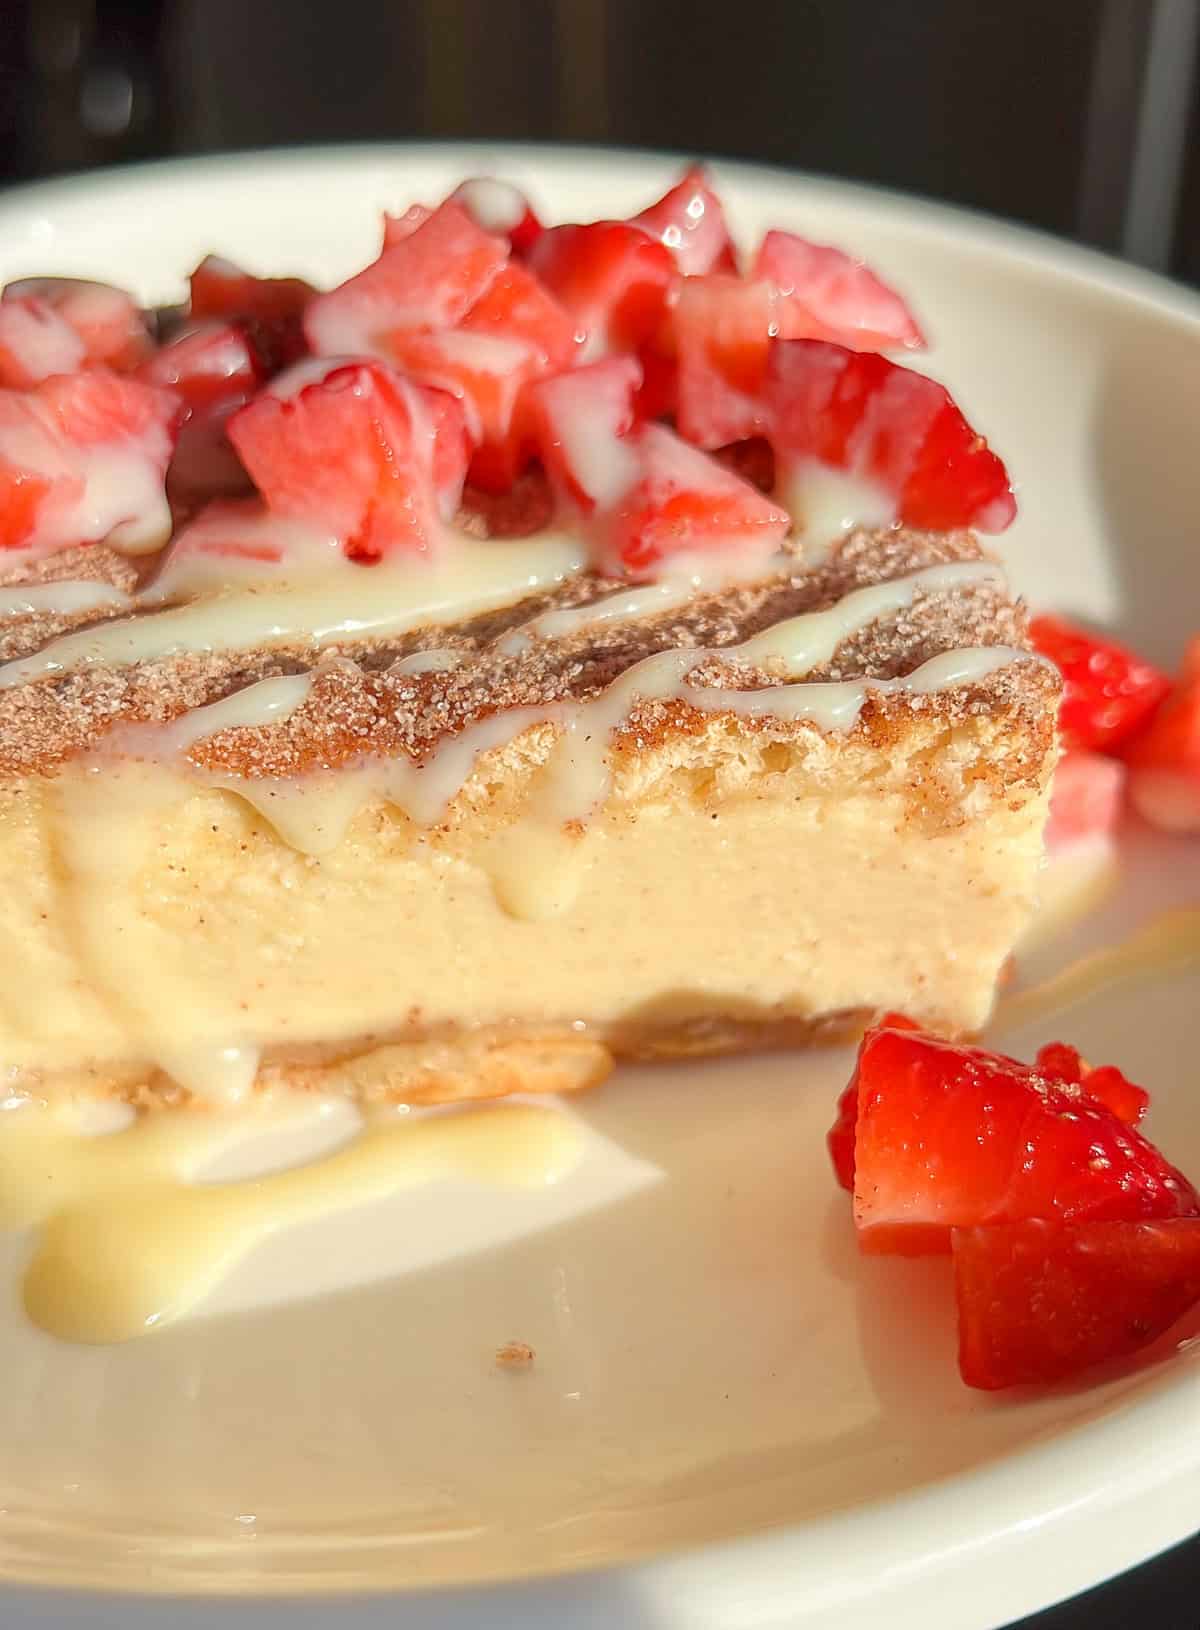
This churro cheesecake recipe is perfect for gathering, potlucks, holidays, etc. You can serve it like brownies but with all the decadent pleasures of cheesecake.
Crescent roll churro cheesecake is made with two cans of Pillsbury crescent roll dough, layers of cinnamon-sugar, and an easy creamy cheesecake. You’ll love how simple this ingredient list is:
Crescent Roll Dough – the sheets work much better if you can find them so you don’t have to fuss with the pre-cut lines.
Cream Cheese – three blocks of the good stuff!
Sour Cream – essential for the base of the cheesecake. Add to the creaminess and tang.
Eggs – we’ll use three eggs. They help to bind the cheesecake.
Vanilla Extract – duh.
Sweetened Condensed Milk – this adds so much creamy, milky sweetness
Cinnamon Sugar – we mix sugar with cinnamon for the churro element
Be sure to review the recipe card below for the details recipe with measurements for this churro cheesecake recipe.
In a large mixing bowl, combine cream cheese with sour cream, eggs, vanilla extract, sweetened condensed milk, sugar and cinnamon. Use a hand mixer to mix well until smooth and no chunks remain.
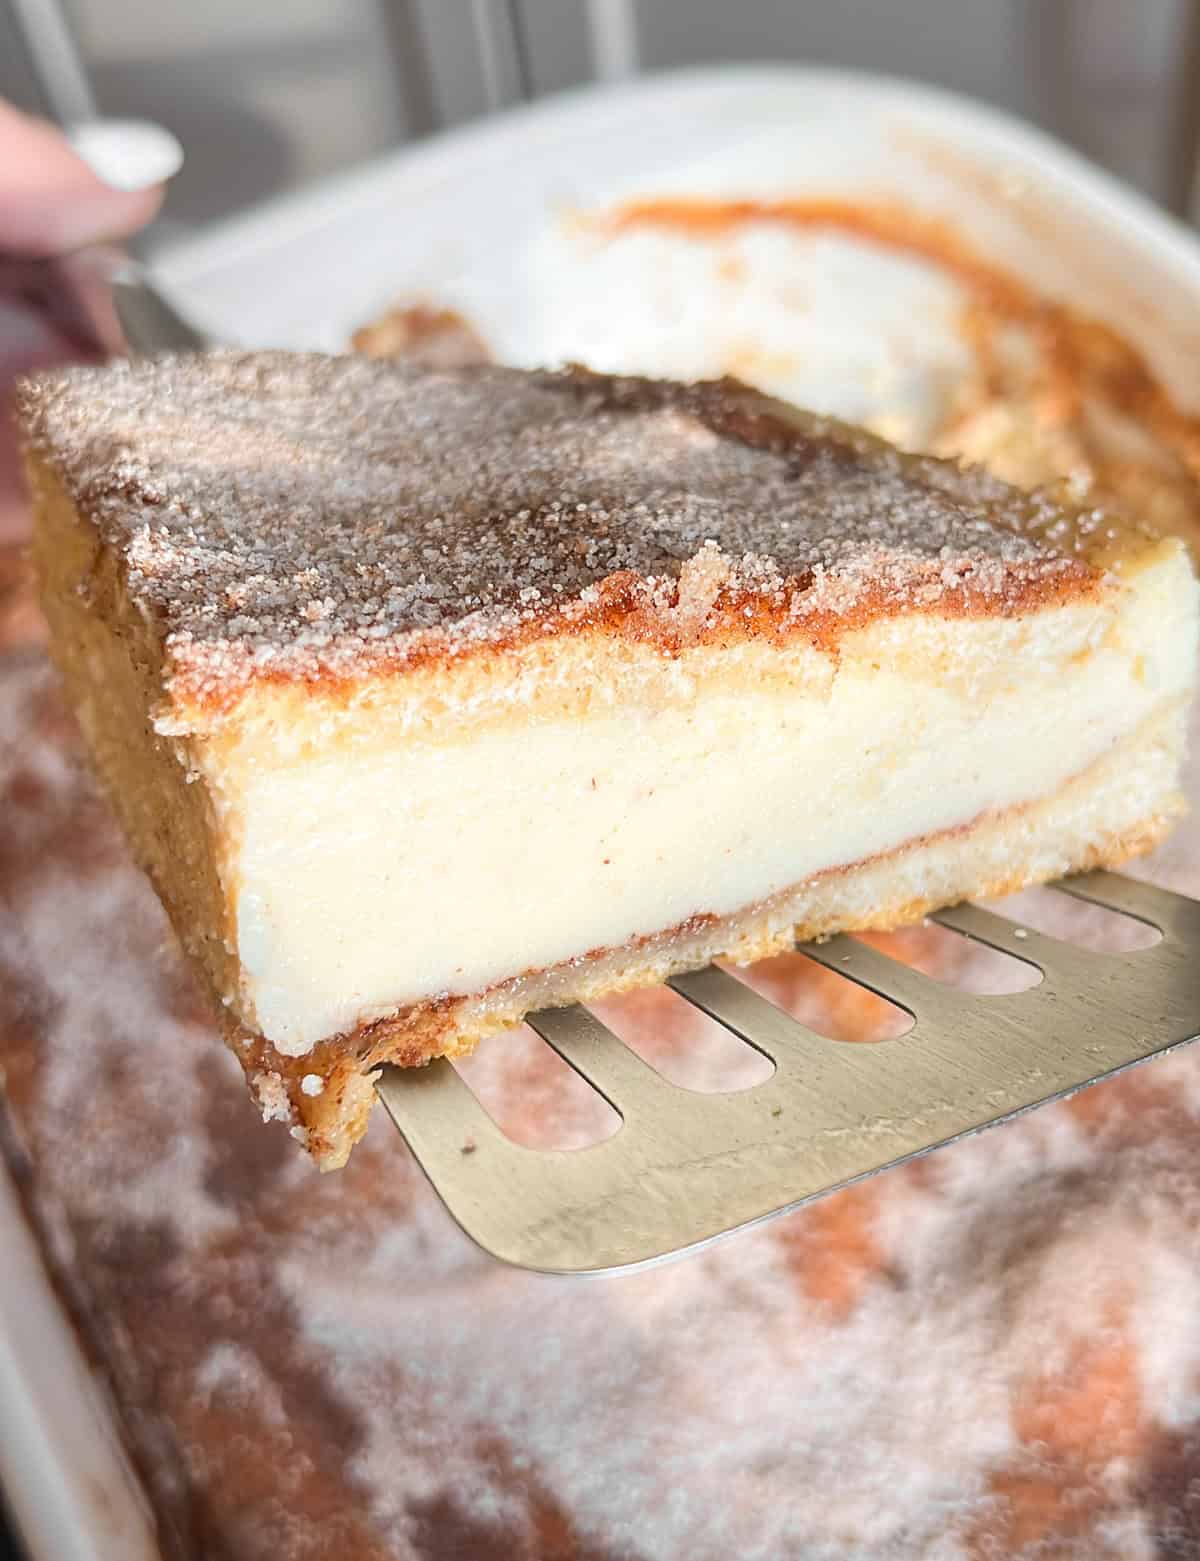
Roll out one can of crescent dough to approximately match the size of the baking dish. Lay it into the bottom of the dish, pressing it to evenly cover the bottom. It’s ok if it doesn’t look perfect, it will be covered. Sprinkle the crescent dough with an even coating of cinnamon-sugar to cover the dough.
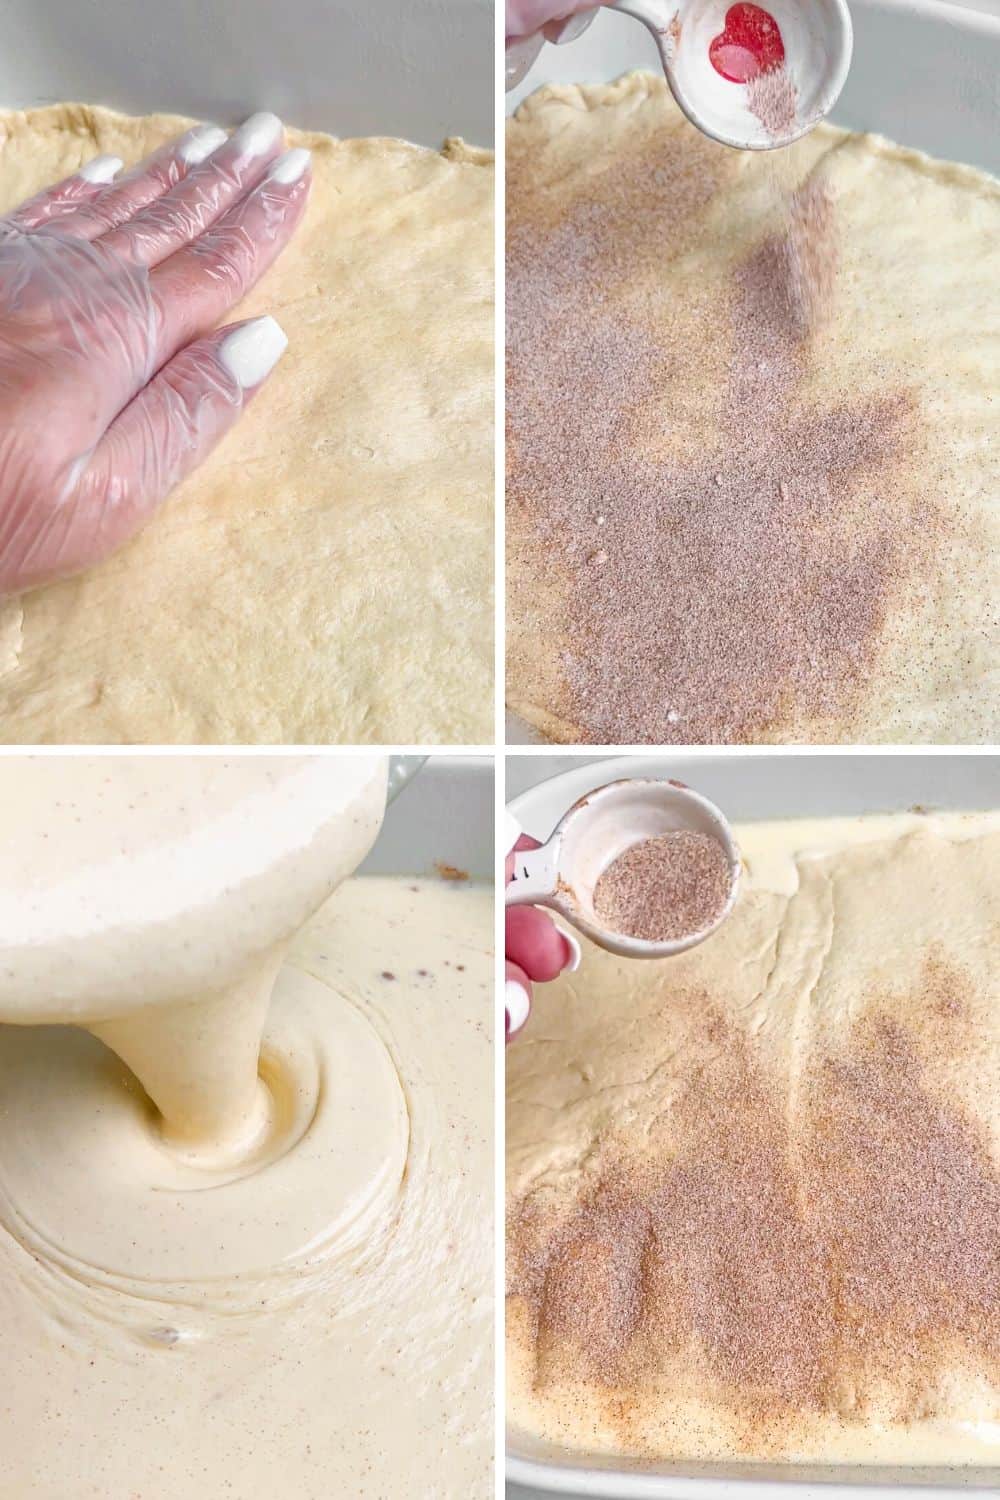
Pour in the cheesecake filling. Repeat the same process with the dough, laying it on top the cheesecake. Work gently as to not make the dough sink. It doesn’t need to look perfect.
Sprinkle the entire top of the cheesecake with remaining cinnamon to coat the top.
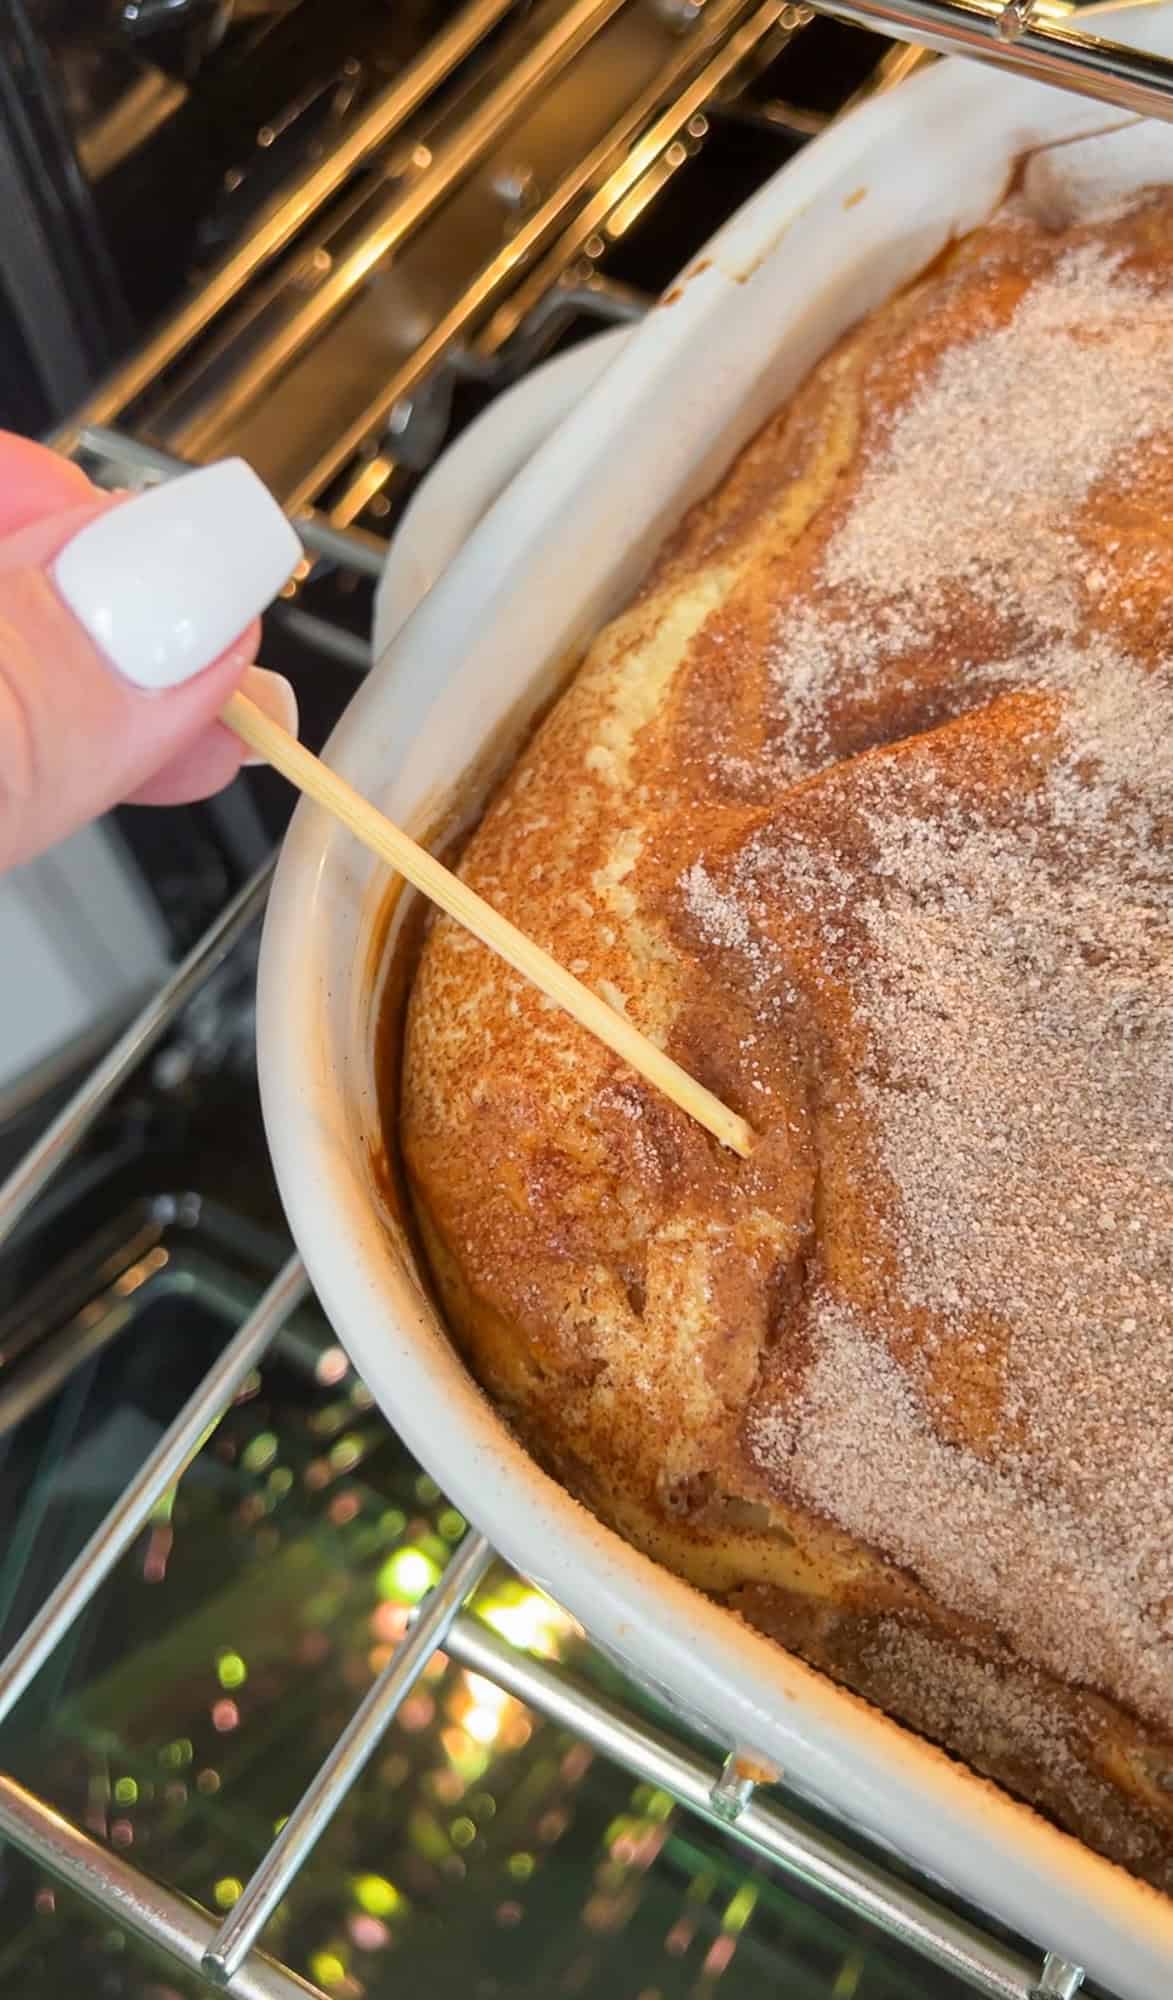
Bake for 40-45 minutes. A toothpick inserted in the center comes out clean indicates its fully cooked.
Place cheesecake on top of a cooling rack or stove to allow heat to escape from under the dish, cool about 1 hour,. Cover tightly and refrigerate for 8 hours before serving (ideally overnight). Cheesecake is better the second day, so make ahead if possible.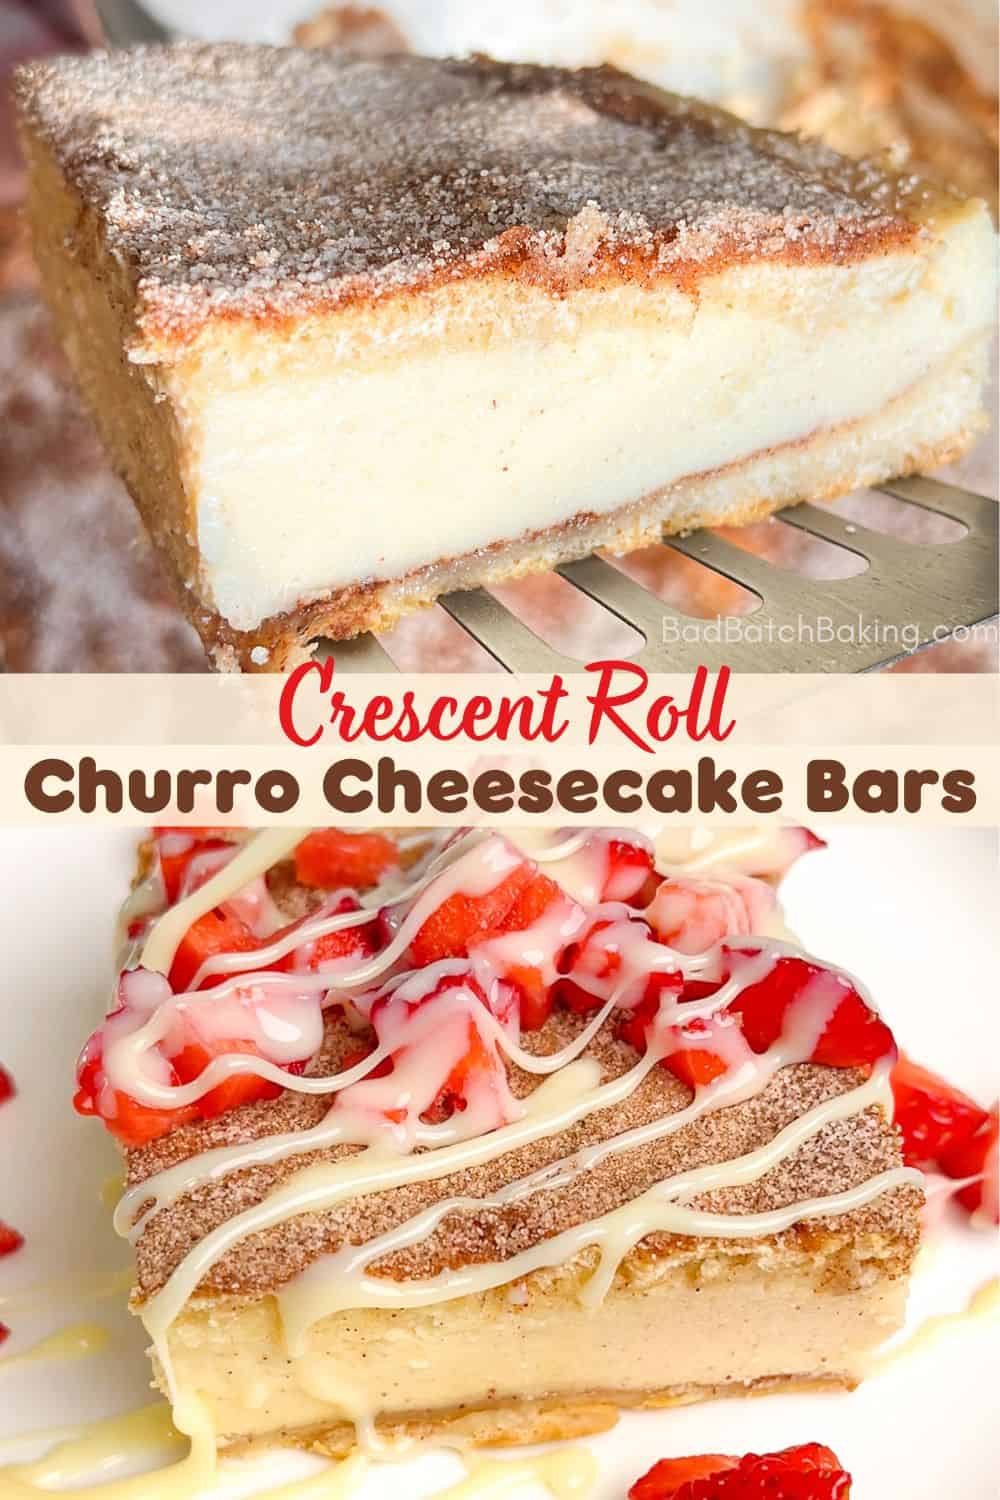
When you make this churro cheesecake recipe, it can last up to 4 days in the fridge (tightly wrapped or in an air-tight container). If you want to save this for a future date they freeze really well.
I recommend cutting them into the desired size first. Then individually wrap them in plastic wrap and place into a zip-top bag. Sometimes we’ll but them into small one-bite size pieces for topping on ice cream sundaes or for snacking.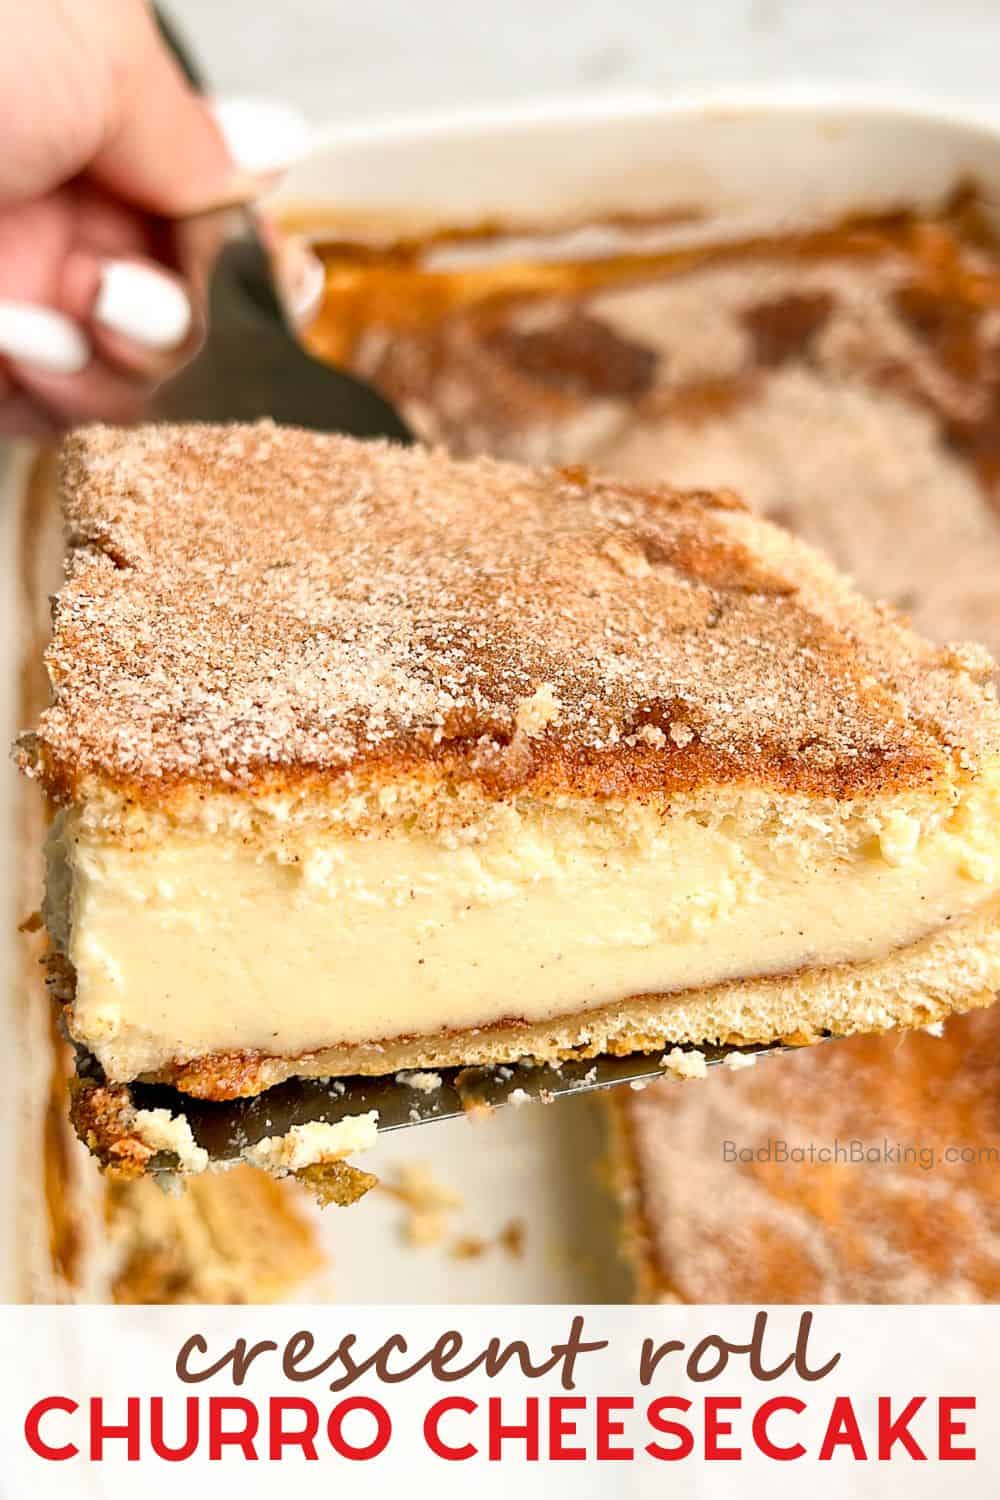
I hope you enjoy this Churro Cheesecake recipe. Be sure to comment below with any questions or feedback!

In this easy and low maintenance cheesecake recipe, the cheesecake is baked in a casserole dish and uses cinnamon-sugar topped crescent dough sheets as the crust. No fuss, easy to cut and you don’t need to worry about your cheesecake cracking. Serve this at your next gathering topped with fresh sliced strawberries.

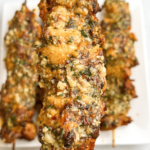
This post is all about how to make air fried Ranch Garlic Parmesan Chicken Skewers; juicy chicken pieces that are basted in the most delectable garlic Parmesan butter sauce. This is an herby spin on my viral garlic parmesan chicken skewers.

Looking to steal the spotlight at your next gathering? These garlic parmesan ranch chicken skewers are the perfect party appetizer or equally amazing for an easy weekday dinner and they’re bound to be one of the best chicken dishes you’ve ever had!
Basted throughout the cooking process, these garlic parmesan chicken skewers are so tender they just fall right off the skewers.
After my Garlic Parmesan Chicken Skewers and Hot Lemon Pepper Chicken Skewers went crazy on social media, I had to give ya’ll with another incredible flavor using the same easy and fail-proof method. This is a spin on my Garlic Parmesan Chicken Skewers. By adding some ranch seasoning and dill, we truly kick up these succulent skewers up another notch.
You can easily make these Ranch Garlic Parmesan Chicken Skewers in the air fryer (method used for the photos) or you can bake or grill them. I paired my skewers over warm rice and added some of the leftover garlic-parm butter into the rice for the most incredible meal.
This recipe post is all about how to make air fried Garlic Parmesan Ranch Chicken Skewers.


Step 1: Soak wooden skewers in water for at least 30 minutes.
Combine spice mixture in a small bowl and set aside. Prep your chicken by cutting in 3″ pieces. Place them in a bowl and toss in olive oil and the spices, coating well on all sides.
Step 2: Pack the chicken onto each skewer, making sure they are tightly packed with no space in between to ensure maximum juiciness. If needed, snip the top few inches of the skewers to fit in the air fryer after the chicken is skewered

Step 3: Make the garlic parmesan sauce by combining all ingredients into a saucepan over low heat. Scoop out 1/3 of the sauce and use that for basting the chicken as it cooks. Reserve the remaining sauce for basting the cooked chicken so you don’t cross contaminate.

Step 3: Cook 2-3 skewers at a time in an air fryer at 400 degrees for 5 minutes. Remove and flip the skewers and baste with sauce, returning to cook an additional 2 minutes at 400 degrees.
Baste with more sauce and cook another 5-6 minutes or until the internal temp reaches 165 degrees. A total cook time of 12-14 minutes. Once they are finished cooking, hit them with a final pass of the garlic sauce (the reserved sauce) and sprinkle with some parmesan and serve.

There are a few reasons that the garlic parmesan butter sauce might break, one of the most common reasons is the sauce getting too hot. Luckily, there is an easy way to fix this.
Simply adding 1-2 tablespoons of softened butter into the sauce and whisking gently until it emulsifies back into a soft and smooth slightly-melted paste.


Oven Preparation:
Preheat oven to 450 degrees. Place chicken skewers on a rimmed baking sheet lined with foil and cook for 14 minutes, flipping half way through and basting with butter a few times throughout the baking process.
Switch the oven to broil and cook an additional 2 minutes so get the tops golden brown. Remove from the oven and baste it one last time with the butter sauce and sprinkle with leftover parmesan.
Grill Preparation:
Preheat your grill to medium-high. Place the prepared skewers over direct heat and cook each side for 5-6 minutes each, basting with butter throughout the cooking process.
Remove from the grill and baste it one last time with the butter sauce and sprinkle with leftover parmesan.
I hope you enjoy this easy Air Fryer recipe for Ranch Garlic Parmesan Chicken Skewers. Be sure to comment below with any questions or feedback! If you make these or any other recipes, don’t forget to tag me on IG @BadBatchBaking to be featured on my story. Seeing your recreations makes my day!
A ranch herby version of my tender fall-apart chicken skewers. These are basted with a homemade ranch garlic parmesan sauce throughout the cooking process and easily prepared in an air fryer.
Enjoy as an appetizer or serve over a bed of rice and veggies spread with leftover garlic parmesan butter
**SEE NOTES for oven or grill instructions**
Oven Preparation:Preheat oven to 450 degrees. Place chicken skewers on a rimmed baking sheet lined with foil and cook for 14 minutes, flipping half way through and basting with butter a few times throughout the baking process. Switch the oven to broil and cook an additional 2 minutes so get the tops golden brown. Remove from the oven and baste it one last time with the butter sauce and sprinkle with leftover parmesan.
Grill Preparation: Preheat your grill to medium-high. Place the prepared skewers over direct heat and cook each side for 5-6 minutes each, basting with butter throughout the cooking process. Remove from the grill and baste it one last time with the butter sauce and sprinkle with leftover parmesan.

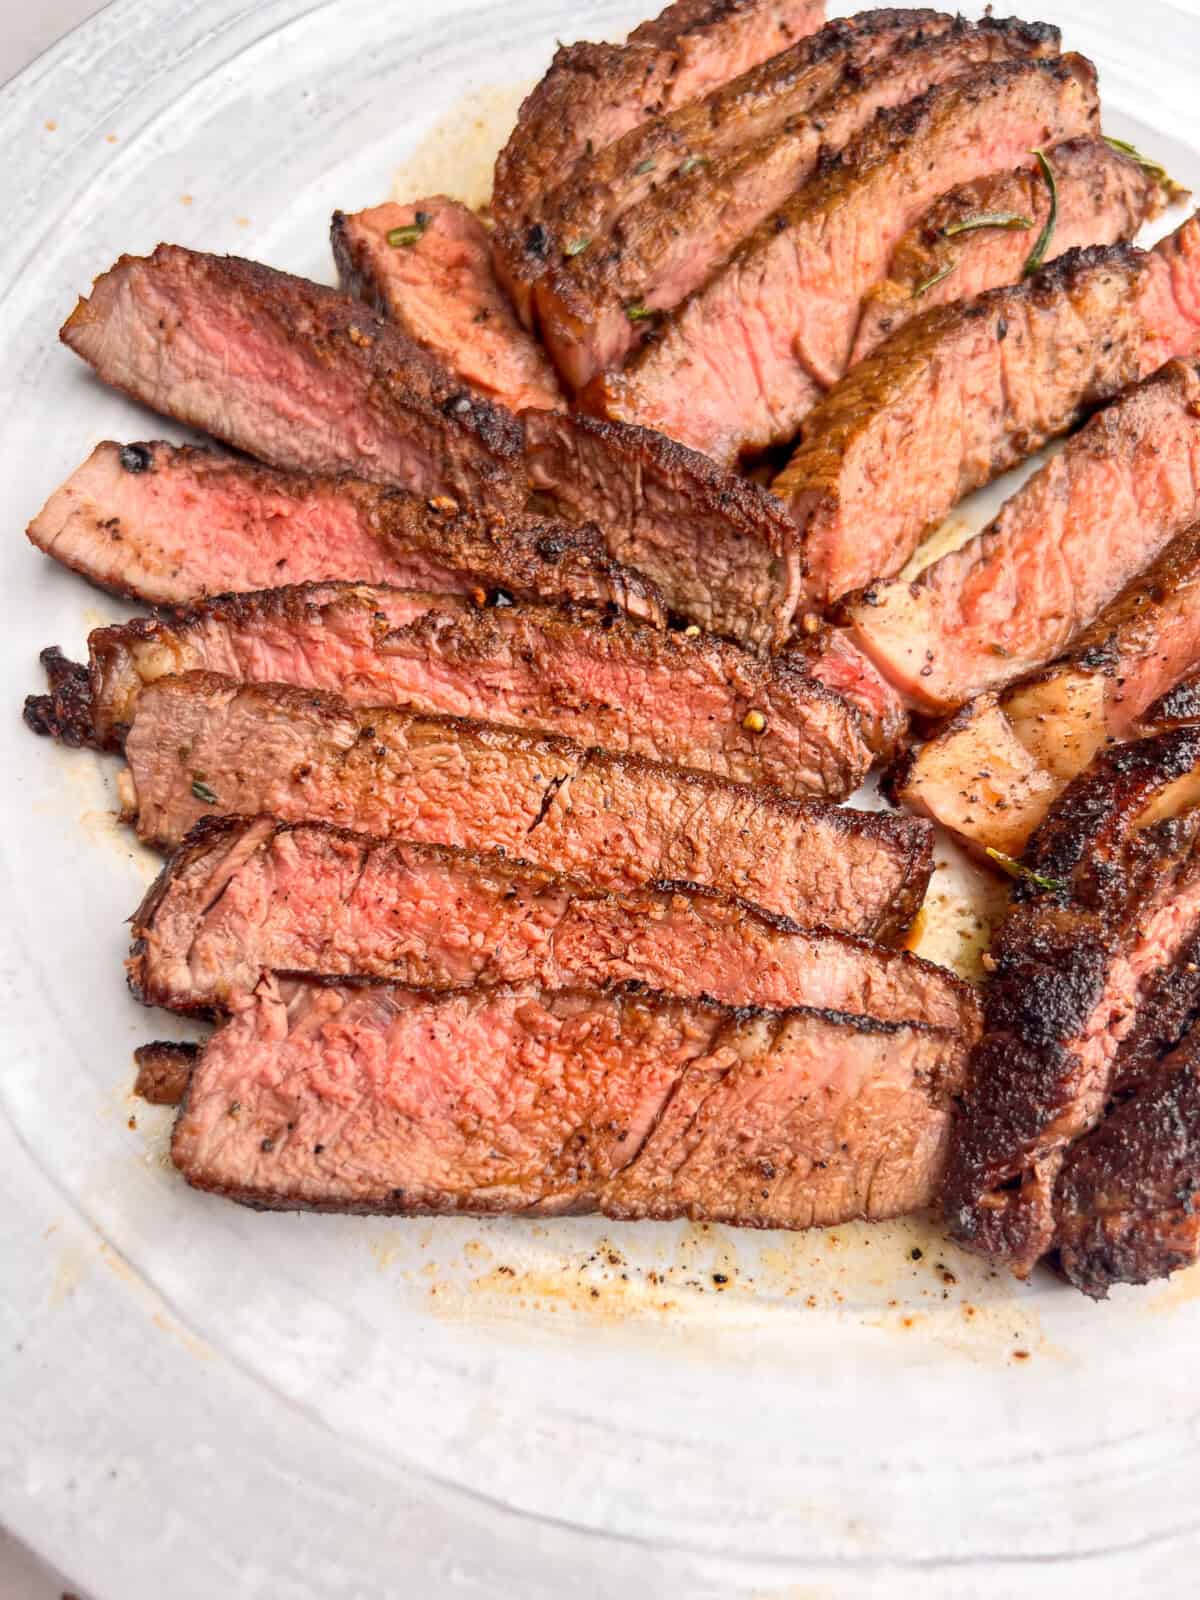
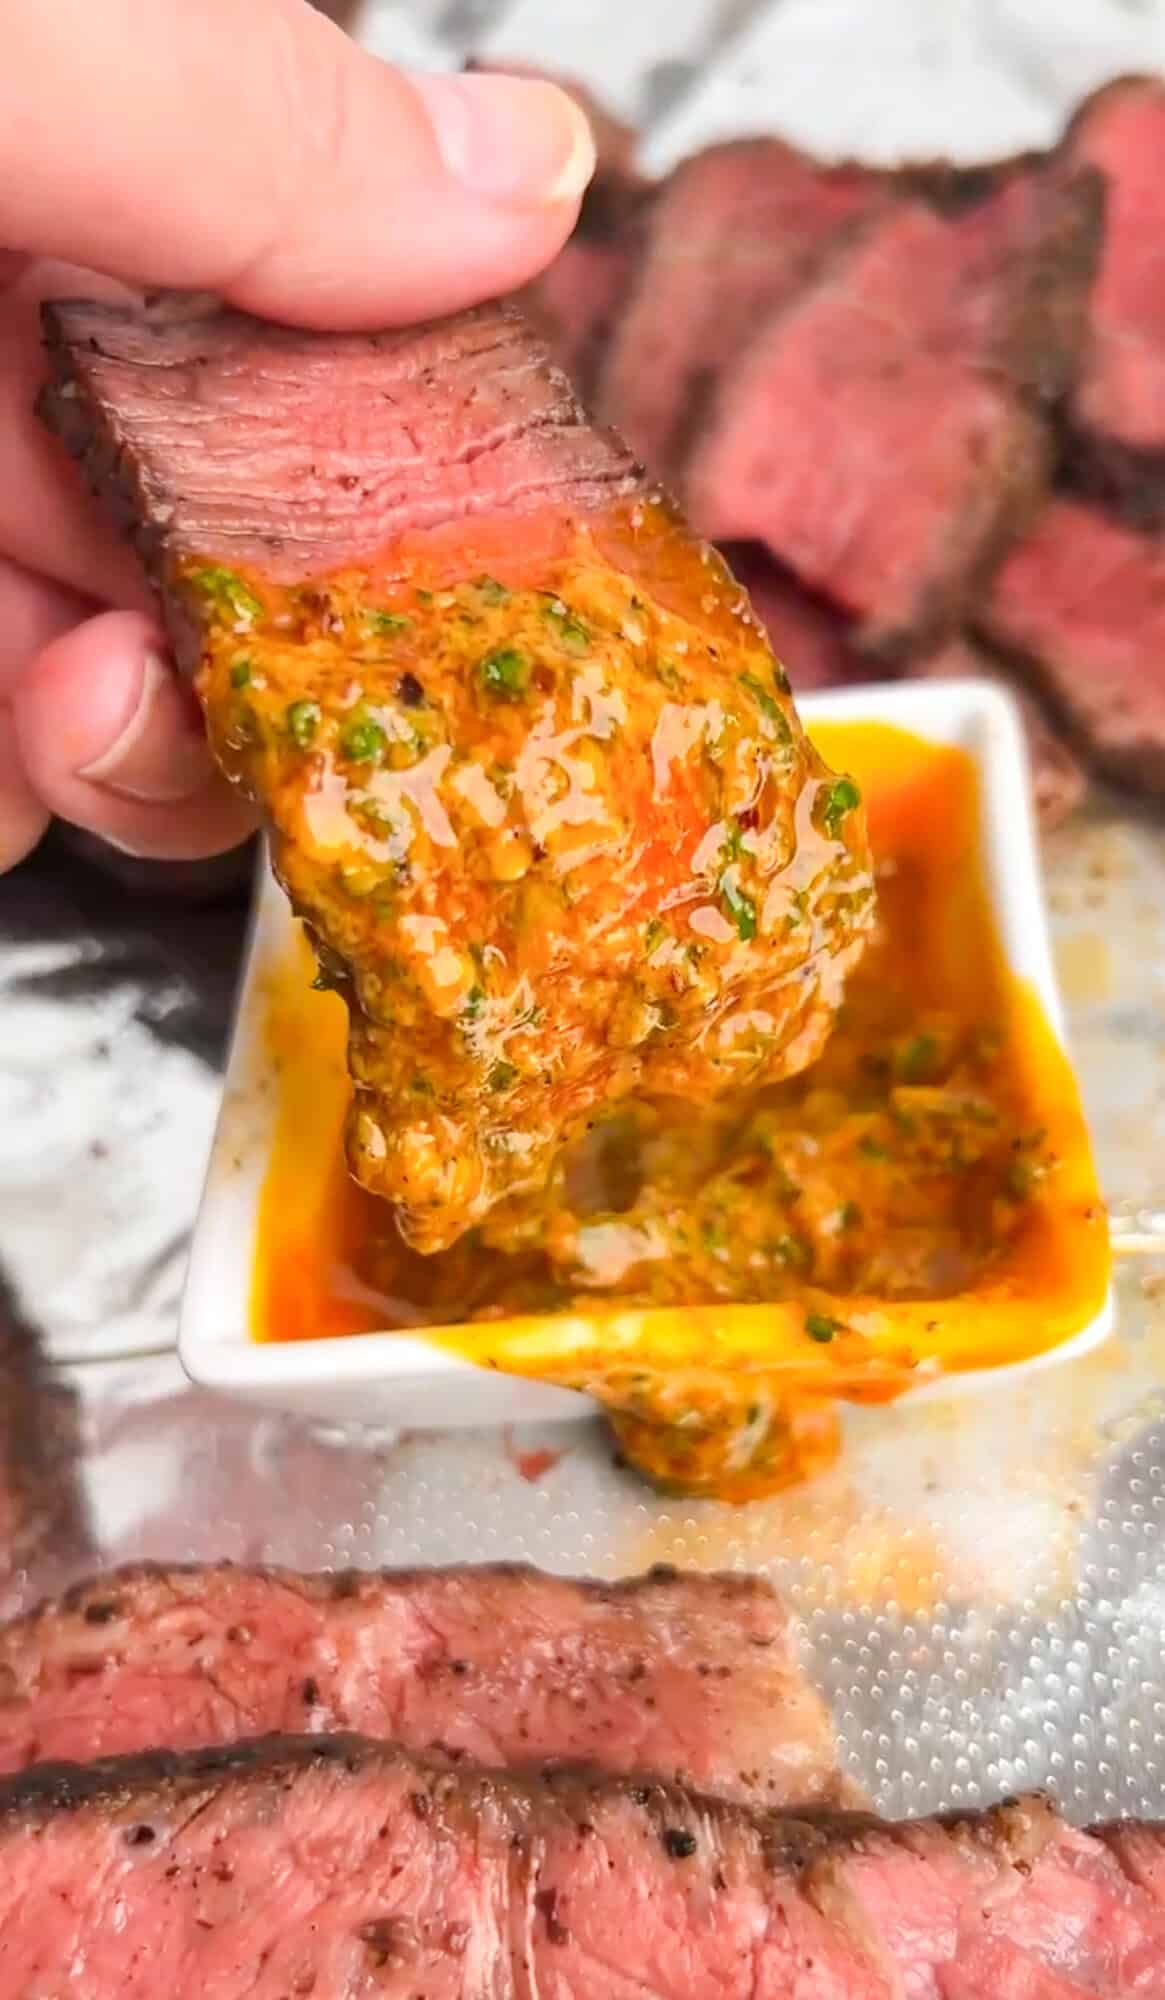
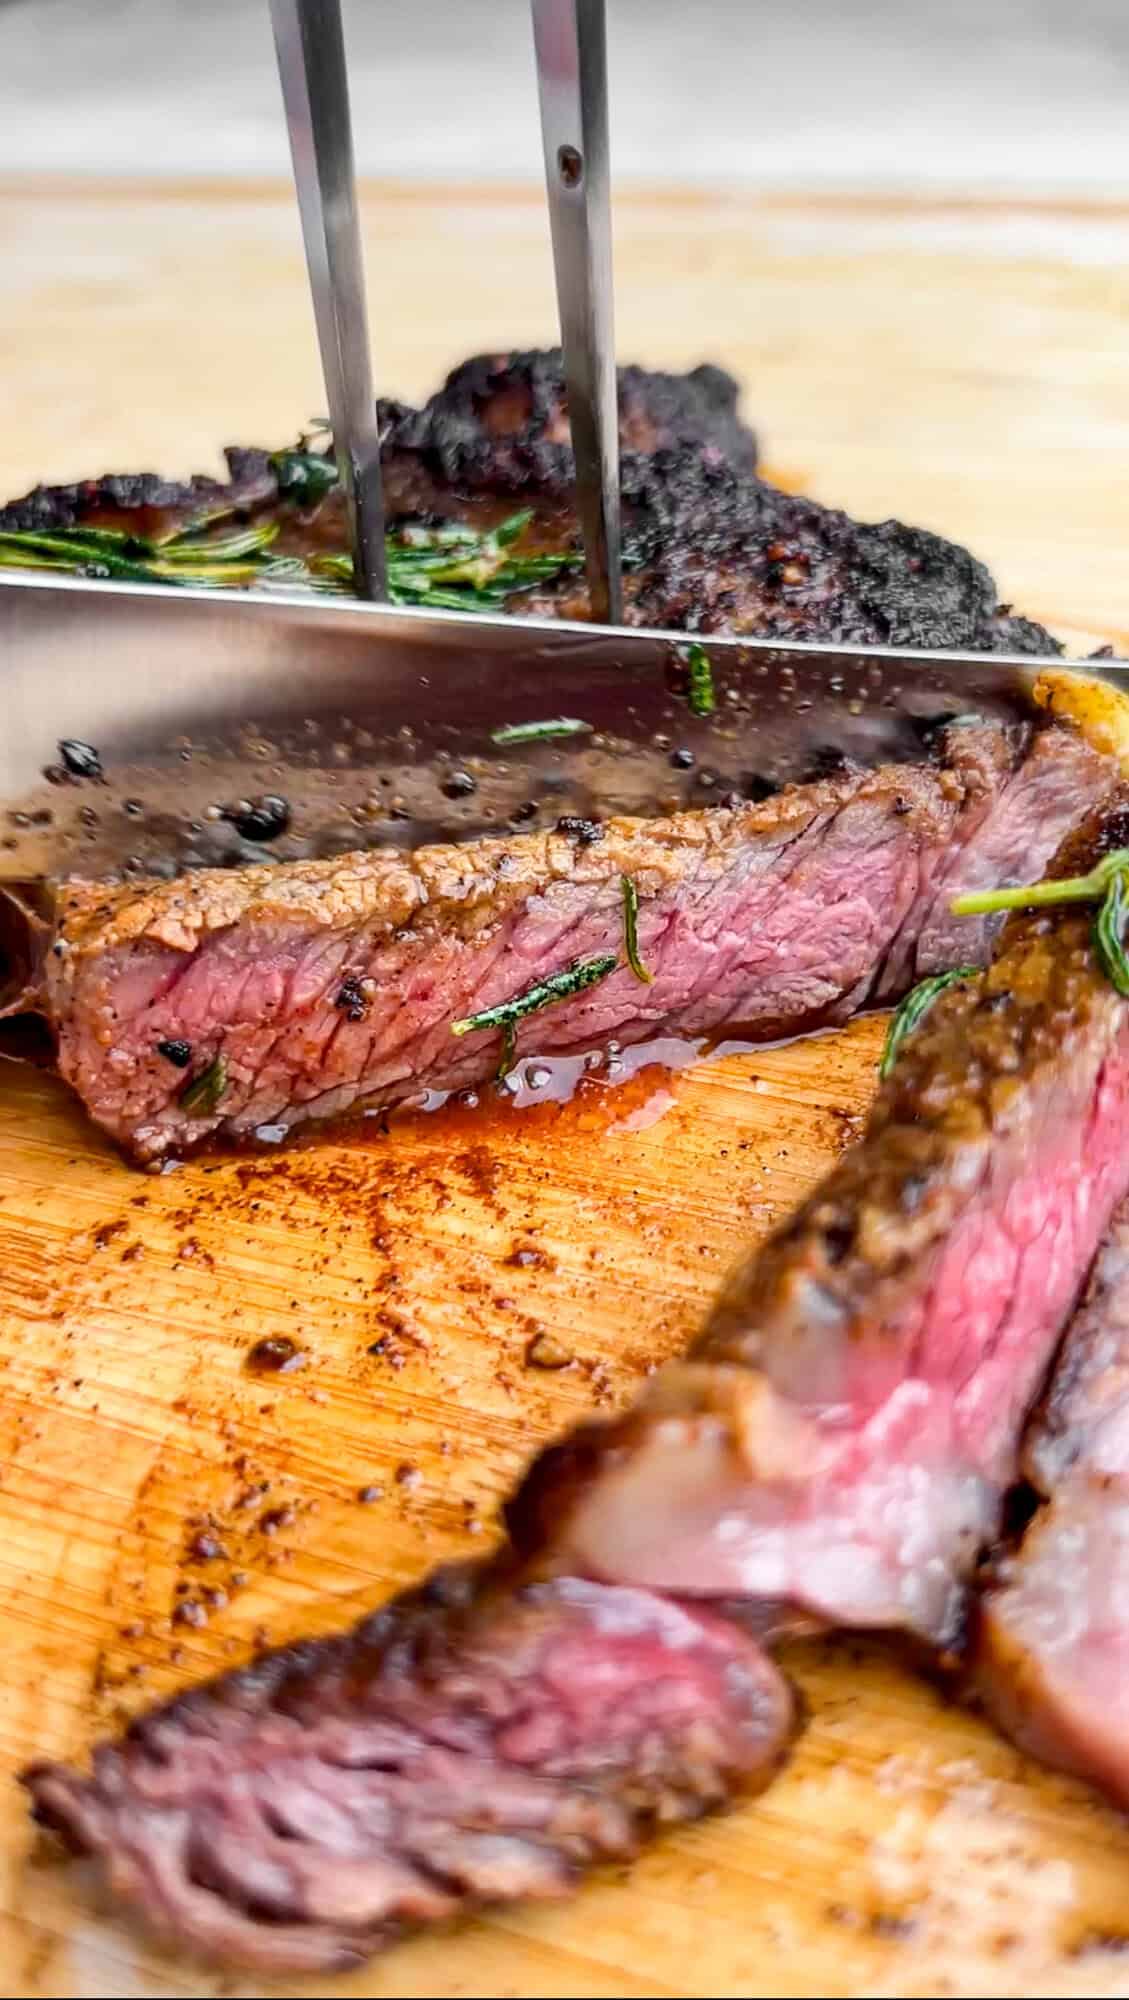
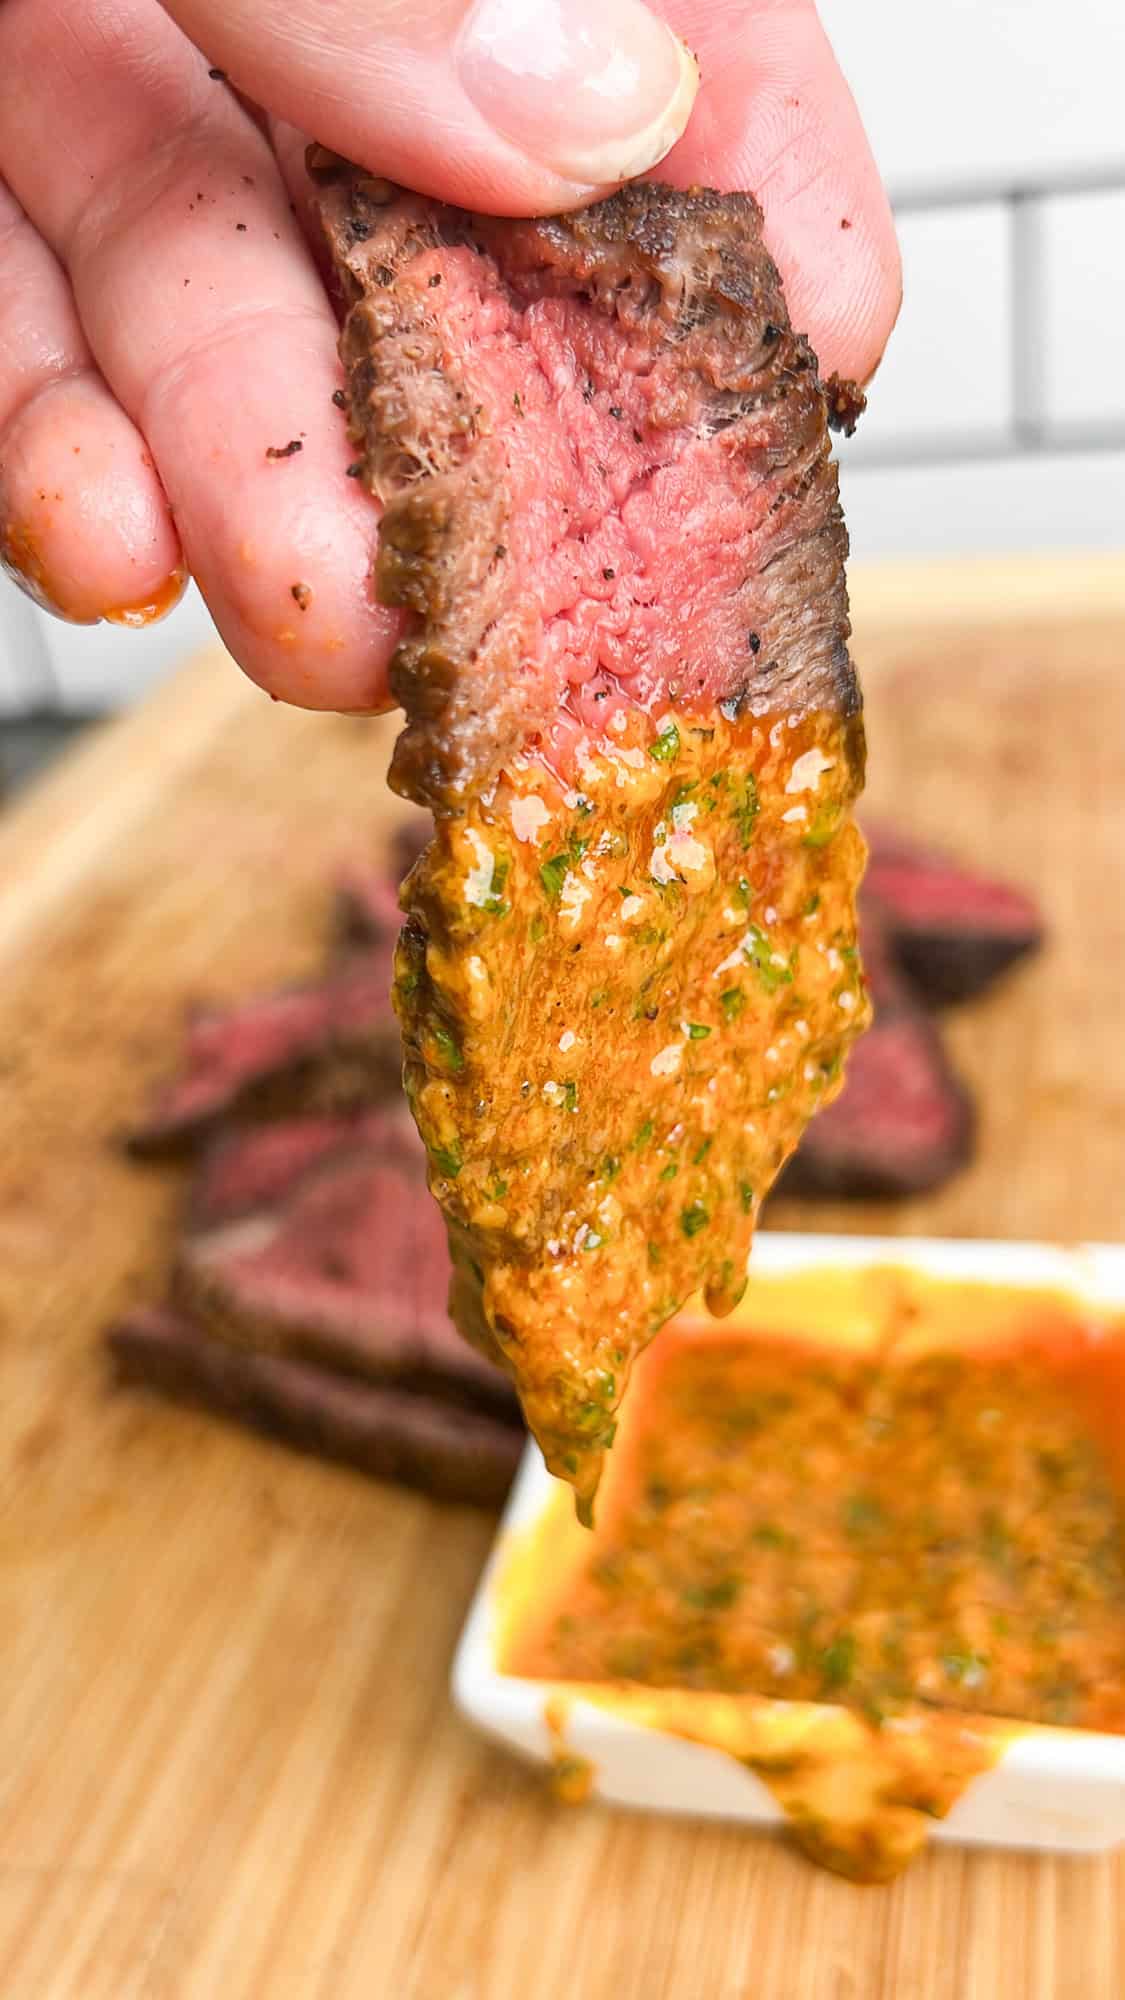
Let’s make Cowboy Butter Steak. Tender steak is seasoned to perfection, grilled or seared indoors in a cast iron skillet and the best part – it’s paired with this herby, tangy cowboy butter for dipping or melting over your steak.
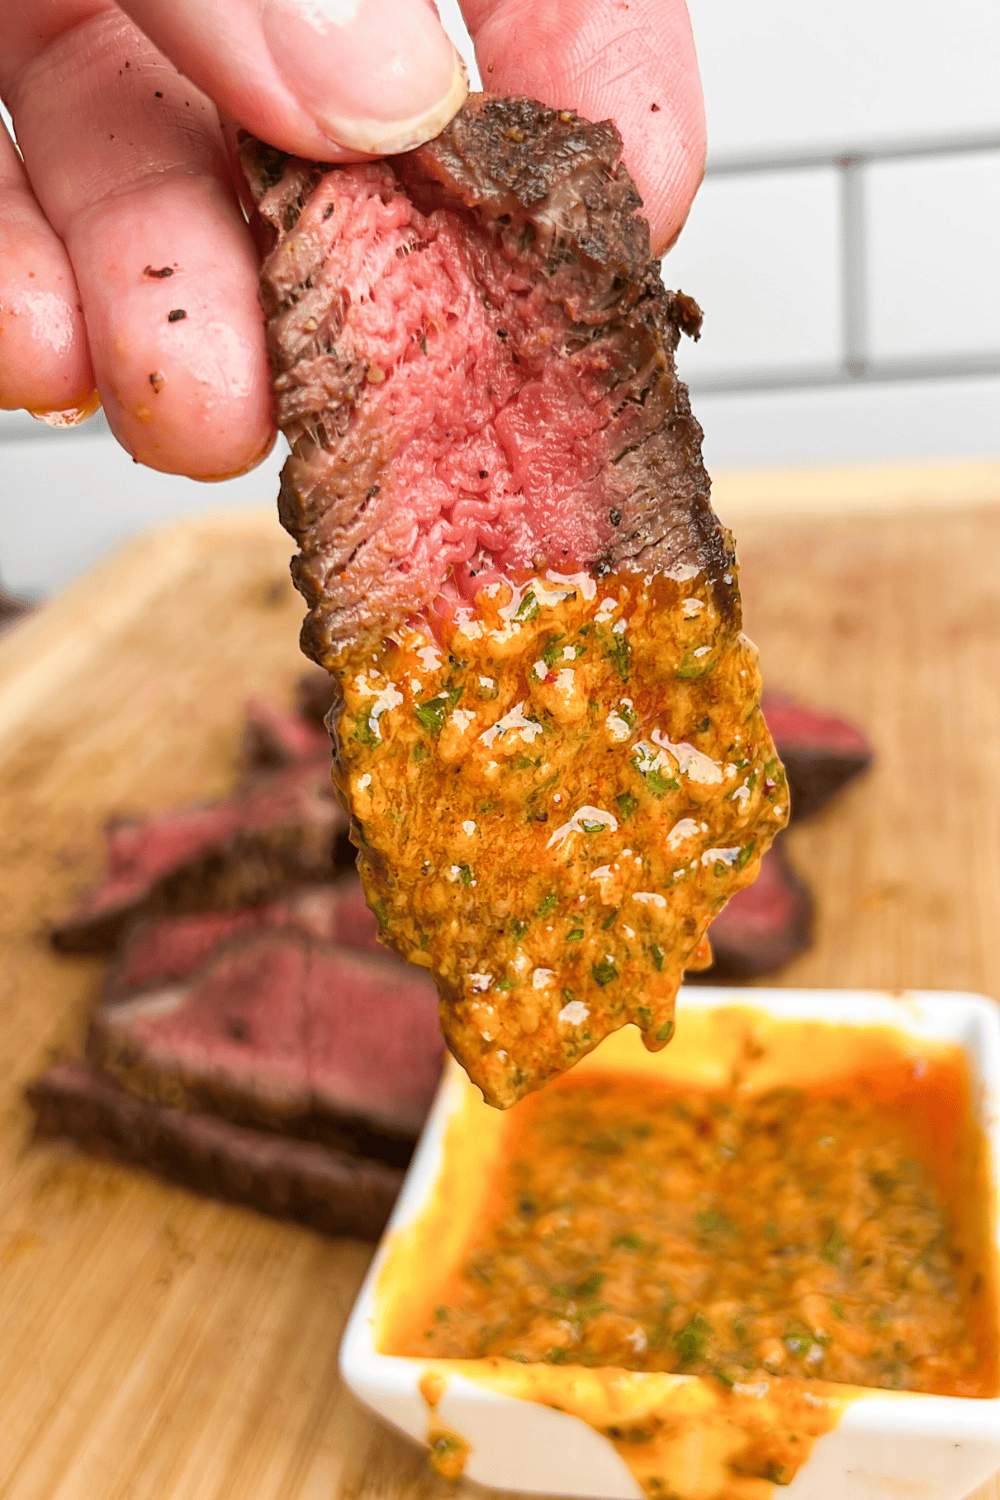
Cowboy butter has become even more popular in the recent year or so, including my Cowboy Butter Steak Sliders that went super viral last year. I first hear about cowboy butter from the Pioneer Woman back in 2015 although her version was simply garlic, parsley and red pepper added to butter.
I’ve created my own version adding lemon juice and zest, dijon mustard, red pepper or cayenne, green onions and parsley, garlic and dried thyme. It’s robust, herbaceous and tangy with a kick of heat. And so delicious you’ll want to smother it over everything.
If that sounds delicious, be sure to also check out my Cowboy Butter Chicken Tenders, and my Cowboy Butter Steak and Potatoes.
Here are all the elements to make this easily bring this cowboy butter steak recipe together:
Steak – a quality, tender cut such as ribeye or tenderloin filet. Starting with a quality cut is the most important step in this recipe being a success. Costco has great options!
Butter – I love using Kerrygold or similar Ireland/European butter. But you can use regular butter as well.
Herbs – dried thyme, fresh parsley, fresh chives or green onions.
Garlic – freshly minced garlic is essential, skip the jarred alternative for this recipe.
Seasonings – red pepper flakes or cayenne pepper, freshly cracked pepper and paprika
Dijon Mustard – a little dijon adds a tangy sharpness that’s just enough to balance out the creamy decadence of the butter.
Lemon – adds a tangy acidity and lemon flavor from the zest and juice.
Avocado Oil – if you’ll be cooking the steak in a cast iron skillet, be sure to use avocado oil instead of olive oil for the high smoke point.
In just a few easy steps you can be enjoying a tender, juicy steak with melty cowboy butter. In these instructions I share a cooking method for grilling or for making it in a cast iron skillet indoors.
Make the Cowboy Butter
Add softened butter to a bowl with all the cowboy butter ingredients. Heat in the microwave for 10 seconds until it’s barely melted. Don’t fully melt or the butter can break/separate.
If you want to make a firm compound butter, skip the melting part. Instead, place the softened cowboy butter onto plastic wrap and roll it into a log. Then refrigerate until firms up. When you’re ready to use it, slice and add to the top of the warm steak.
Cook the Steak (Grill Method)
Preheat grill to medium-high with an indirect heat zone. Remove steaks from the fridge and allow them to rest at room temp for 30 minutes.
Cook steaks over direct heat for about 2-3 minutes per side, being sure not to char them. If high flames appear, move them to indirect heat until flame subsides.
Brush both sides with cowboy butter as they cook. After 5-6 minutes of total cook time, move the steaks to indirect heat until desired temperature is reached.
Remove and allow steaks to rest on a plate with tented foil for 10 minutes before slicing. Serve with cowboy butter on top or on the side.
Cook the Steak (Cast Iron Skillet Method)
Heat 1-2 tbsp avocado oil in a cast iron skillet over medium-high heat until it’s shimmering.
Place the seasoned steaks in the skillet and cook for 4 minutes on one side without touching. Use tongs to flip the steaks and cook for 4 more minutes on the other side.
Reduce heat to medium-low, add a few spoonfuls of cowboy butter. As the butter melts, tilt the skillet and spoon the butter over the steaks repeatedly until the steaks reach desired doneness.
Transfer the steaks to a plate or cutting board, and allow them to rest for 10 minutes before slicing. Serve with cowboy butter on top or on the side.
Make it ahead – you can easily prepare the cowboy butter ahead, cover tightly and store in the fridge for up to 1 week. When ready to use you can warm it in the microwave in 5-7 second bursts until it’s softened and partially melted.
Create a Compound Butter – instead of a melted butter sauce/dip, you can turn this into a compound butter instead for slicing and topping the steaks.
Use it for Chicken – I love how delicious this flavorful butter is on chicken. It pairs perfectly on poultry. Whether it’s grilled chicken or chicken tenders you’ll love this on chicken.
Use it on Veggies and Side Dishes – use cowboy butter on your mashed potatoes instead of butter, or to sautéed asparagus or green beans, or even Brussels sprouts and pan fried sweet corn.

*Steak Temp: keep in mind that the internal temperature will continue to rise about 5 degrees after you remove from heat and the steaks rest.
*Internal temperature chart:Rare: 120–125°FMedium rare: 130–135°FMedium: 140–145°FMedium well: 150–155°FWell done: 160–165°F
Homemade Blackened Seasoning2 tablespoons smoked paprika regular paprika works too1 tablespoon cayenne pepper1 tablespoon onion powder2 teaspoon garlic powder1 teaspoon ground black pepper1 teaspoon salt1/2 teaspoon dried thyme1/2 teaspoon dried oregano