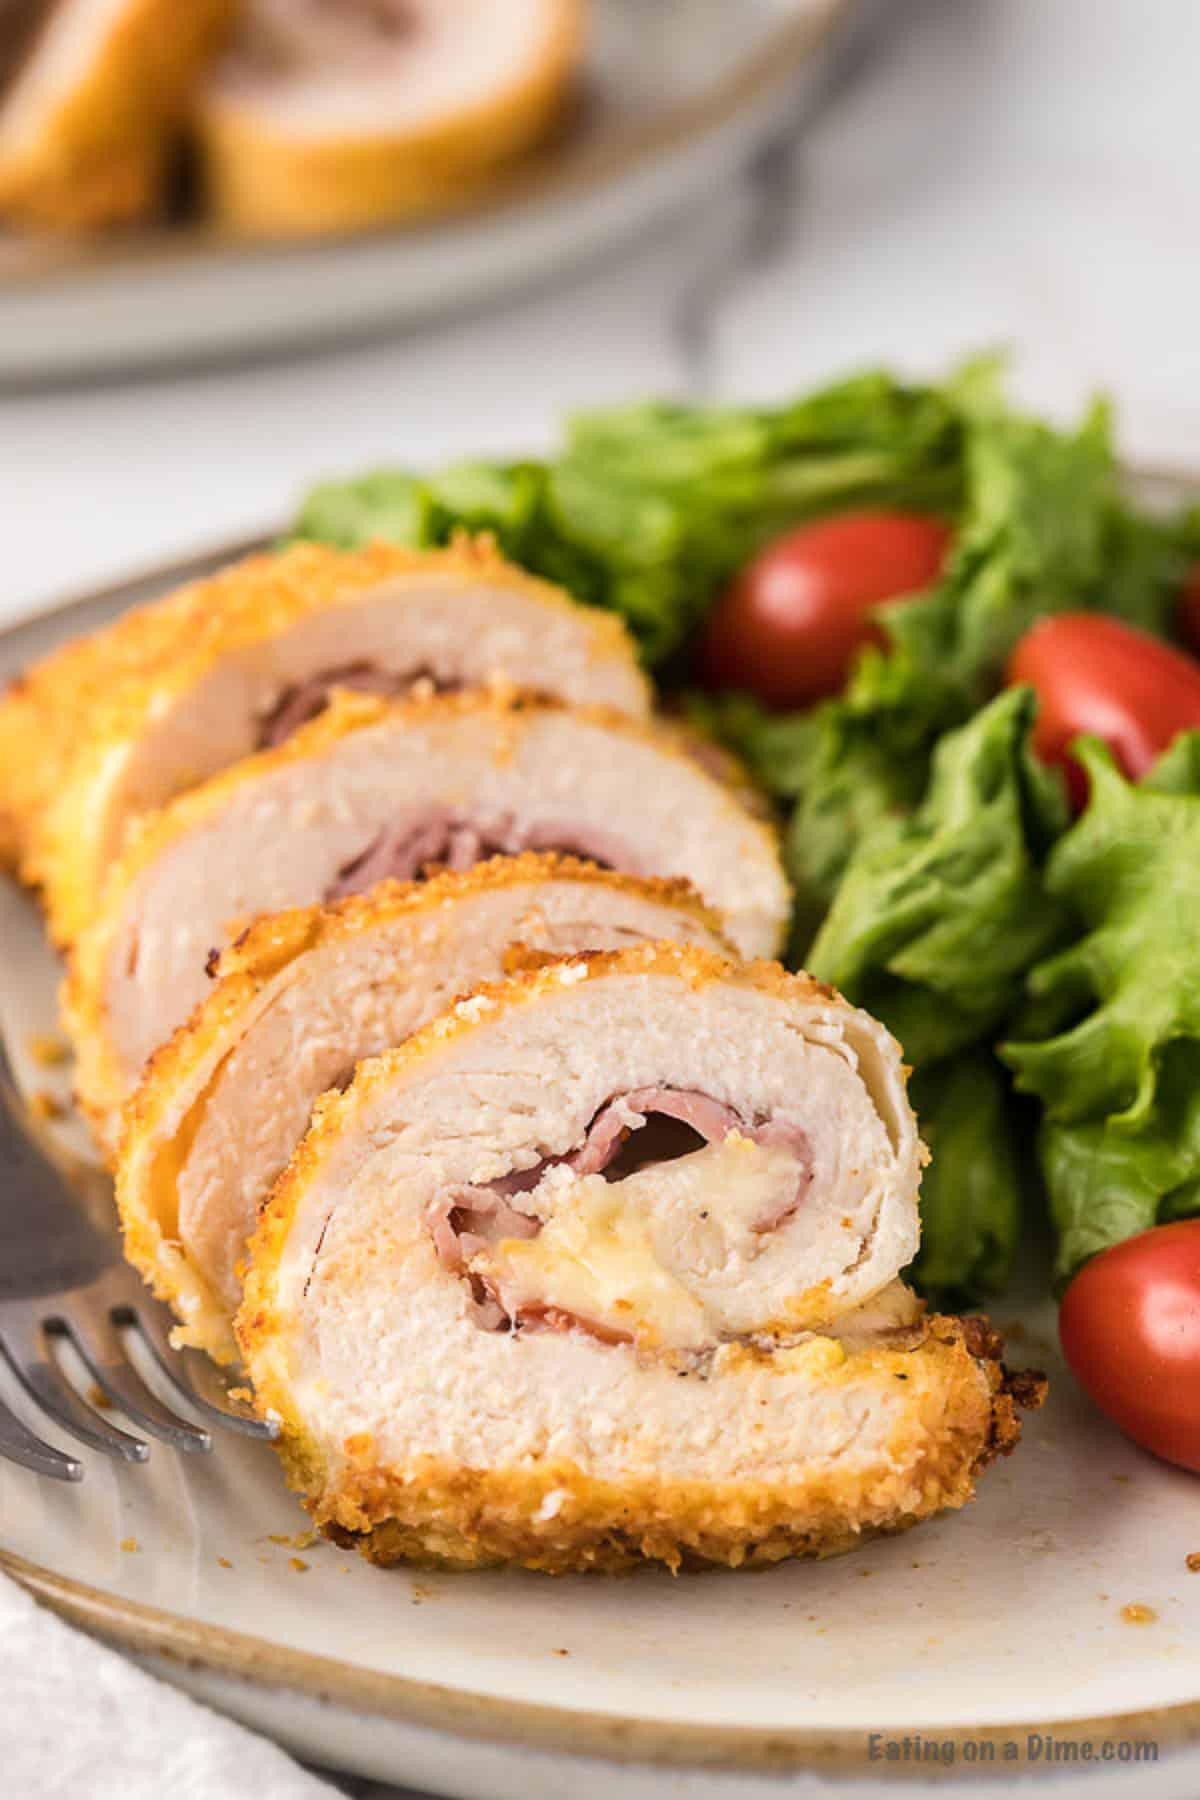
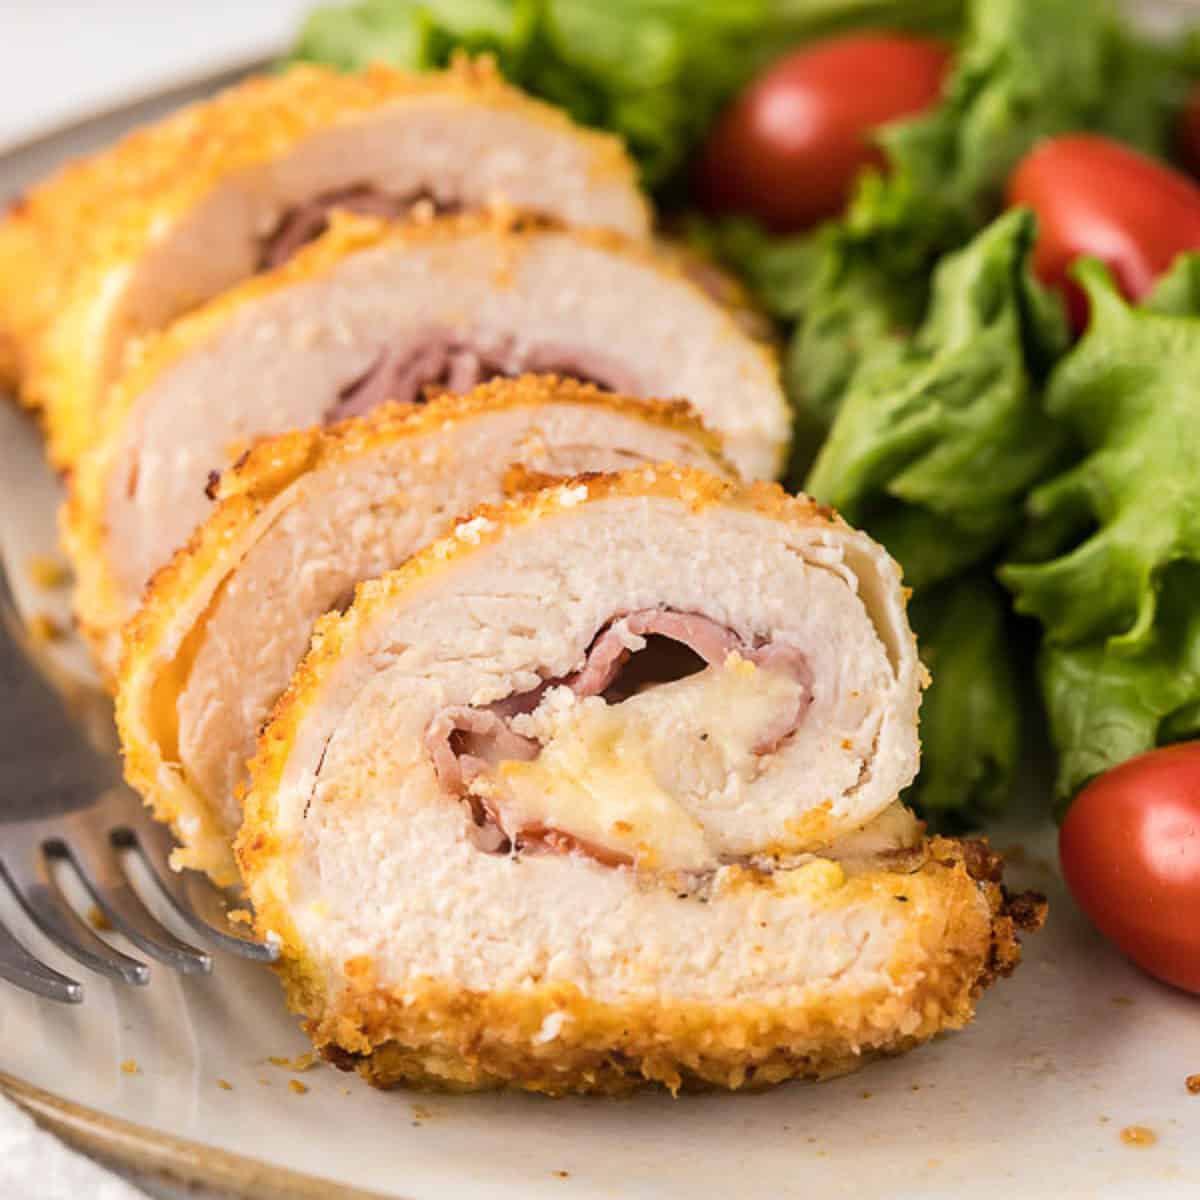
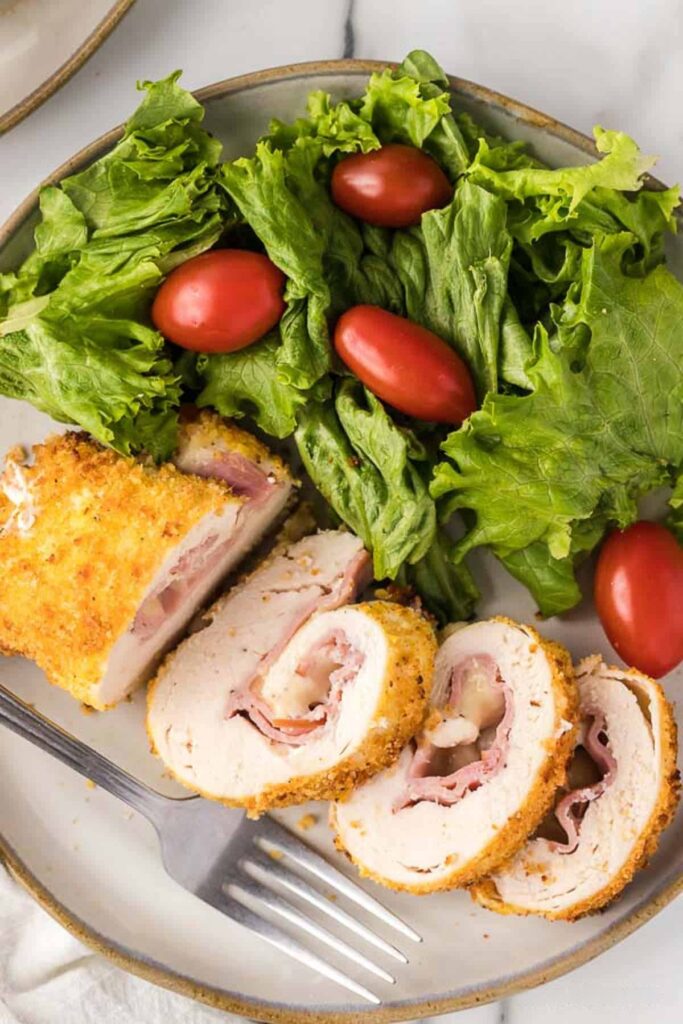
Air Fryer Chicken Cordon Bleu Recipe is a great way to jazz up a chicken breast. The chicken has layers of ham and swiss cheese and is air fried to perfection.
Air Fryer Chicken Cordon Bleu Recipe is a family favorite. It is a great way to take thinly sliced chicken and turn it into an amazing meal. This Blue Ribbon meal is stuffed chicken breast with thinly sliced ham, swiss cheese and topped with bread crumbs.
We love that this meal can be served for as a fancy meal or just a weeknight dinner. My kids love it and served with a side salad makes this meal complete. Makes sure to check out these other chicken cordon blue recipes – Crock Pot Chicken Cordon Bleu and Instant Pot Chicken Cordon Bleu.
What is Chicken Cordon Bleu?
The reason that we call Chicken Cordon Bleu because Cordon bleu translate to Blue Ribbon Chicken. We couldn’t agree more. Air Fryer chicken is so tender and come out so flavorful and juicy.
We love that this chicken can be made into your own recipe. It is traditionally made with slice of ham and swiss cheese, but we have gotten creative with this recipe and used different cheeses and seasoning.
Ingredients:
Scroll to the bottom of the post for the full recipe in the recipe card.
Recipe Tips
Chicken – Make sure your pound the chicken about the same size so that it cooks evenly.
Meat Thermometer – To make sure you chicken is full cooked, make sure to use an instant-read thermometer to check internal temperature.
What to Serve with Chicken Cordon Bleu
When we serve Chicken Cordon Bleu since it is a hearty full meal, we tried to stick to sides that are light. Here are some of our favorites.
Air Fryer Chicken Cordon Bleu is a great way to jazz up a chicken. It has layers of ham and swiss cheese and is air fried to perfection.
Ingredients
Scale
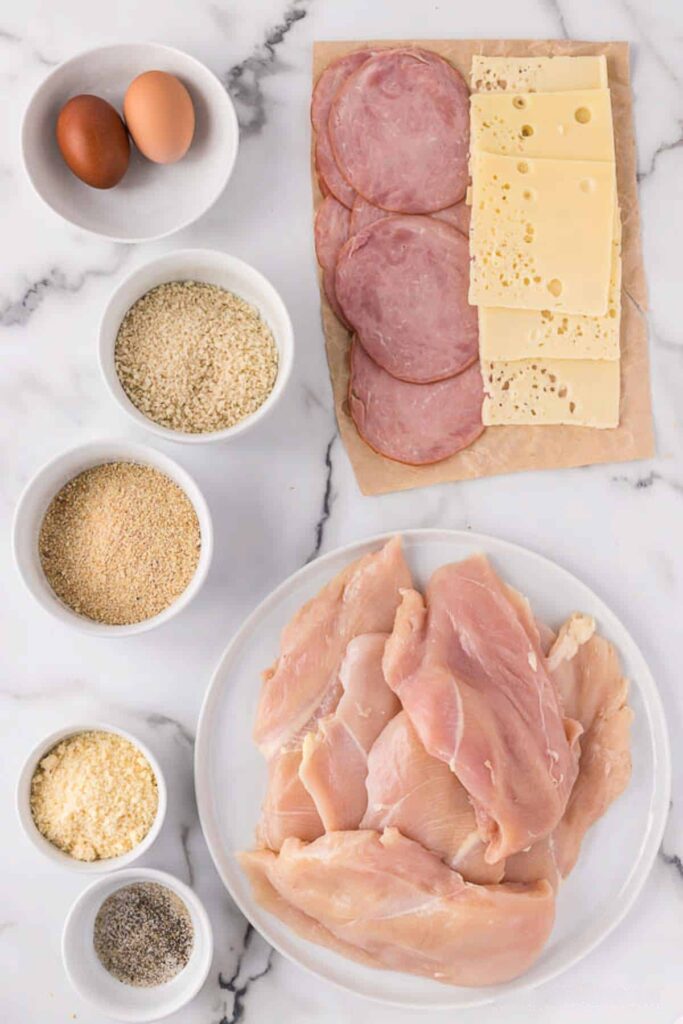
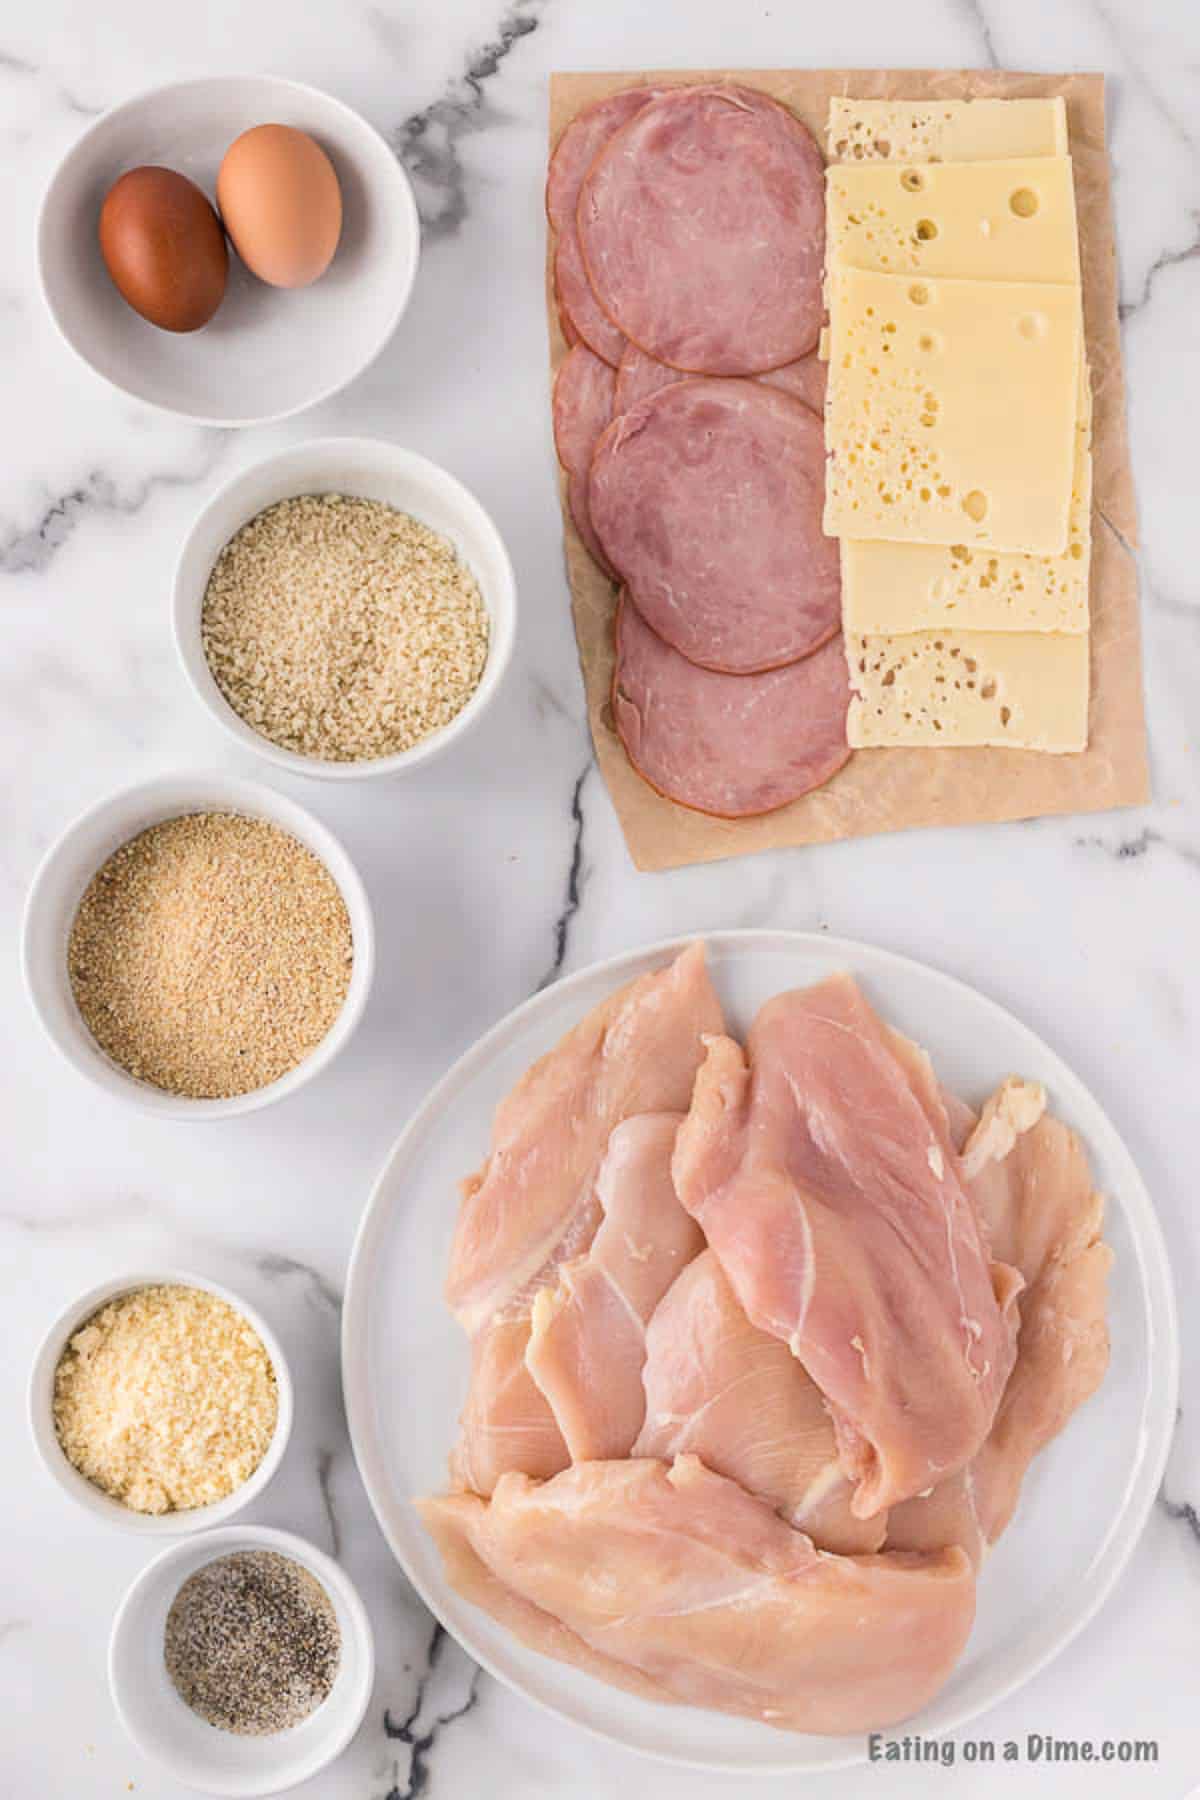
6Boneless Skinless Chicken Breasts
6thin Slices of Ham
6SlicesSwiss cheese
1/2tspSalt
1/2tspPepper
1/2cupBreadcrumbs
1/2cupPanko Breadcrumbs
1/4cupGrated Parmesan Cheese
2large eggs
Instructions
Preheat the oven to 400 degrees F and spray a 9X13 baking pan or large baking sheet with a non stick cooking spray.
Gently pound the chicken breast until it’s 1/4-1/2” thick. I place plastic wrap on top of the chicken and beat with a wooden mallet or rolling pin. Be careful not to over beat as the chicken will tear.
Then lay the chicken on a work surface and season it with salt and pepper.
Top each chicken with a slice of the ham and a slice of the cheese. Roll the chicken and sit them aside seam down.
Then place the eggs in a shallow bowl and whisk them.
Then stir together the breadcrumbs and Parmesan Cheese together in a separate shallow bowl.
Dip each piece of chicken into the eggs to coat. Then dip the chicken into the breadcrumbs mixture to fully coat it. Pat the breadcrumbs into the chicken to make sure that it sticks to all the sides of the chicken. Then place the chicken in the baking pan.
Spray all sides of the chicken with oil.
Preheat the air fryer to 400 degrees F. If your air fryer does not have a preheat option, then let it run at 400 degrees F for 5 minutes to warm it up.
Cook the chicken for 12-15 minutes, flipping it halfway through until the chicken reaches an internal temperature of 160 degrees F. Make sure to only check the chicken layer when checking for the doneness of the chicken. You will likely need to cook the chicken in batches as you do not want them to overlap or touch in the air fryer.
Then let the chicken rest for 5 minutes and then it’s ready to enjoy!
This post is all about how to make air fried Ranch Garlic Parmesan Chicken Skewers; juicy chicken pieces that are basted in the most delectable garlic Parmesan butter sauce. This is an herby spin on my viral garlic parmesan chicken skewers.
Looking to steal the spotlight at your next gathering? These garlic parmesan ranch chicken skewers are the perfect party appetizer or equally amazing for an easy weekday dinner and they’re bound to be one of the best chicken dishes you’ve ever had!
Basted throughout the cooking process, these garlic parmesan chicken skewers are so tender they just fall right off the skewers.
After my Garlic Parmesan Chicken Skewers and Hot Lemon Pepper Chicken Skewers went crazy on social media, I had to give ya’ll with another incredible flavor using the same easy and fail-proof method. This is a spin on my Garlic Parmesan Chicken Skewers. By adding some ranch seasoning and dill, we truly kick up these succulent skewers up another notch.
You can easily make these Ranch Garlic Parmesan Chicken Skewers in the air fryer (method used for the photos) or you can bake or grill them. I paired my skewers over warm rice and added some of the leftover garlic-parm butter into the rice for the most incredible meal.
This recipe post is all about how to make air fried Garlic Parmesan Ranch Chicken Skewers.
Key Ingredients in Ranch Garlic Parmesan Chicken Skewers
Chicken Tenders – you can use breast or thighs but I prefer how moist tenders are.
Butter – one stick of butter is used.
Garlic – lots of garlic is used, about 8-10 cloves
Parmesan – grated parm is the best for this recipe as it easily incorporates in the butter sauce.
Hot sauce – just a tablespoon to give this chicken a little kick without adding too much heat.
Ranch Seasoning – a few tablespoons of dry ranch seasoning is added to the chicken dry rub and to the garlic butter sauce.
Seasonings – paprika, garlic powder, onion powder, salt, pepper, and red pepper flakes
Fresh Parsley – the fresh parsley adds the perfect herbiness to balance the savory butter sauce.
Don’t forget the wooden skewers!
How to Make Ranch Garlic Parmesan Chicken Skewers
Step 1:Soak wooden skewers in water for at least 30 minutes.
Combine spice mixture in a small bowl and set aside. Prep your chicken by cutting in 3″ pieces. Place them in a bowl and toss in olive oil and the spices, coating well on all sides.
Step 2:Pack the chicken onto each skewer, making sure they are tightly packed with no space in between to ensure maximum juiciness. If needed, snip the top few inches of the skewers to fit in the air fryer after the chicken is skewered
Step 3: Make the garlic parmesan sauce by combining all ingredients into a saucepan over low heat. Scoop out 1/3 of the sauce and use that for basting the chicken as it cooks. Reserve the remaining sauce for basting the cooked chicken so you don’t cross contaminate.
Step 3:Cook 2-3 skewers at a time in an air fryer at 400 degrees for 5 minutes. Remove and flip the skewers and baste with sauce, returning to cook an additional 2 minutes at 400 degrees.
Baste with more sauce and cook another 5-6 minutes or until the internal temp reaches 165 degrees. A total cook time of 12-14 minutes. Once they are finished cooking, hit them with a final pass of the garlic sauce (the reserved sauce) and sprinkle with some parmesan and serve.
There are a few reasons that the garlic parmesan butter sauce might break, one of the most common reasons is the sauce getting too hot. Luckily, there is an easy way to fix this.
Simply adding 1-2 tablespoons of softened butter into the sauce and whisking gently until it emulsifies back into a soft and smooth slightly-melted paste.
Don’t Have an Air Fryer? Try These Methods:
Oven Preparation:
Preheat oven to 450 degrees. Place chicken skewers on a rimmed baking sheet lined with foil and cook for 14 minutes, flipping half way through and basting with butter a few times throughout the baking process.
Switch the oven to broil and cook an additional 2 minutes so get the tops golden brown. Remove from the oven and baste it one last time with the butter sauce and sprinkle with leftover parmesan.
Grill Preparation:
Preheat your grill to medium-high. Place the prepared skewers over direct heat and cook each side for 5-6 minutes each, basting with butter throughout the cooking process.
Remove from the grill and baste it one last time with the butter sauce and sprinkle with leftover parmesan.
I hope you enjoy this easy Air Fryer recipe for Ranch Garlic Parmesan Chicken Skewers. Be sure to comment below with any questions or feedback! If you make these or any other recipes, don’t forget to tag me on IG @BadBatchBaking to be featured on my story. Seeing your recreations makes my day!
A ranch herby version of my tender fall-apart chicken skewers. These are basted with a homemade ranch garlic parmesan sauce throughout the cooking process and easily prepared in an air fryer.
Enjoy as an appetizer or serve over a bed of rice and veggies spread with leftover garlic parmesan butter
**SEE NOTES for oven or grill instructions**
Ingredients
Scale
2lbschicken tendersthighs or breast
2tbspolive oil
Garlic Parmesan Butter Sauce
1stick butter
8–10clovesgarlicminced
1/2cupparmesangrated
1tbsphot sauce more if desired
2teaspoonsred pepper flakes
1/3cupfresh parsleyminced
1tablespoondry ranch seasoning
1teaspoondried dill
1/2teaspoononion powder
Chicken Seasonings
1.5tablespoondry ranch seasoning
1teaspoondried dill
2teaspoonspaprika
1teaspoongarlic powder
1teaspoononion powder
1/2teaspoonsalt
1/2teaspoonpepper
Instructions
Prep and Skewer Chicken
Before you start, make sure to soak your wooden skewers in water for at least 30 minutes.
Start by combining your chicken seasoning mixture in a small bowl and set aside. Prep your chicken by cutting in 3″ pieces. Place them in a large bowl or ziptop bag and toss in olive oil and the spices, coating well on all sides.
Pack the chicken onto each skewer, making sure they are tightly packed with no space in between to ensure maximum juiciness. If needed, snip the top few inches of the skewers to fit in the air fryer after the chicken is skewered.
Make the Garlic Parmesan Butter Sauce
Add the butter and garlic in a microwave-safe bowl and heat until partially melted. Then add in red pepper flakes, hot sauce, seasonings and parmesan. Whisk together until combined. (If sauce separates, add 1-2 tablespoons of softened butter and stir to re-emulsify.)
Scoop out 1/3 of the sauce and use that for basting the par-cooked chicken. Reserve the remaining sauce for basting the cooked chicken so you don’t cross contaminate. Be sure to wash your basting brush in between.
Cook The Chicken
Cook 2-3 skewers at a time. Place in an air fryer and cook at 400 degrees for 5 minutes. Remove and flip the skewers, baste with sauce, return to cook an additional 2 minutes at 400 degrees.
Flip them back, baste with more sauce and cook another 5-6 minutes or until the internal temp reaches 165 degrees. Total cook time of 12-14 minutes. This time will vary based on your air fryer.
Once they are finished cooking, hit them with a final pass of the garlic sauce (the clean reserved sauce) and sprinkle with some extra parmesan and serve.
Notes
Oven Preparation:Preheat oven to 450 degrees. Place chicken skewers on a rimmed baking sheet lined with foil and cook for 14 minutes, flipping half way through and basting with butter a few times throughout the baking process. Switch the oven to broil and cook an additional 2 minutes so get the tops golden brown. Remove from the oven and baste it one last time with the butter sauce and sprinkle with leftover parmesan.
Grill Preparation:Preheat your grill to medium-high. Place the prepared skewers over direct heat and cook each side for 5-6 minutes each, basting with butter throughout the cooking process. Remove from the grill and baste it one last time with the butter sauce and sprinkle with leftover parmesan.
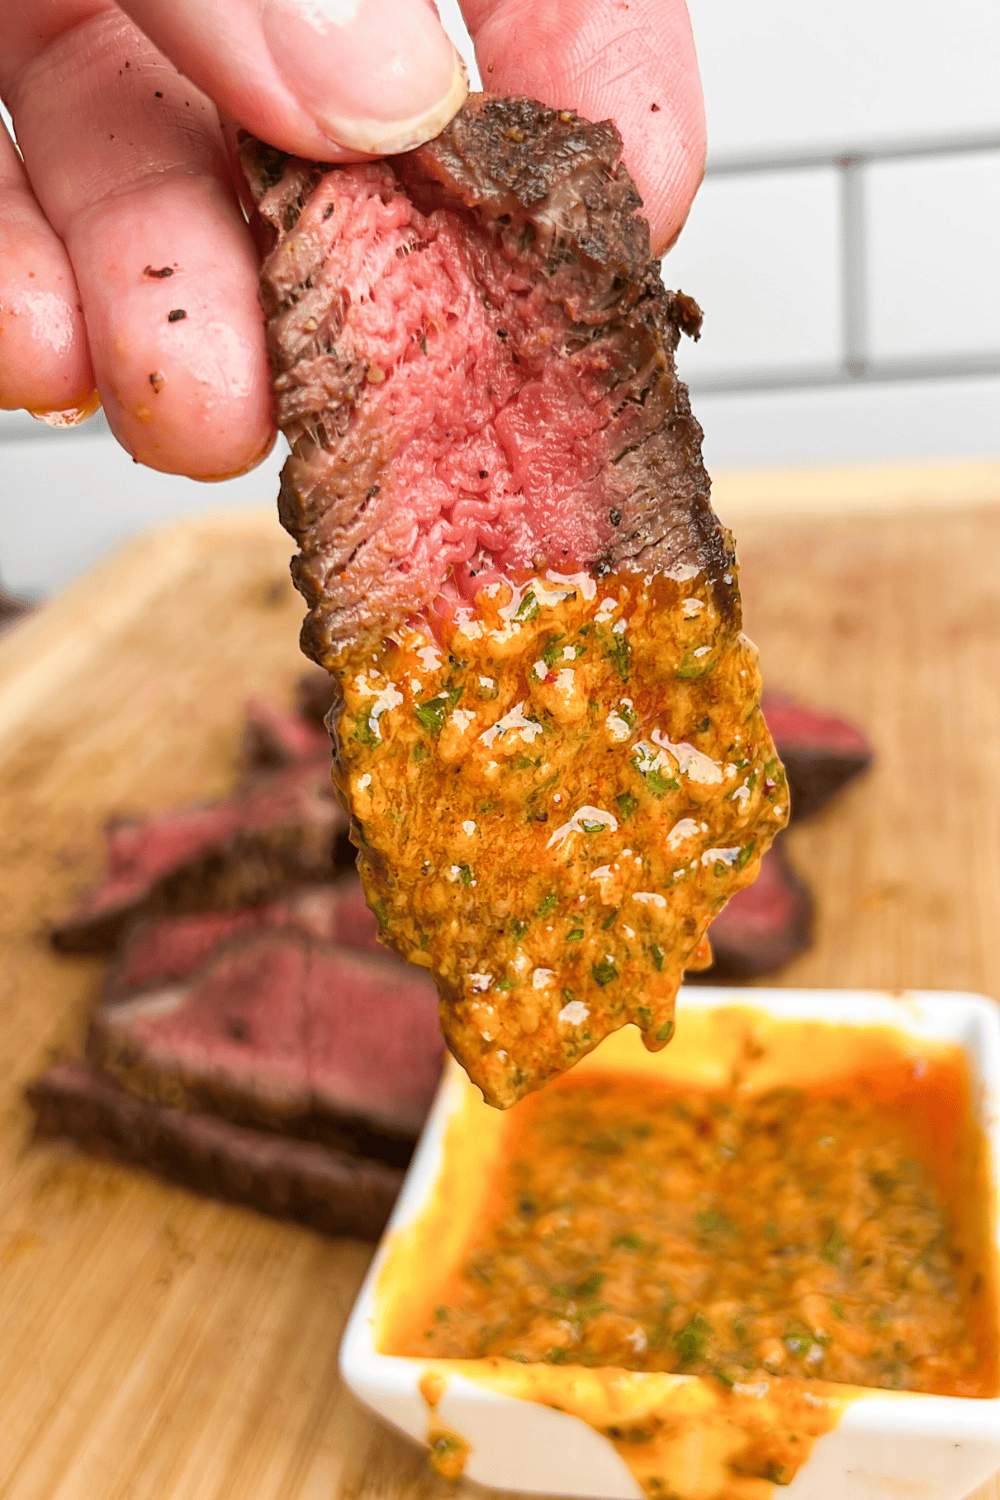
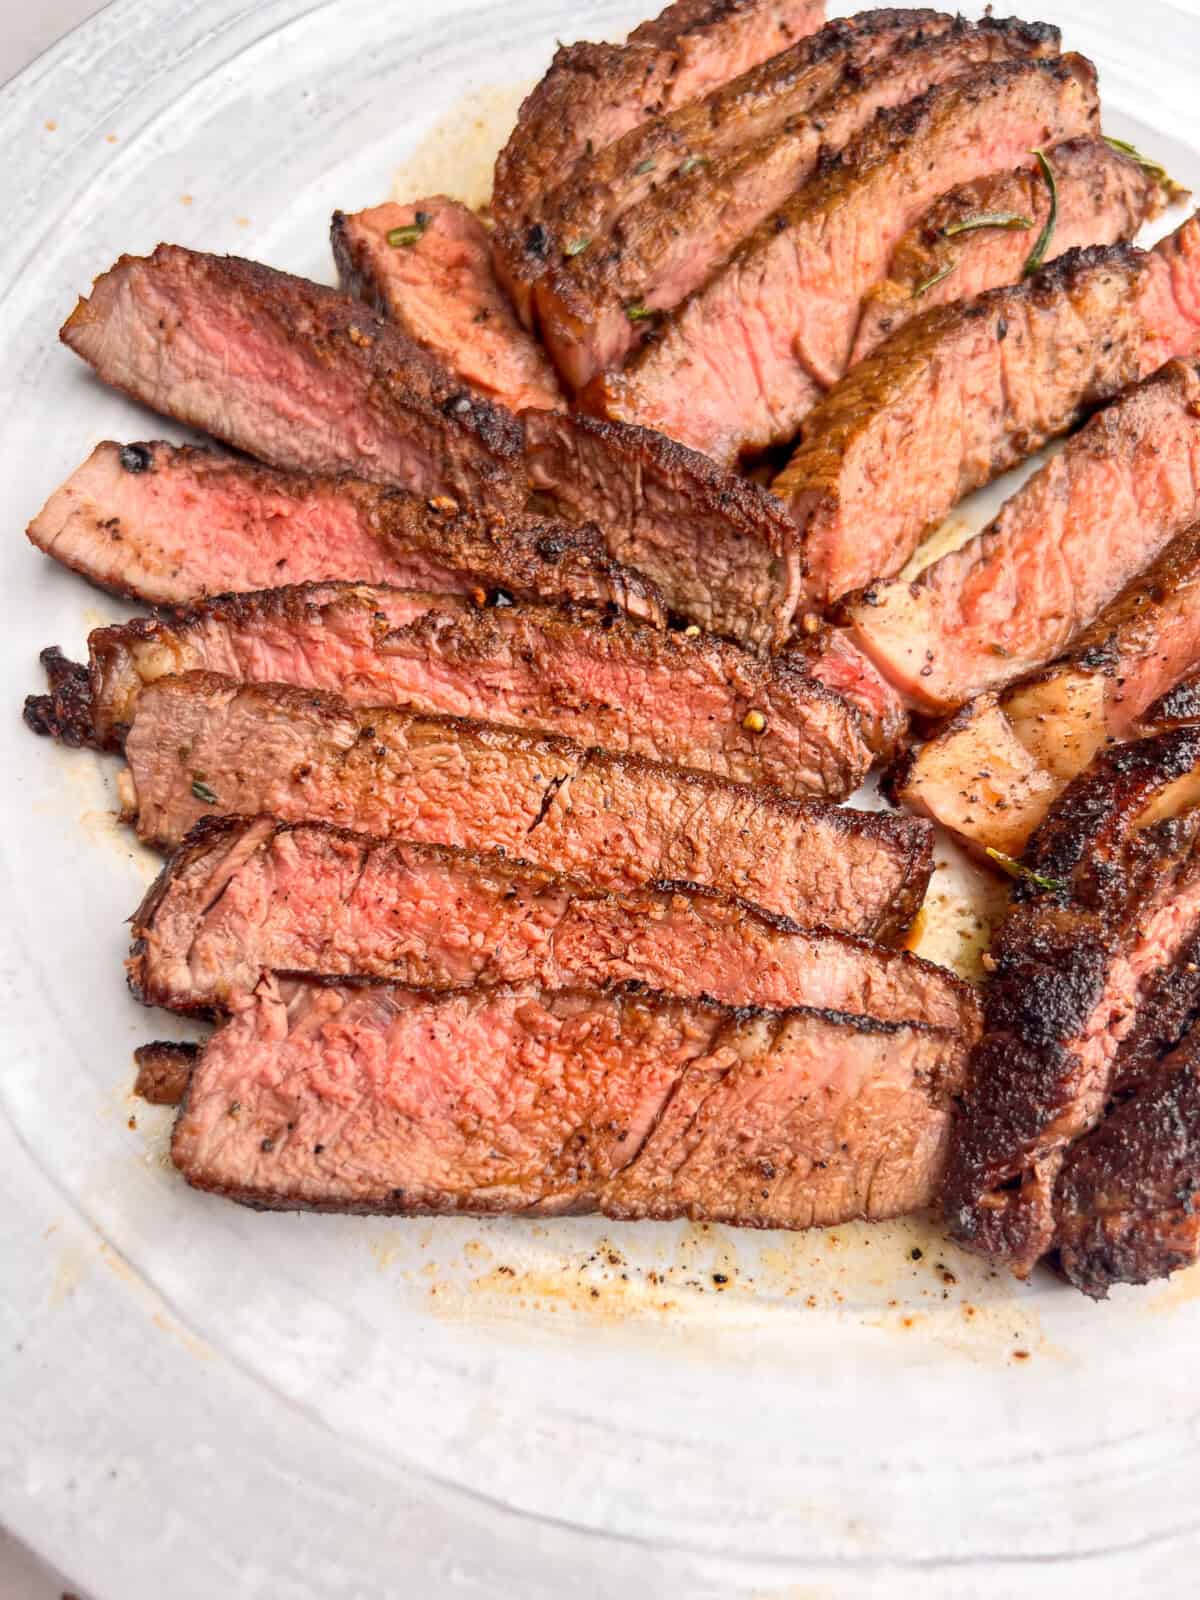
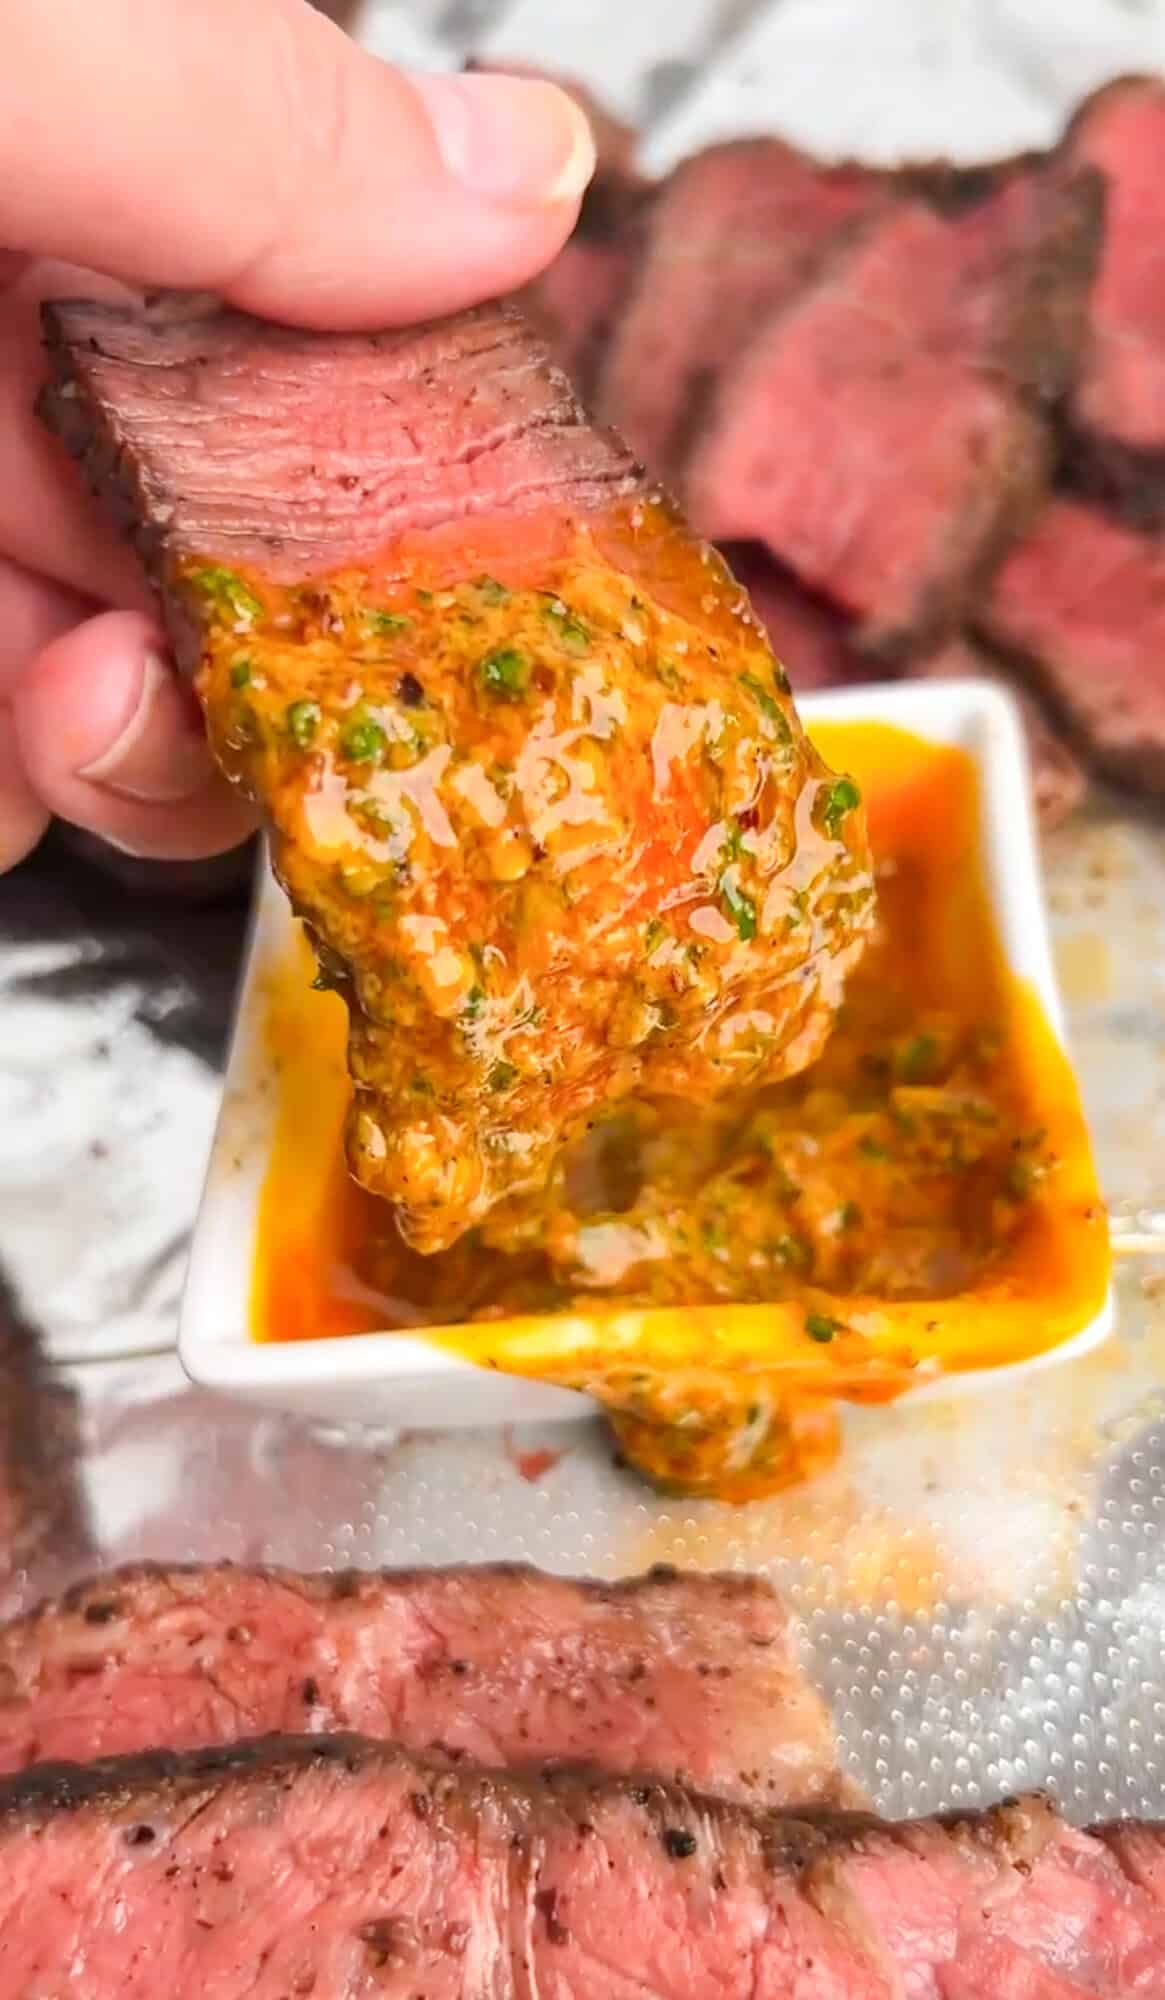
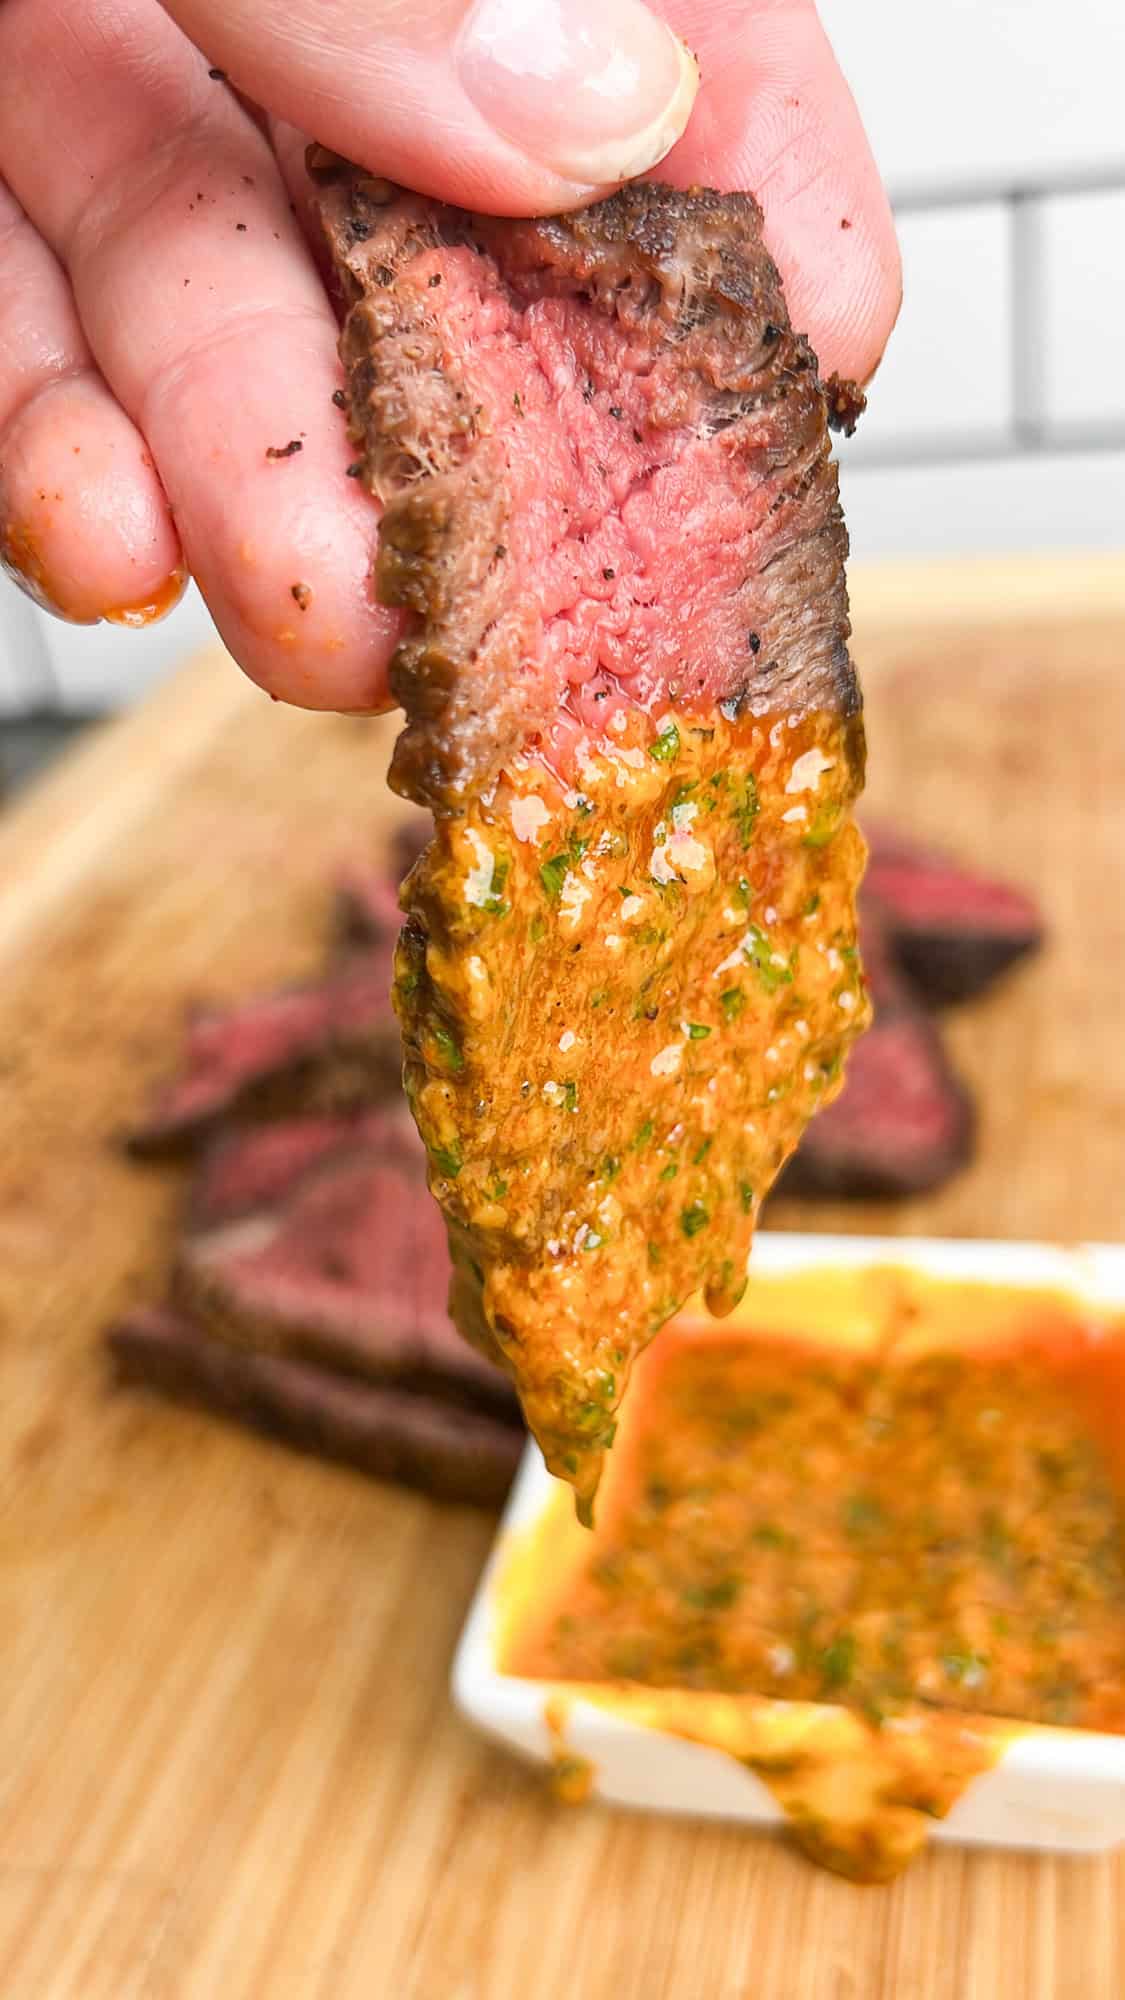
Let’s make Cowboy Butter Steak. Tender steak is seasoned to perfection, grilled or seared indoors in a cast iron skillet and the best part – it’s paired with this herby, tangy cowboy butter for dipping or melting over your steak.
Why You’ll Love Cowboy Butter Steak
Cowboy butter has become even more popular in the recent year or so, including my Cowboy Butter Steak Sliders that went super viral last year. I first hear about cowboy butter from the Pioneer Woman back in 2015 although her version was simply garlic, parsley and red pepper added to butter.
I’ve created my own version adding lemon juice and zest, dijon mustard, red pepper or cayenne, green onions and parsley, garlic and dried thyme. It’s robust, herbaceous and tangy with a kick of heat. And so delicious you’ll want to smother it over everything.
If that sounds delicious, be sure to also check out my Cowboy Butter Chicken Tenders, and my Cowboy Butter Steak and Potatoes.
Key Ingredients
Here are all the elements to make this easily bring this cowboy butter steak recipe together:
Steak – a quality, tender cut such as ribeye or tenderloin filet. Starting with a quality cut is the most important step in this recipe being a success. Costco has great options!
Butter – I love using Kerrygold or similar Ireland/European butter. But you can use regular butter as well.
Herbs – dried thyme, fresh parsley, fresh chives or green onions.
Garlic – freshly minced garlic is essential, skip the jarred alternative for this recipe.
Seasonings – red pepper flakes or cayenne pepper, freshly cracked pepper and paprika
Dijon Mustard – a little dijon adds a tangy sharpness that’s just enough to balance out the creamy decadence of the butter.
Lemon – adds a tangy acidity and lemon flavor from the zest and juice.
Avocado Oil – if you’ll be cooking the steak in a cast iron skillet, be sure to use avocado oil instead of olive oil for the high smoke point.
How to Make Cowboy Butter Steak
In just a few easy steps you can be enjoying a tender, juicy steak with melty cowboy butter. In these instructions I share a cooking method for grilling or for making it in a cast iron skillet indoors.
Make the Cowboy Butter
Add softened butter to a bowl with all the cowboy butter ingredients. Heat in the microwave for 10 seconds until it’s barely melted. Don’t fully melt or the butter can break/separate.
If you want to make a firm compound butter, skip the melting part. Instead, place the softened cowboy butter onto plastic wrap and roll it into a log. Then refrigerate until firms up. When you’re ready to use it, slice and add to the top of the warm steak.
Cook the Steak (Grill Method)
Preheat grill to medium-high with an indirect heat zone. Remove steaks from the fridge and allow them to rest at room temp for 30 minutes.
Cook steaks over direct heat for about 2-3 minutes per side, being sure not to char them. If high flames appear, move them to indirect heat until flame subsides.
Brush both sides with cowboy butter as they cook. After 5-6 minutes of total cook time, move the steaks to indirect heat until desired temperature is reached.
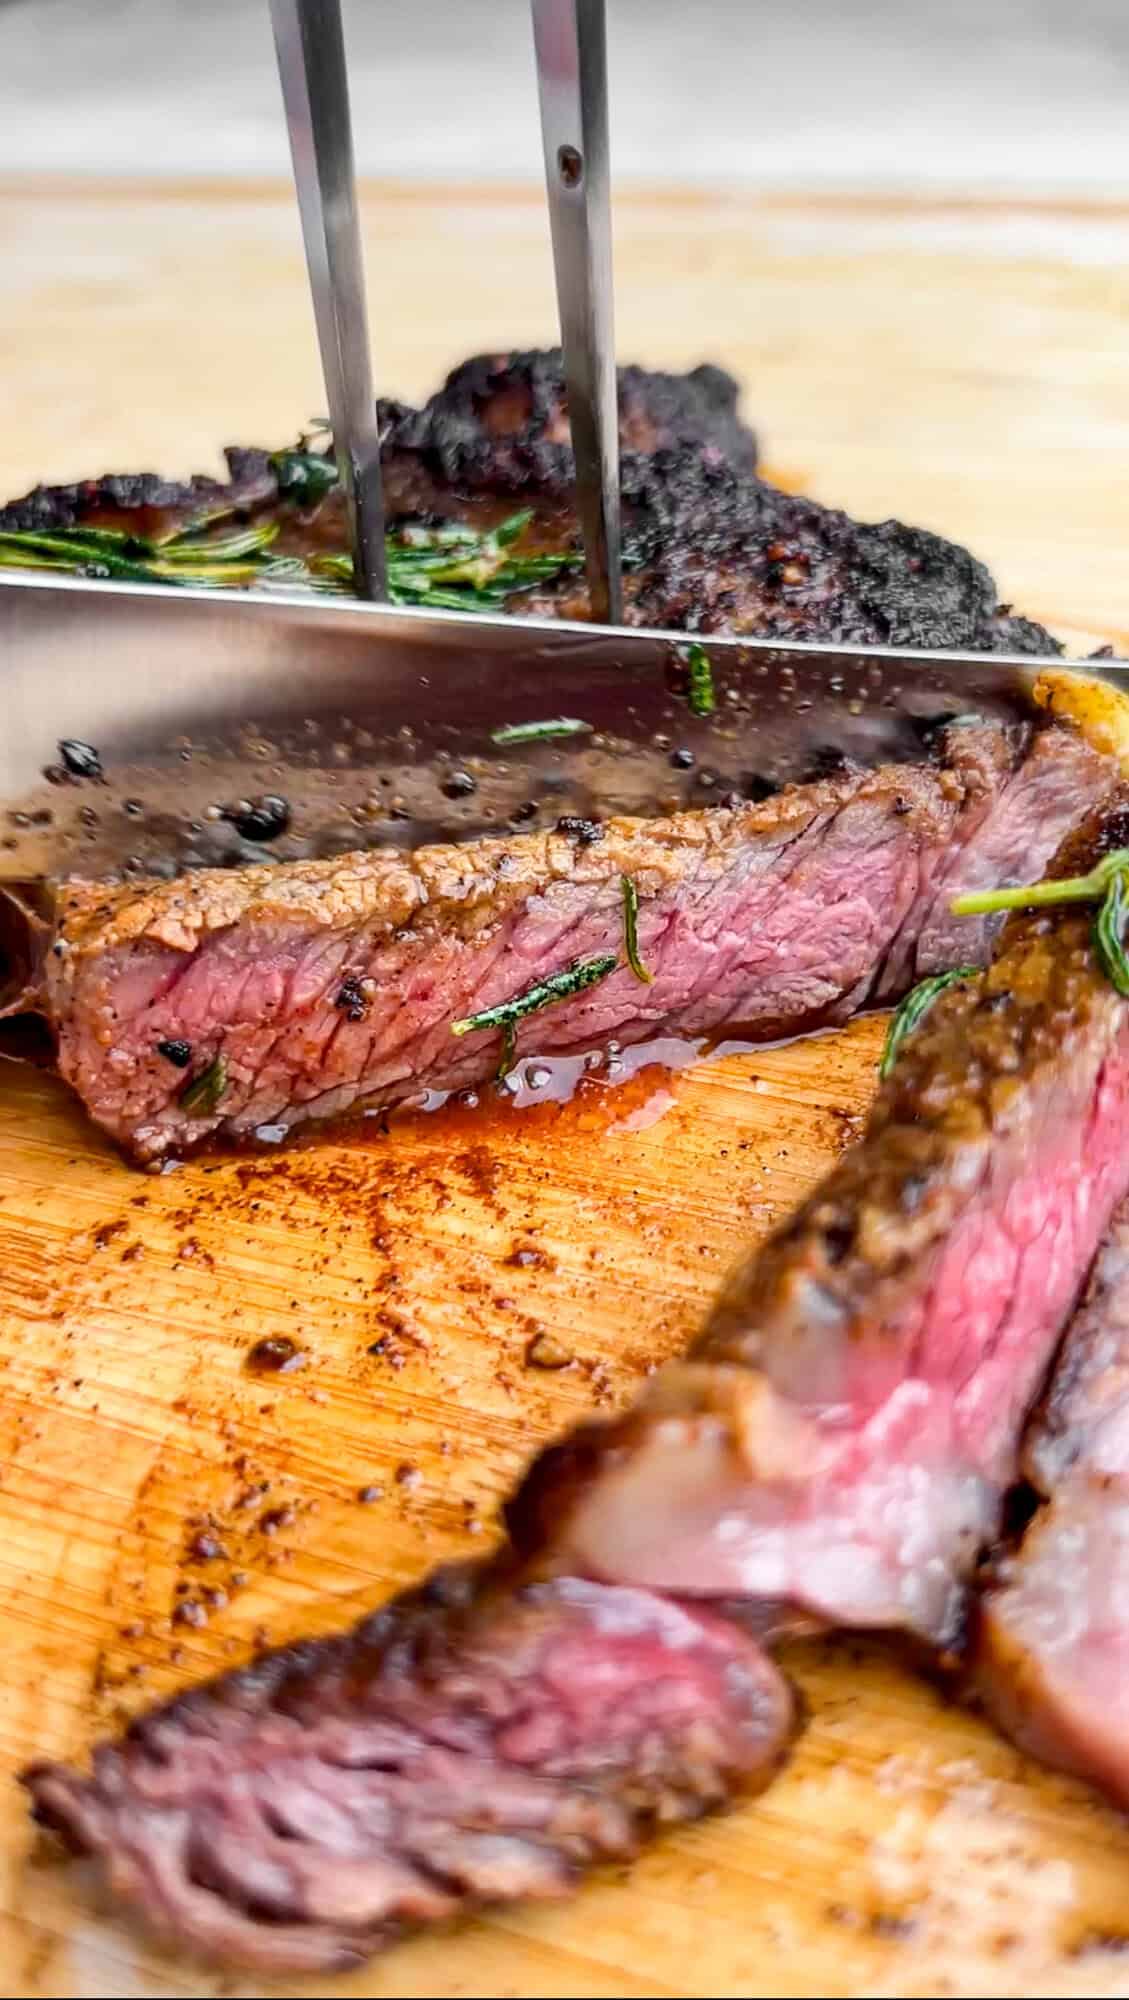
Remove and allow steaks to rest on a plate with tented foil for 10 minutes before slicing. Serve with cowboy butter on top or on the side.
Cook the Steak (Cast Iron Skillet Method)
Heat 1-2 tbsp avocado oil in a cast iron skillet over medium-high heat until it’s shimmering.
Place the seasoned steaks in the skillet and cook for 4 minutes on one side without touching. Use tongs to flip the steaks and cook for 4 more minutes on the other side.
Reduce heat to medium-low, add a few spoonfuls of cowboy butter. As the butter melts, tilt the skillet and spoon the butter over the steaks repeatedly until the steaks reach desired doneness.
Transfer the steaks to a plate or cutting board, and allow them to rest for 10 minutes before slicing. Serve with cowboy butter on top or on the side.
Tips and Modifications
Make it ahead – you can easily prepare the cowboy butter ahead, cover tightly and store in the fridge for up to 1 week. When ready to use you can warm it in the microwave in 5-7 second bursts until it’s softened and partially melted.
Create a Compound Butter – instead of a melted butter sauce/dip, you can turn this into a compound butter instead for slicing and topping the steaks.
Use it for Chicken – I love how delicious this flavorful butter is on chicken. It pairs perfectly on poultry. Whether it’s grilled chicken or chicken tenders you’ll love this on chicken.
Use it on Veggies and Side Dishes – use cowboy butter on your mashed potatoes instead of butter, or to sautéed asparagus or green beans, or even Brussels sprouts and pan fried sweet corn.
Let’s make Cowboy Butter Steak. Tender steak is seasoned to perfection, grilled or seared indoors in a cast iron skillet and the best part – it’s paired with this herby, tangy cowboy butter for dipping or melting over your steak.
Ingredients
Scale
2 – 2.5poundshigh quality steaksuch as ribeye or tenderloin filet. You can also use top sirloin but it won’t be as tender
2–3tbspavocado oilif using a cast iron
kosher salt to taste
freshly cracked black pepper to taste
Cowboy Butter
1stickbuttermostly melted
4clovesgarlicminced
1/2lemon zested + 1 tablespoon juice
1tablespoondijon mustard
1teaspoonpaprika
1/2teaspooncayenne or red pepper flakes
1/2teaspoondried thyme
1teaspoonred pepper flakes or cayenne powder
1tablespoonchives or green onionssliced
2tablespoonsfresh parsley minced
salt and pepper to taste
optional: rosemary sprig and smashed garlic for the cast iron preparation
Instructions
Add 6 tablespoons softened butter into a bowl followed by 4 minced garlic cloves, dijon, lemon zest and juice, seasonings and herbs. Heat in the microwave about 7-10 seconds until barely melted.
Remove steaks from the fridge 30 minutes before cooking to remove the chill. Pat them dry with a paper towel and season with salt and pepper or your favorite steak seasoning (see notes for my steak seasoning).
Grill Method
Preheat grill to medium-high with an indirect heat zone. Remove steaks from the fridge and allow them to rest at room temp for 30 minutes.
Cook steaks over direct heat for about 2-3 minutes per side, being sure not to char them. If high flames appear, move them to indirect heat until flame subsides.
Brush both sides with cowboy butter as they cook. After 5-6 minutes of total cook time, move the steaks to indirect heat until desired temperature is reached.
Remove and allow steaks to rest on a plate with tented foil for 10 minutes before slicing. Serve with cowboy butter smothered on top or on the side for dipping.
Cast Iron Method
Heat 1-2 tbsp avocado oil in a cast iron skillet over medium-high heat until it’s shimmering.
Place the steaks in the skillet (being careful not to overcrowd the pan) and cook for 4 minutes on one side without touching. Use tongs to flip the steaks and cook for 4 more minutes on the other side.
Reduce heat to medium-low, add a few spoonfuls of cowboy butter (and rosemary sprig and smashed garlic optionally) into the pan. As the butter sizzles, tilt the skillet and spoon the butter over the steaks repeatedly until the steaks reach desired doneness.
Transfer the steaks to a plate or cutting board, and allow them to rest for 5 minutes before slicing or serving. Serve with the melted butter, garlic and rosemary from the skillet.
Notes
*Steak Temp:keep in mind that the internal temperature will continue to rise about 5 degrees after you remove from heat and the steaks rest.
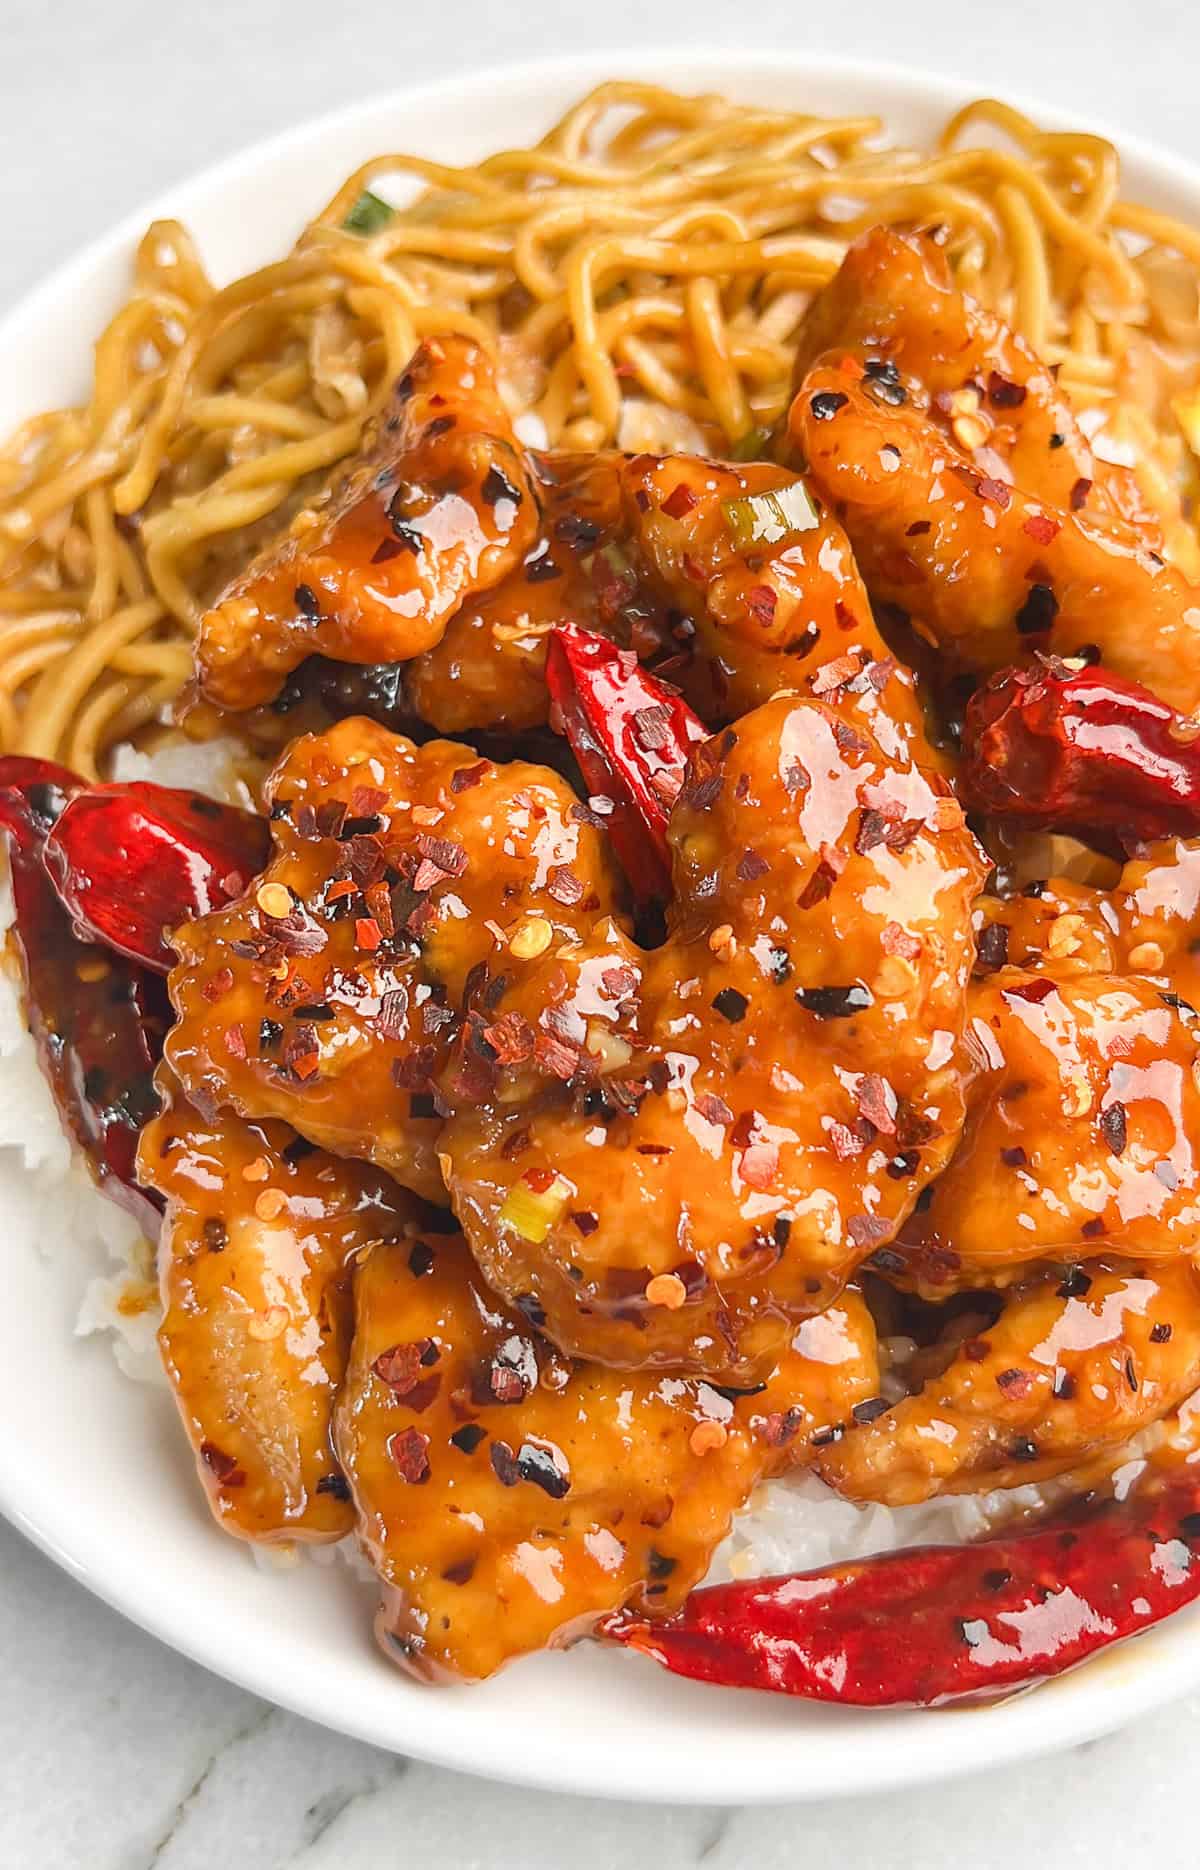
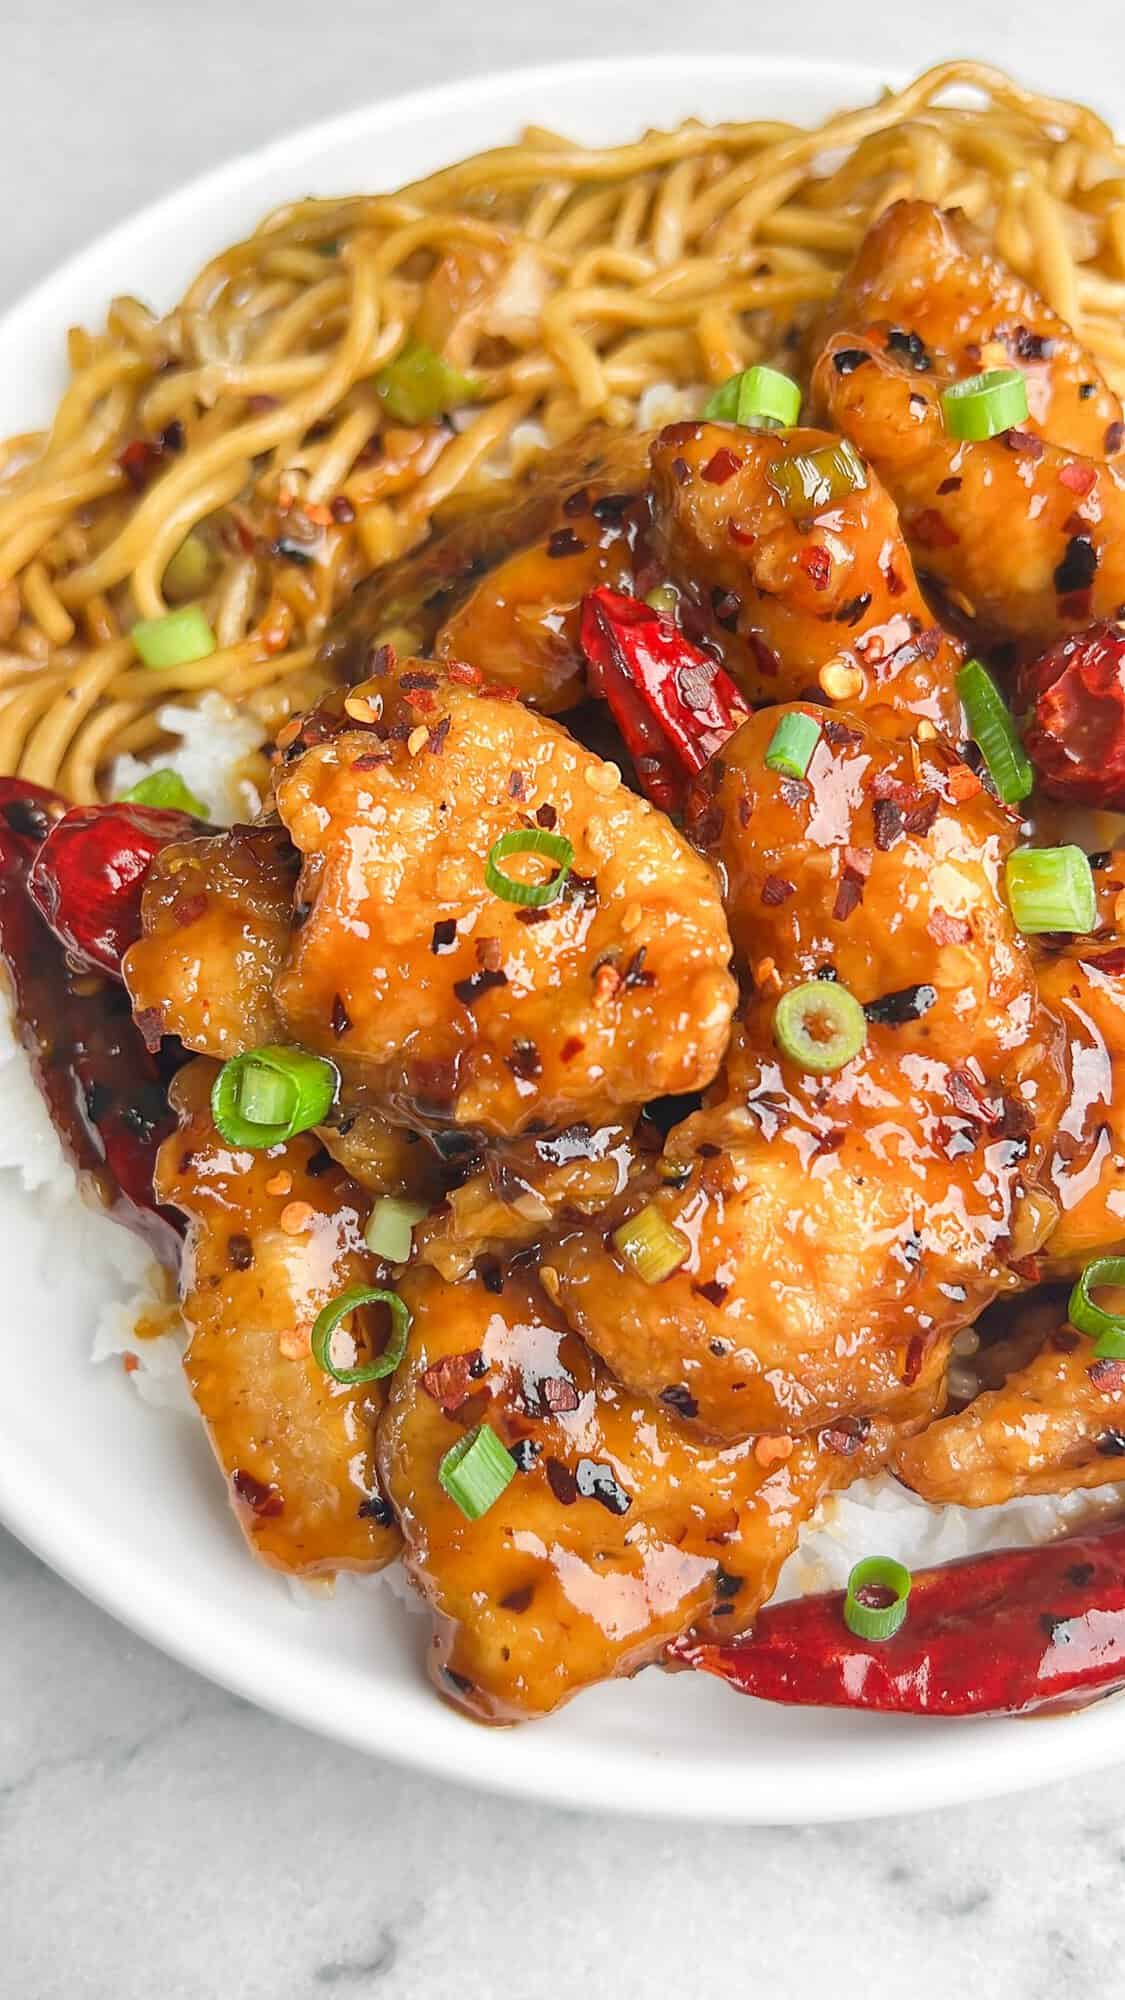
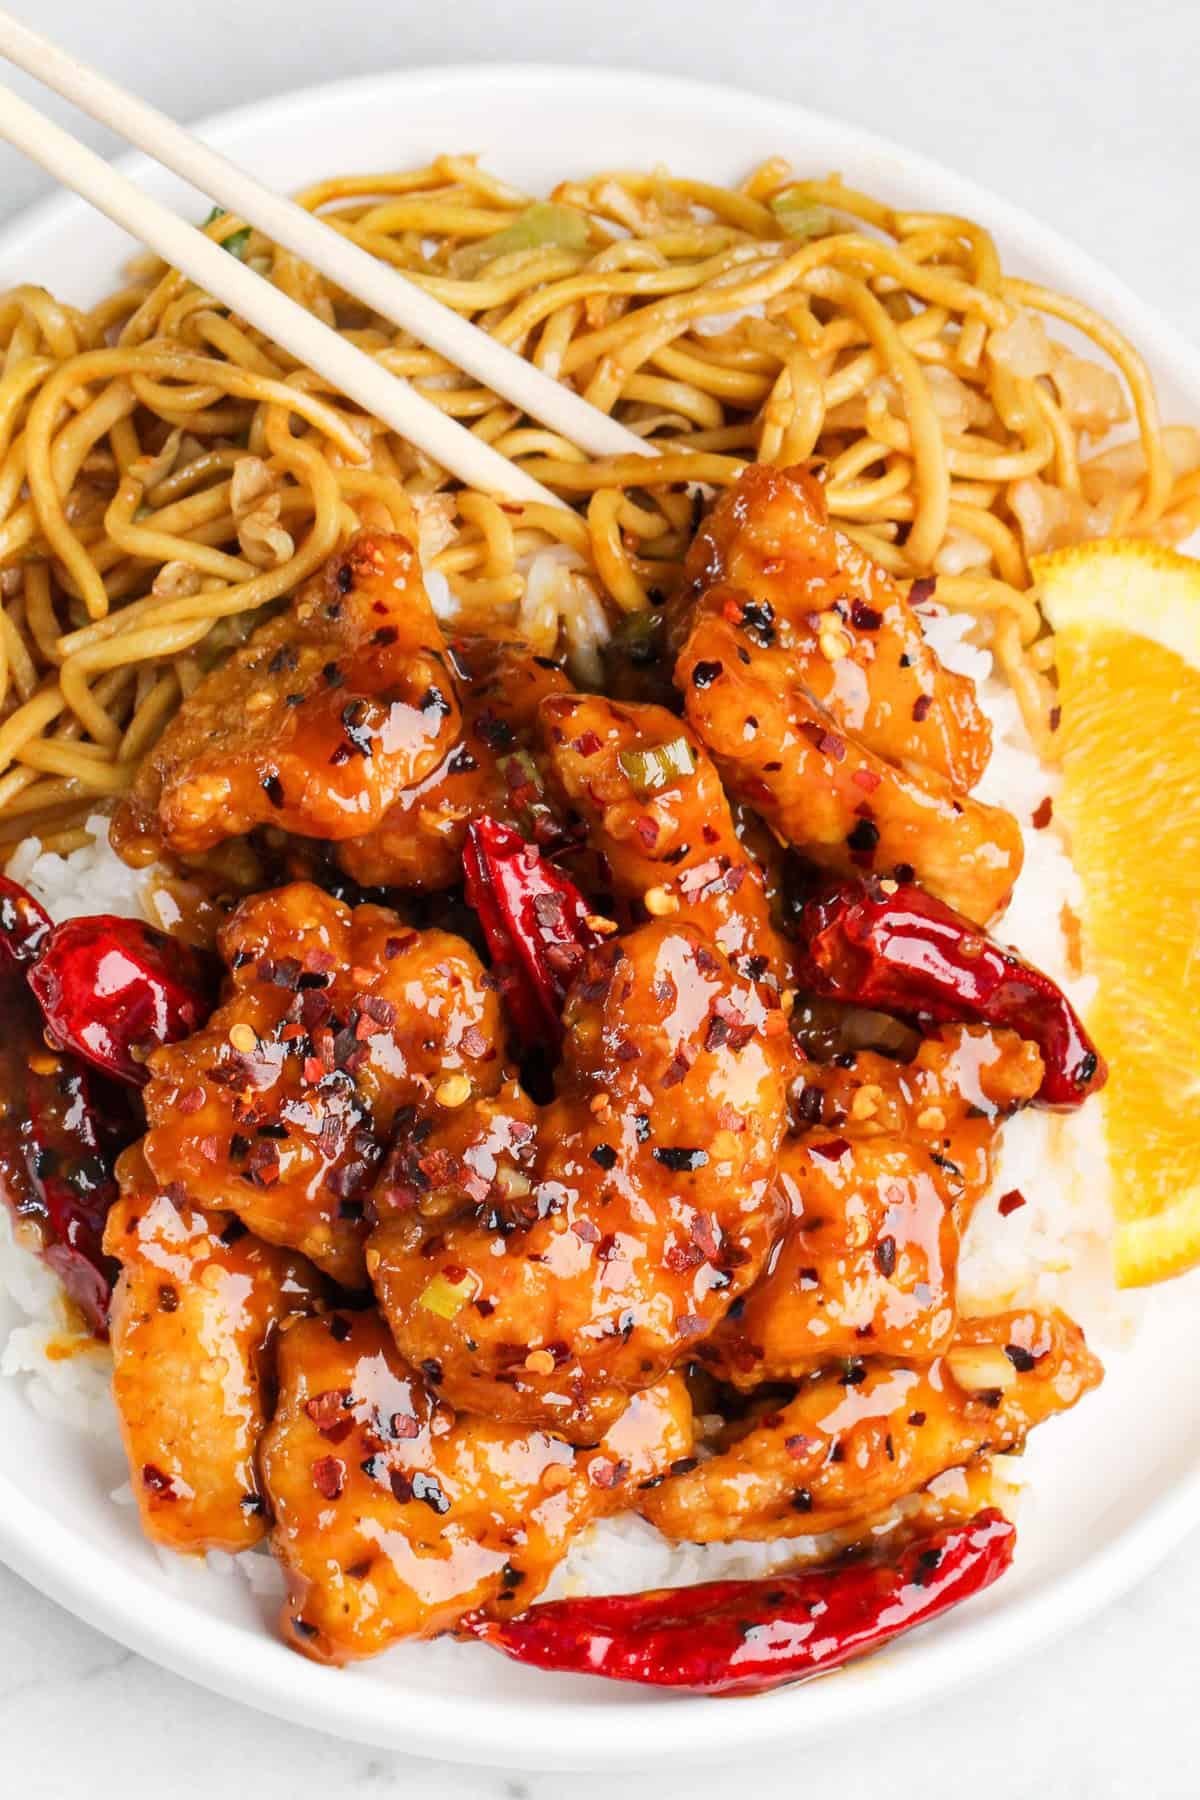
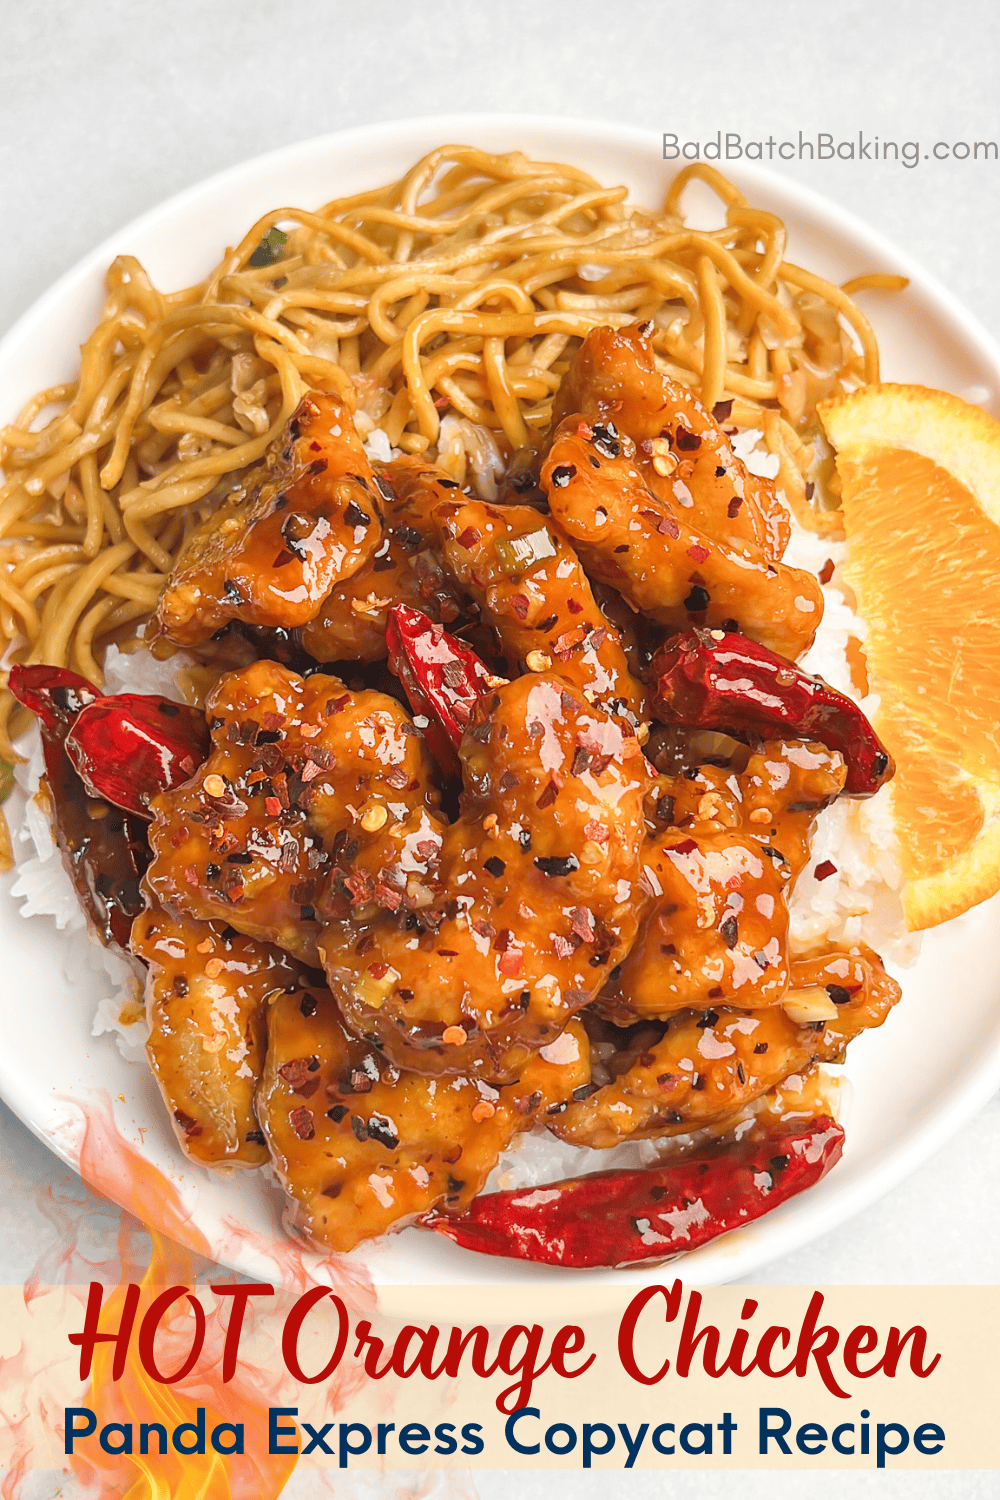
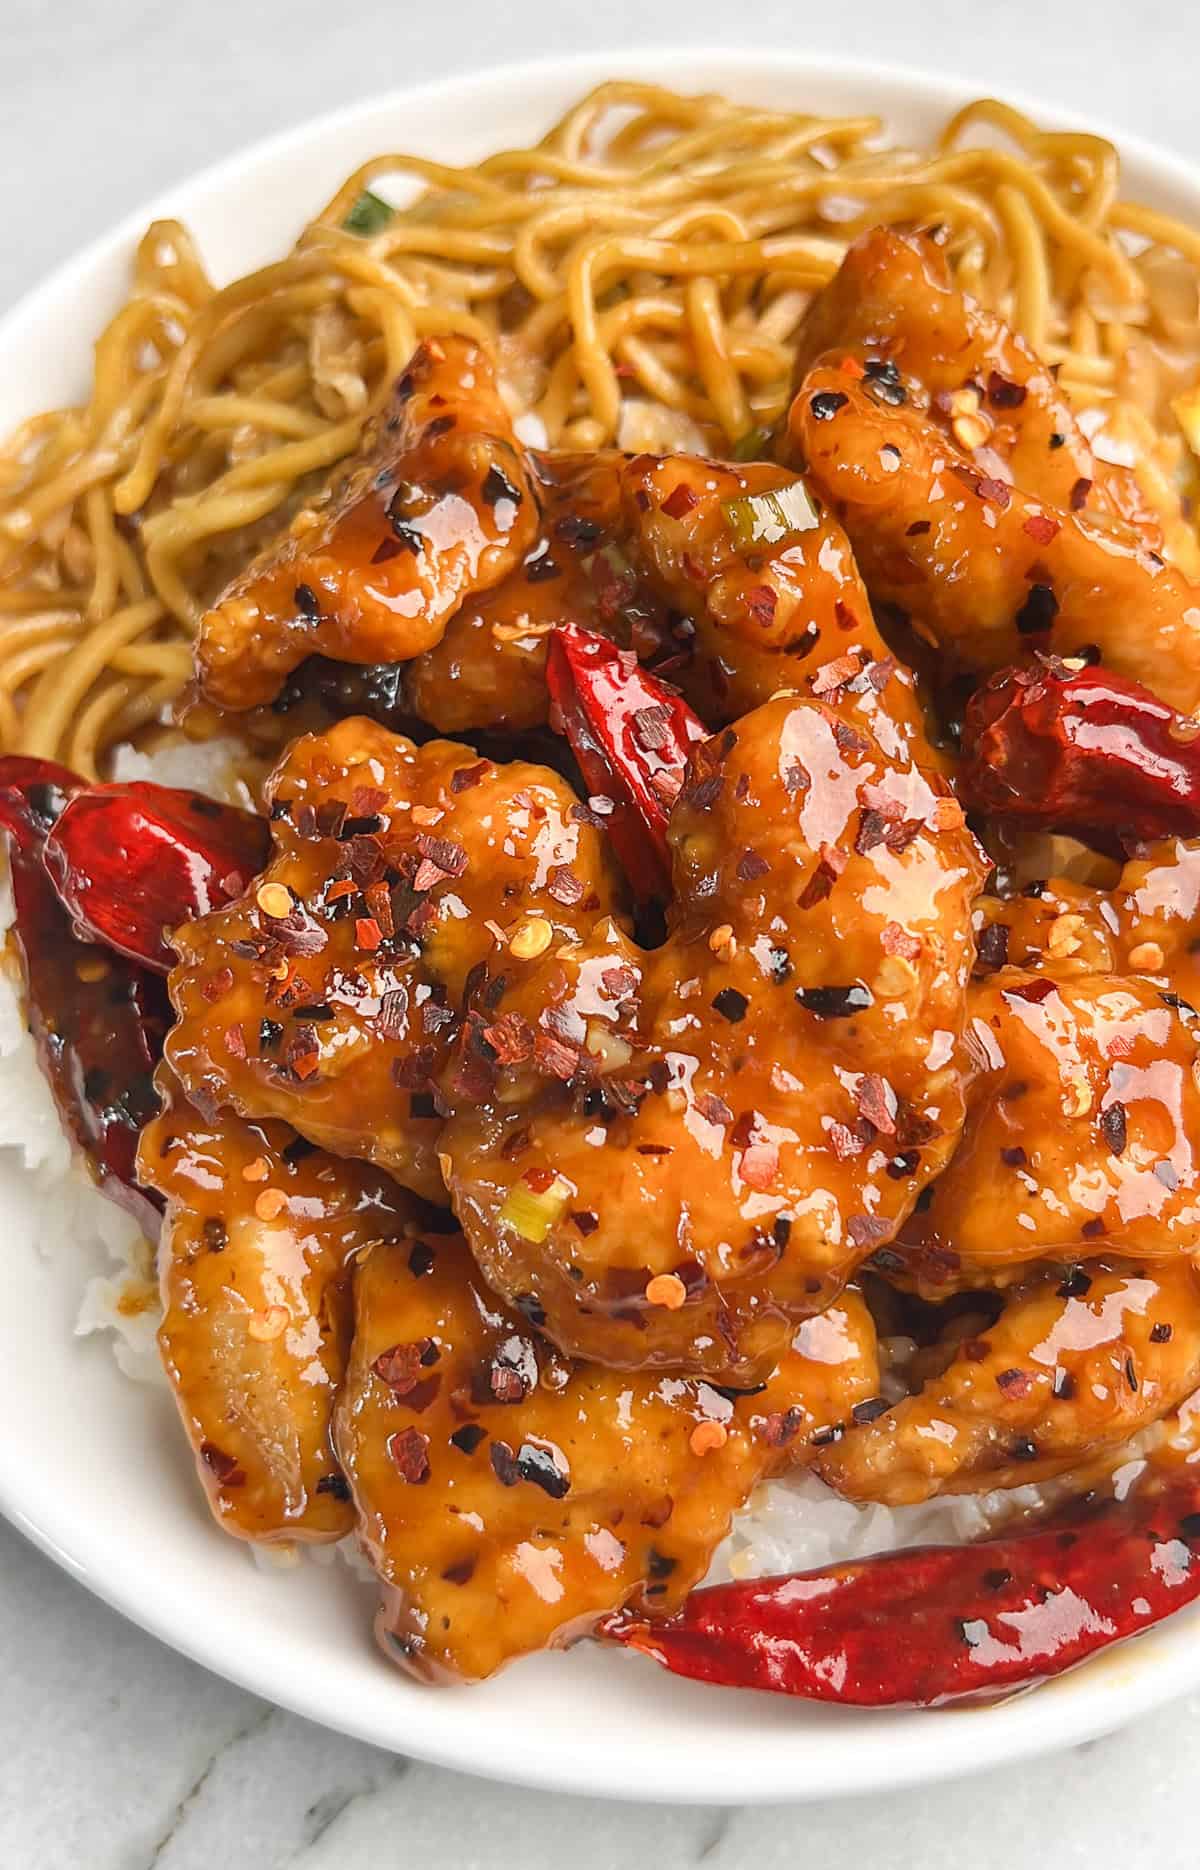
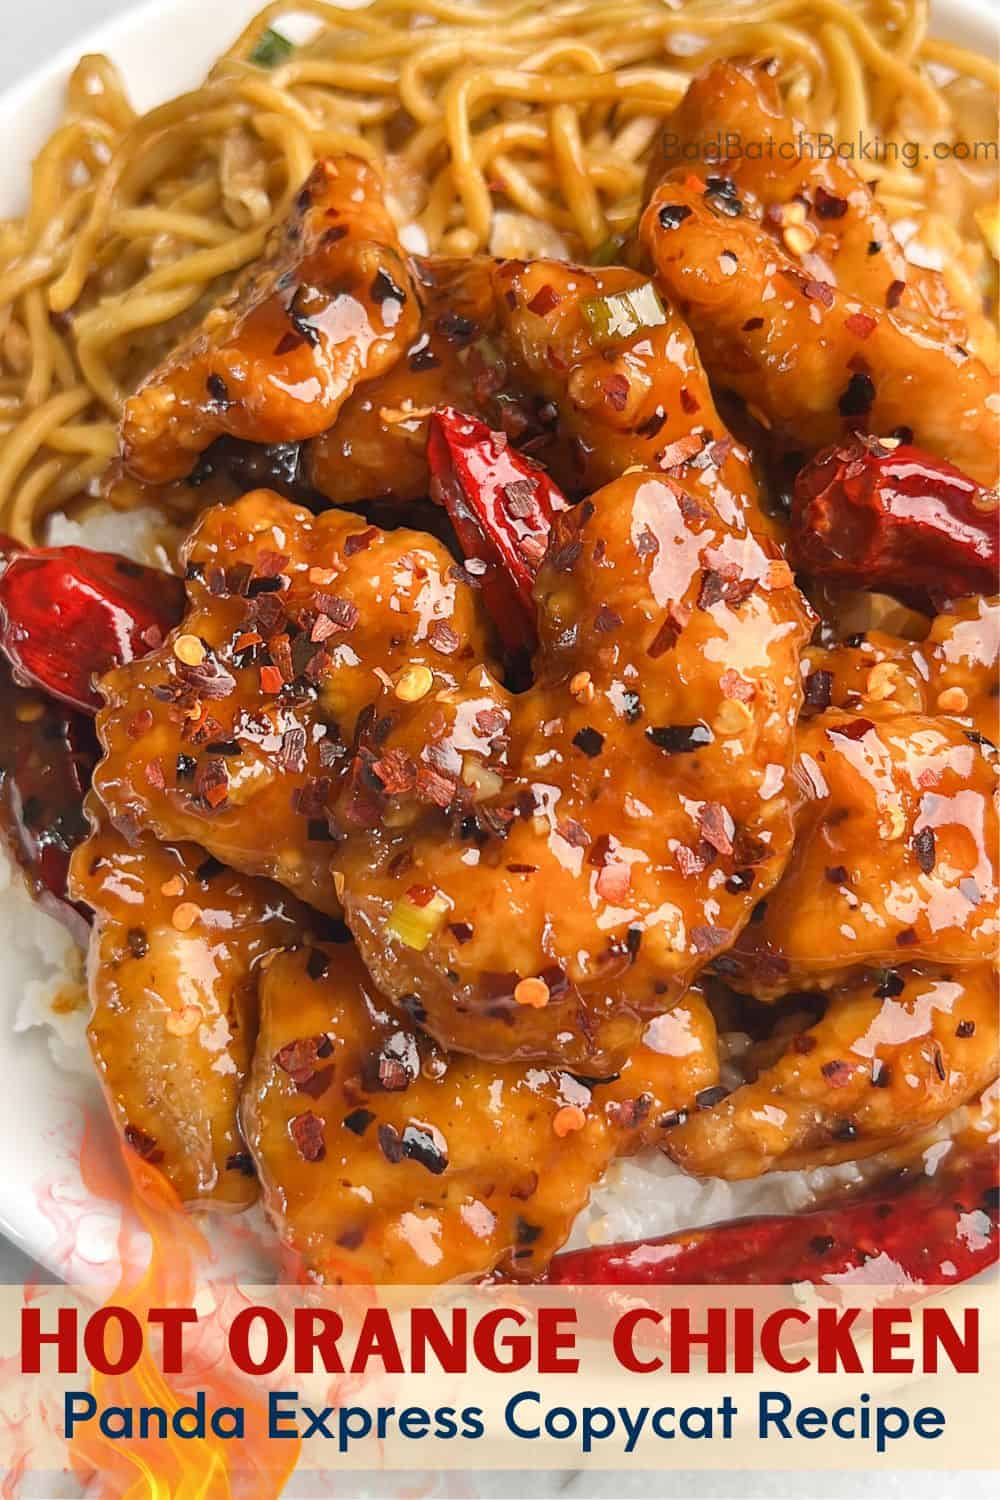
The Hot Orange Chicken Panda Express has dropped on their menu this week is all the rage on the internet and social media. After trying it myself, it was love at first bite! And since this hotty is only available at their restaurants for a limited time, I just knew this was a recipe that deserved a homemade remake we can all enjoy once it disappears.
Tender chicken breasts are sliced into bite sized pieces, fried crispy and tossed in a sizzling wok full of fragrant spices, garlic, and a citrusy tangy sweet sauce. This copycat recipe is a spin on their classic Orange Chicken amped up with tons of chilies! The spice is intensely fiery delicious but not overwhelming as it’s complimented by the sweet tanginess of the orange chicken.
Why You’ll Love Hot Orange Chicken
If you haven’t tried Panda Express Hot Orange Chicken you absolutely must make this at home. Panda Express locations aren’t saturating each street corner and they can be out of reach for lots of us. So if you’re curious (or already a lover of their Hot Orange Chicken), you gotta try it. Here’s why:
Fiery Spice – the six scoops of red pepper flakes and szeschuan red chili peppers add the perfect warm heat without being unbearable.
Better Than Panda Express – yes, I said it. This hot orange chicken was selected by everoyone in a blind side-by-side taste test.
Sticky Sweet – the balance of tang, sweetness and spice is perfectly balanced.
Lots of Citrus – arguably more “orangey” than Panda Express’ version. The fresh zest and juice yield a strong orange flavor.
Breading stays in tact – unlike some sauce-coated asian dishes, the breading can get goopy and soggy, this hot orange chicken stays firmly attached to the chicken.
What is Hot Orange Chicken from Panda Express?
The latest limited time menu item from Panda Express is a hot and spicy version of their famous and beloved Orange Chicken. It’s gone crazy on social media and according to Panda, they added dried whole red chili peppers and SIX scoops of red pepper flakes (where the traditional orange chicken has just one scoop).
Where to Find Ingredients?
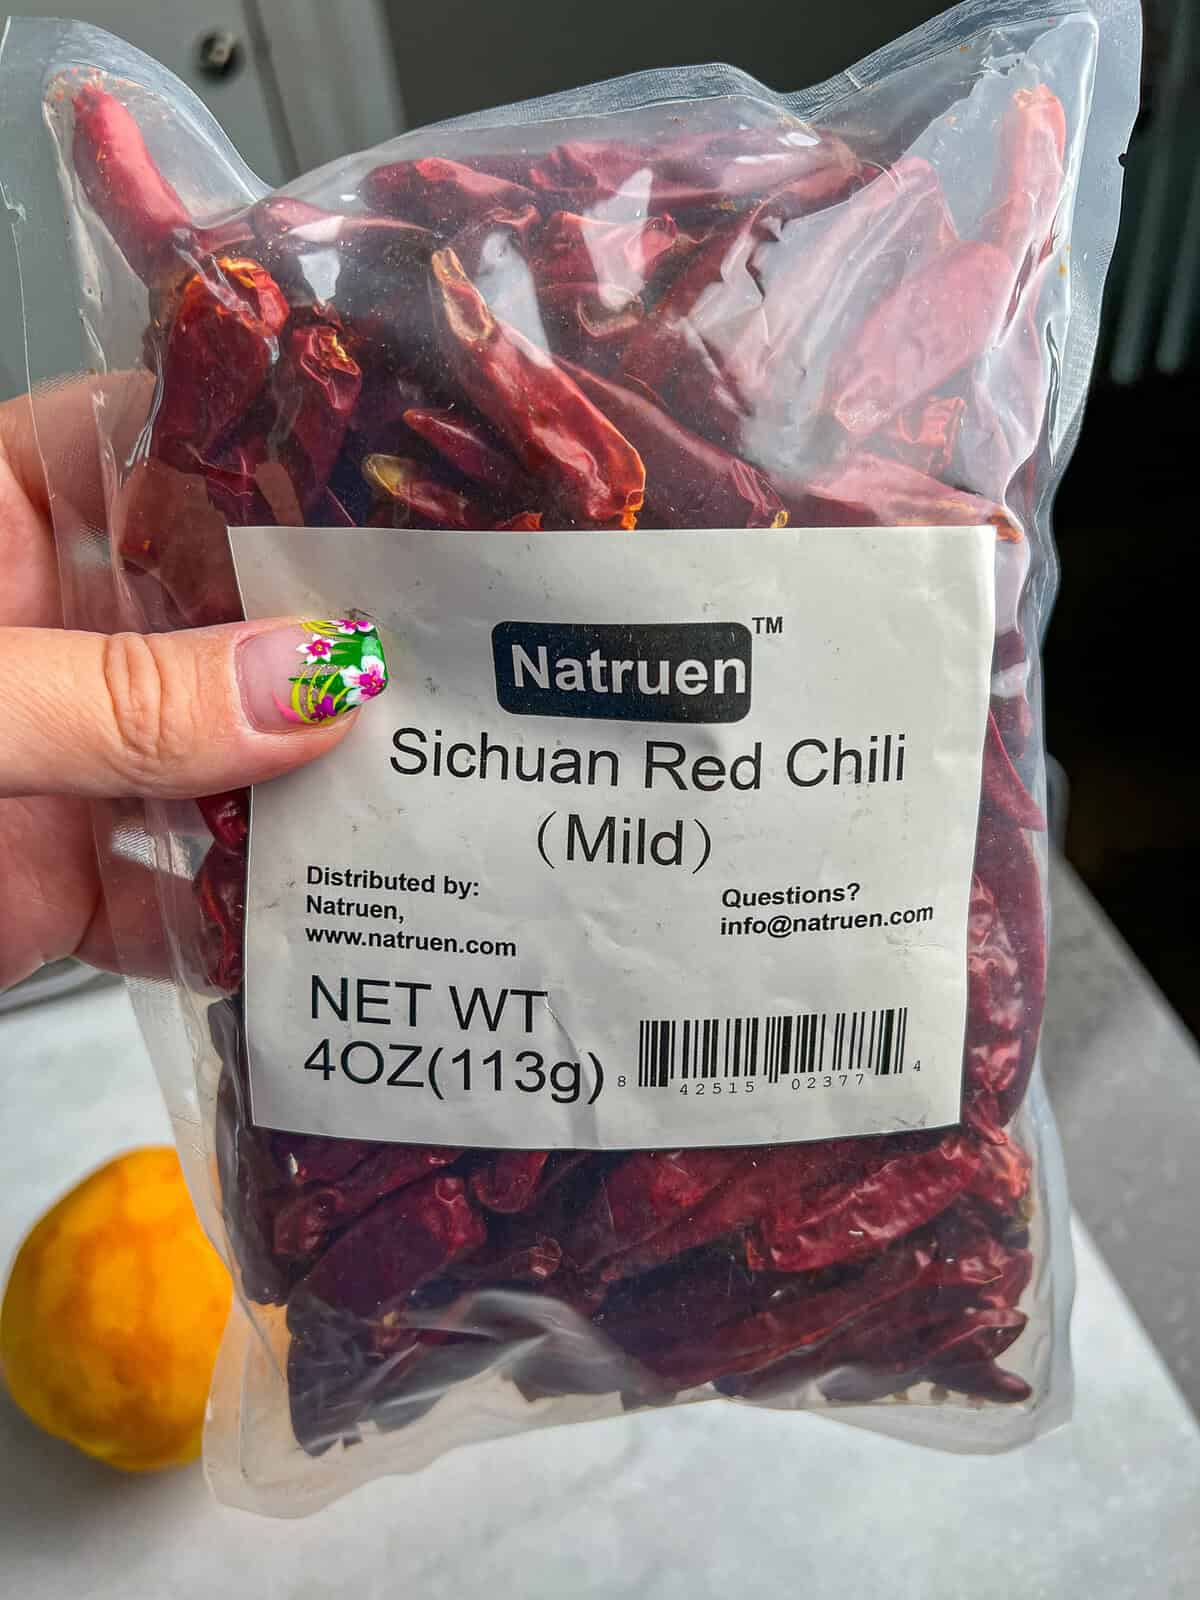
Most all of the listed ingredients can be found right in the asian foods/International aisle of your grocery store. If you are near an Asian mart (like H Mart) they will certainly have everything. The dried Szechuan red chili peppers are the only ingredient that can be tricky to find. If you can’t find them locally, Amazon sells a large bag that will last a while.
Key Ingredients
Chicken breasts – we’ll dice up boneless skinless chicken breasts into 1-2″ pieces. You can also use dark meat like chicken thighs, which is what they use in the restaurant.
Orange juice + zest – a whole orange is zested and added to the sauce. Be sure you have a microplane or zester to remove the zest without removing the pith (the white bitter part).
Brown sugar – the brown sugar adds a caramely sugar taste.
Soy sauce – the salty element for the sauce. I always use a low sodium variation as to not overwhelm the dish with too much salt.
Rice wine vinegar – this adds tanginess to the sauce. If you can’t find rice wine vinegar, you can substitute with distilled white vinegar or apple cider vinegar.
Garlic – be sure to use freshly minced garlic and not the pre-minced kind in the jar as it doesn’t add a true distinct garlicky flavor.
Sesame oil – just a few spoonfuls go a long way in added flavor. If you can get your hands on toasted sesame oil it’s even more intensely flavored.
Flour + Cornstarch – the base for our chicken dredge. The cornstarch is also used in the sauce to help thicken.
How to Make Hot Orange Chicken
Step 1: Make The Sauce
We’ll whisk together all of the ingredients in the sauce, then cover and set it aside until it’s ready to be used in the final step.
Step 2: Bread & Fry the Chicken
Once the chicken is cut into bite-sized chunks, we’ll toss it in the egg+oil wash, then into the cornstarch+flour dredge. Dust off the excess flour and fry them in batches for about 3 minutes.
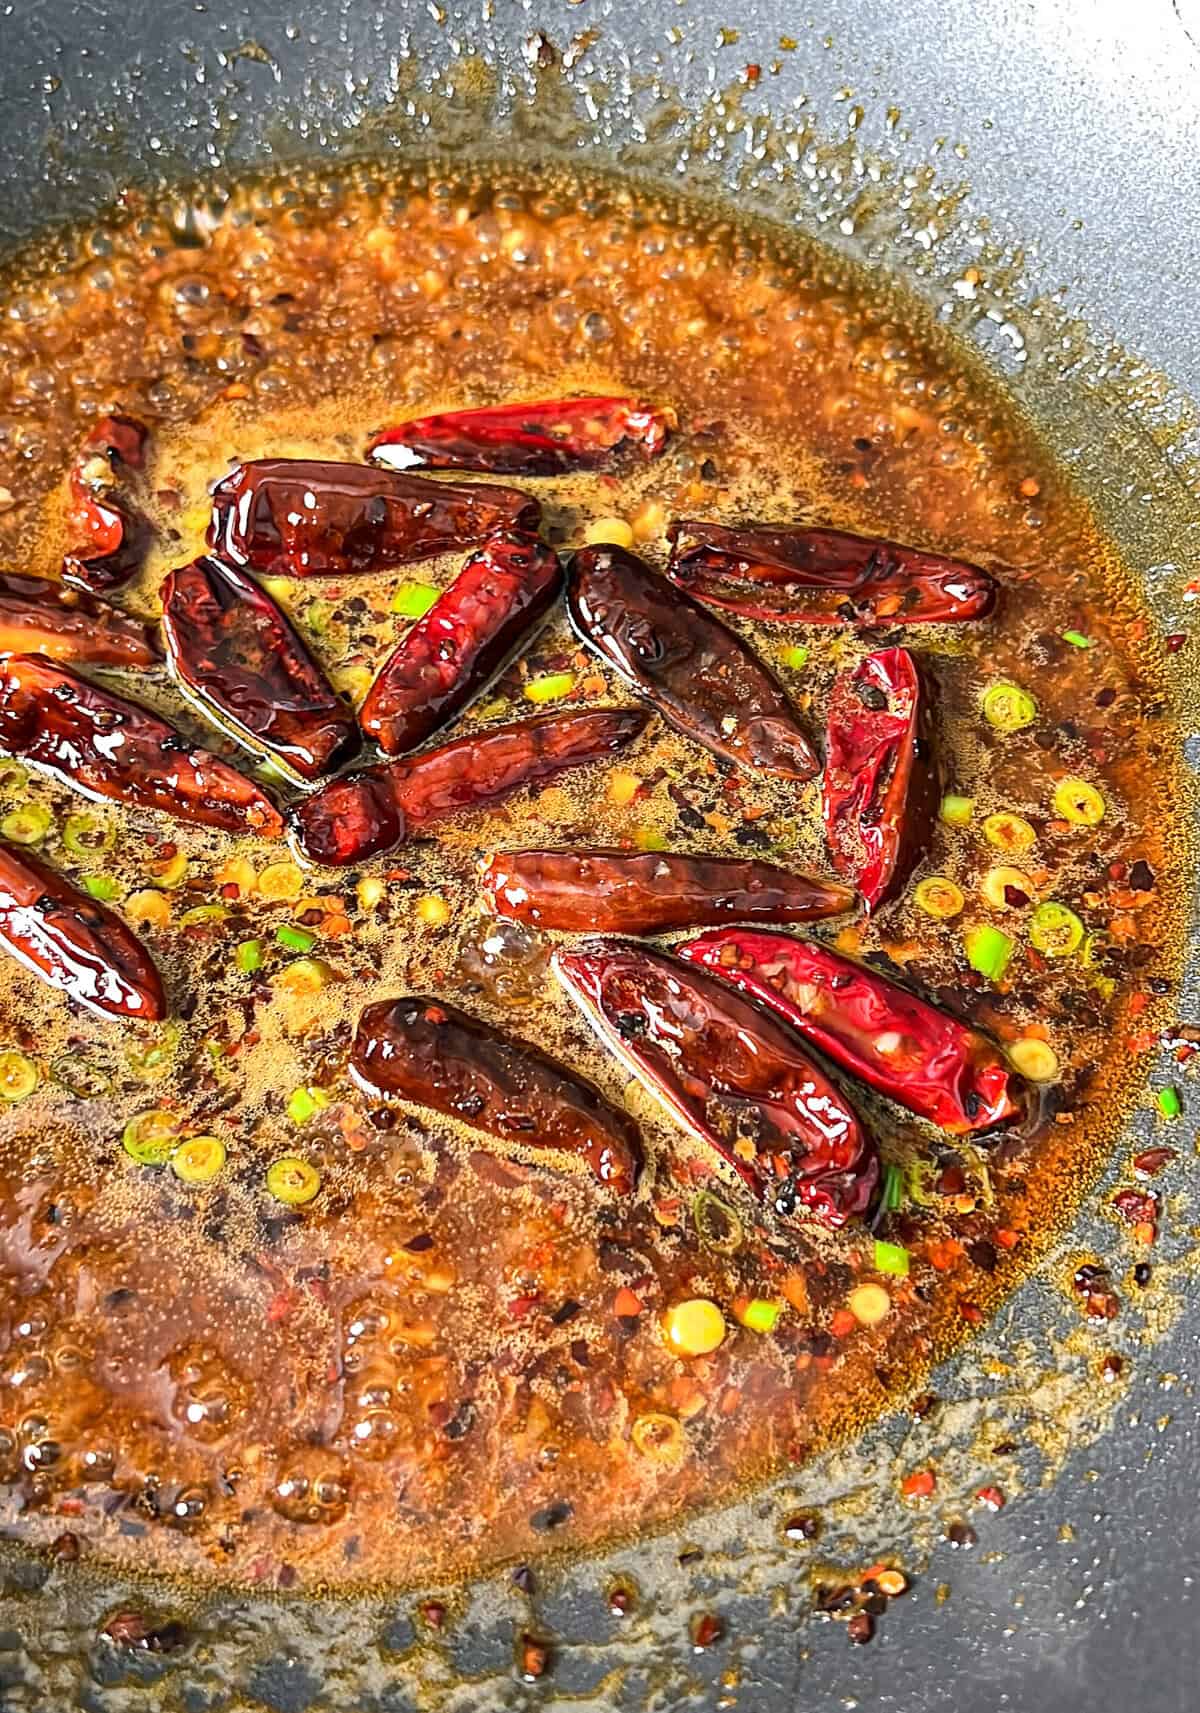
Step 3: Fire Up the Wok
We start with sizzling up our chilies, red pepper flakes and garlic in a wok with hot oil. Once those sizzle for 30 seconds or so, we’ll add in the sauce and allow it to begin to thicken. Toss in the chicken and stir and toss until all the pieces are well coated and warmed through.
I hope you enjoyed this Hot Orange Chicken Panda Express recipe. I look forward to your questions and feedback below.
Please be sure to tag me @BadBatchBaking using hashtag #badbatchbaking if you made this recipe and I will feature you on my story! Plus, I LOVE to see your baking accomplishments.
Make The Orange Sauce
In a medium bowl, whisk together all of the ingredients for the sauce, then cover and set it aside until it’s ready to be used in the final step.
Prep and Bread Chicken
Prep the dredge by adding cornstarch and flour together in a shallow pie dish (or similar). Whisk in the salt and pepper to it’s evenly distributed.
In a medium bowl, whisk together the eggs with 2 tablespoons vegetable oil. Whisk vigorously until the egg is no longer stringy and the mixture starts to emulsify.
Start to get the oil heated to 375 degrees in a heavy bottom skillet, wok or deep saute pan. Attach a thermometer to best manage the heat.
While oil is heating, work in batches placing diced chicken pieces into the egg wash. Coat well then toss into the dredging flour. Coat the chicken pieces well on all sides making sure no chicken shows through the breading.
Stir Fry in Wok
In a wok, add 2 tablespoons of vegetable oil and heat over medium-high. Add in the chili peppers and red pepper flakes. Heat through about 15 seconds, stirring constantly.
Add in the garlic (and ginger if using) and sesame oil, cook another 15 seconds as you stir.
Pour the sauce into the wok to thicken. You’ll see it start to bubble on the edges and begin to thicken, about 2 minutes. Add the crispy chicken pieces to the sauce and toss multiple times to coat well and warm the chicken back up, about 1 minute. Serve over rice and top with green onion slices.
Tender chicken breasts are sliced into bite sized pieces, fried crispy and tossed in a sizzling wok full of fragrant spices, garlic, and a citrusy tangy sweet sauce. This copycat recipe is a spin on their classic Orange Chicken amped up with tons of chilies! The spice is intensely fiery delicious but not overwhelming as it’s complimented by the sweet tanginess of the orange chicken.
Ingredients
Scale
To Make Chicken
2lbschicken boneless skinless breasts or thighs, cut into 1–2” inch pieces
1cupcornstarch
1/2cupall-purpose flour
2eggs
2tablespoonsoilcanola or vegetable
1tspsalt
1/2tspwhite pepper
oil for frying
To Make Orange Sauce
1cuporange juice
1orange, zest of
3tablespoonssoy sauce
4tablespoonsrice wine vinegar
1/2cupbrown sugar
2teaspoonssesame oil
1tablespooncornstarch
1tablespoongreen onions, slicedplus extra for garnish
To Stir-Fry
2tablespoonsoilcanola or vegetable
1/2cupdried whole red chili peppers
6teaspoonsred pepper flakes
1tablespoonsesame oil
2clovesgarlic, minced
optional: 1 tablespoon ginger, grated
Instructions
Make The Orange Sauce
In a medium bowl, whisk together all of the ingredients for the sauce, then cover and set it aside until it’s ready to be used in the final step.
Prep and Bread Chicken
Prep the dredge by adding cornstarch and flour together in a shallow pie dish (or similar). Whisk in the salt and pepper to it’s evenly distributed.
In a medium bowl, whisk together the eggs with 2 tablespoons vegetable oil. Whisk vigorously until the egg is no longer stringy and the mixture starts to emulsify.
Start to get the oil heated to 375 degrees in a heavy bottom skillet, wok or deep saute pan. Attach a thermometer to best manage the heat.
While oil is heating, work in batches placing diced chicken pieces into the egg wash. Coat well then toss into the dredging flour. Coat the chicken pieces well on all sides making sure no chicken shows through the breading.
Fry the Chicken
Dust off the excess flour and fry them in batches for about 3 minutes. Be sure to adjust the heat as it will drop once the chicken is added. Place cooked chicken on a wire rack to drain oil.
Stir Fry in Wok
In a wok, add 2 tablespoons of vegetable oil and heat over medium-high. Add in the chili peppers and red pepper flakes. Heat through about 15 seconds, stirring constantly.
Add in the garlic (and ginger if using) and sesame oil, cook another 15 seconds as you stir.
Pour the sauce into the wok to thicken. You’ll see it start to bubble on the edges and begin to thicken, about 2 minutes. Add the crispy chicken pieces to the sauce and toss multiple times to coat well and warm the chicken back up, about 1 minute. Serve over rice and top with green onion slices.
Let me share my recipe for traditional maamoul, those precious date filled cookies that make any celebration special. After years of perfecting this family recipe I’ve discovered the secrets to achieving that perfect buttery texture and intricate design. The way these cookies melt in your mouth while delivering bursts of sweet dates makes them absolutely irresistible.
A Cherished Tradition
What makes maamoul so special is how they bring families together during special occasions. The process of filling and decorating these cookies often becomes a gathering activity with everyone playing their part. My kitchen fills with wonderful aromas and happy chatter as we work together creating these beloved treats.
What You’ll Need
Ghee: Fresh and fragrant.
Flours: The perfect semolina blend.
Mahleb: For authentic flavor.
Date Paste: Sweet and smooth.
Orange Blossom: Just a touch.
Let’s Start Baking
Create Your Base
Mix those ingredients with gentle care.
Shape with Love
Each cookie gets its own special design.
Bake to Perfection
Watch for that subtle golden color.
Final Touch
Dust with sweetness before serving.
Success Secrets
The key to perfect maamoul lies in the details. The dough needs just the right consistency to hold those beautiful patterns and that sweet date filling needs to be perfectly smooth. Practice makes perfect when it comes to shaping these special cookies.
Share and Enjoy
These maamoul are meant to be shared and savored. They stay wonderful in an airtight container making them perfect for gifting or enjoying throughout the holiday season. Serve them with strong coffee or tea for a truly authentic experience.
Frequently Asked Questions
→ Why must the dough be pliable?
The dough needs to be soft enough not to crack when shaped, but firm enough to hold patterns and release from molds.
→ How do I prevent cracking?
Monitor cookies closely during baking and remove immediately if tops begin to crack. Let cool completely undisturbed.
→ Can I make these without molds?
Yes, you can shape by hand and create patterns using a fork or strawberry huller.
→ How long do they keep?
They last up to two weeks at room temperature in an airtight container, or two months frozen.
→ Why measure flour carefully?
Use the spoon-in-cup method for measuring flour to ensure proper dough consistency and prevent cookies from being too dry.
Conclusion
Maamoul are delicate Middle Eastern cookies with a rich cultural heritage, featuring a buttery semolina dough and sweet date filling. These intricately decorated cookies are a staple of festive celebrations and represent a centuries-old baking tradition.
I fell in love with this Chicken Avocado Melt Sandwich the first time I made it on a busy weeknight. Now it’s my go-to recipe when I want something quick but special. The way the juicy chicken creamy avocado and melted cheese come together between crispy toasted bread it’s like a warm hug on a plate. Every time I make it people ask for the recipe.
What Makes It So Good
What makes this sandwich truly amazing is how all those flavors play together. You’ve got that perfectly seasoned chicken layered with rich avocado and cheese that melts into every bite. When the bread gets all golden and crispy it’s pure comfort food magic. Plus you can switch things up however you like it’s like having a different sandwich every time.
Perfect Pairings
Fresh Greens: A light salad with vinaigrette makes the perfect partner.
Sweet Potato Fries: These add such nice color and flavor to the plate.
Crunchy Slaw: That creamy-crunchy combo is unbeatable.
Warm Soup: Nothing beats dunking this sandwich in tomato soup.
Fresh Fruit: Some crisp apple slices balance everything perfectly.
Simple Pasta Salad: Great for a heartier meal.
My Best Tips
Fresh Is Best: I always look for perfectly ripe avocados they make such a difference in this sandwich.
Getting That Crunch: A little butter on the outside of your bread before grilling gives you that perfect golden crust.
Avocado Trick: A quick squeeze of lemon keeps those avocado slices bright and fresh.
Green It Up: Sometimes I tuck in some baby spinach it adds such nice freshness.
Spice It Up: My secret? A dash of hot sauce mixed into the mayo.
Make It Your Own
This sandwich is so fun to customize. Sometimes I’ll use sharp cheddar instead of the regular cheese or add roasted red peppers for sweetness. My kids love it with cucumber slices for extra crunch and my husband’s favorite version includes pickled jalapeños for heat. You really can’t go wrong!
Common Questions
Best Chicken Seasonings? I love using garlic powder paprika and Italian herbs they really make the chicken shine.
Leftover Chicken? Perfect! Just warm it up and maybe add some extra seasoning.
More Veggies? The more the merrier try whatever looks fresh at the store.
Why You’ll Love It
What really makes this sandwich special is how it turns simple ingredients into something that feels restaurant-worthy. It’s perfect for those days when you want something a little fancy but don’t have hours to spend in the kitchen. Every bite gives you that perfect combination of flavors and it’s so satisfying to make something this good at home.
Perfect For Any Time
One of my favorite things about this sandwich is how it fits into any meal. Sometimes I’ll make it for a cozy weekend lunch other times it’s my answer to “what’s for dinner?” When friends come over unexpectedly it’s my go-to because it always impresses but takes just minutes to put together.
Keeping It Fresh
Storage: While this sandwich is best fresh you can keep the components ready in the fridge.
Warming Up: A quick trip in a hot skillet brings back that perfect crunch.
Prep Ahead: I often cook extra chicken just to have it ready for sandwiches during the week.
Take Your Sandwich to the Next Level
Let me share some of my favorite ways to make this sandwich extra special. Sometimes I’ll use sourdough bread from our local bakery or add a layer of pesto under the cheese. When I’m feeling fancy I’ll caramelize some onions to add on top or make a quick garlic aioli spread. These little touches make each sandwich feel unique and special.
Give It a Try
You know what’s amazing about this sandwich? It’s how something so simple can make any day feel a little more special. Whether you’re making it for a quick lunch or serving it to friends it never disappoints. The combination of warm chicken melty cheese and creamy avocado just works every single time. And once you make it your own way with your favorite add-ins you’ll see why it’s become such a favorite in my kitchen.
Frequently Asked Questions
→ What’s the best bread to use?
Sturdy breads like sourdough or ciabatta work best as they can hold up to the fillings and grilling process without getting soggy.
→ Can I use pre-cooked chicken?
Yes, leftover or rotisserie chicken works great in this sandwich. Just warm it slightly before assembling for best results.
→ How do I keep the avocado from browning?
Slice the avocado just before assembling the sandwich. The lemon in the mustard also helps prevent browning.
→ What cheese melts best?
Swiss, provolone, and cheddar all melt well. Choose based on your flavor preference – Swiss is mild, cheddar is sharp, provolone is buttery.
→ Can I make this ahead?
It’s best served fresh and warm, but you can prep the chicken ahead of time. Assemble and grill just before serving.
Let me share my favorite holiday party trick these irresistible Eggnog Cake Balls! I started making these little bites of heaven when I needed something special for a Christmas party. Now they’re the most requested treat in my holiday baking lineup. Think rich eggnog cake wrapped in silky chocolate with just a touch of sea salt pure magic!
What Makes These Special
Think of these as fancy cake truffles that capture all the cozy flavors of your favorite holiday drink. We take tender cake mix it with frosting roll it into perfect little bites then dip them in chocolate. They look so fancy but between us they’re actually super easy to make!
Grab These Ingredients
Pound Cake Mix: This makes the perfect rich base.
Eggnog: The real deal makes all the difference!
Butter: Let it soften on the counter first.
Eggs: For that perfect cake texture.
Rum: Optional but so good! Use extract if you prefer.
Nutmeg: Fresh grated if you can get it.
Frosting: Good old vanilla works best here.
Candy Melts: These make dipping a breeze.
Sea Salt: Just a pinch makes the flavors pop.
Let’s Make Magic
Cake Time
Mix up your cake and get it in the oven at 350°F. Your kitchen’s about to smell amazing! Let it cool completely no cheating.
Get Rolling
Crumble that cake into fine crumbs then mix in just enough frosting until it holds together when you squeeze it. This is my favorite part!
Shape The Fun
Roll into cute little balls about an inch wide. Pop them in the fridge to firm up overnight is best but a few hours works too.
Dip and Decorate
Dip each ball in melted candy coating let the extra drip off then add a tiny sprinkle of sea salt while they’re still wet.
The Waiting Game
Pop them back in the fridge for about 30 minutes until they’re set and shiny.
My Best Tips
Don’t skip chilling the balls before dipping they’ll hold their shape better. Can’t find candy melts? Mix chocolate chips with a little coconut oil works like a charm. And always add that sea salt while the chocolate’s still wet or it won’t stick!
Keep Them Fresh
Planning ahead? You can freeze the naked cake balls for up to six weeks! Once they’re coated they’ll stay perfect at room temp for four days in the fridge for two weeks or pop them in the freezer for up to six weeks if they last that long!
Mix It Up
Sometimes I use cream cheese frosting for extra tang. Try different chocolate coatings white chocolate looks so festive! Want to make them extra special? Add holiday sprinkles crushed cookies or even edible glitter instead of salt.
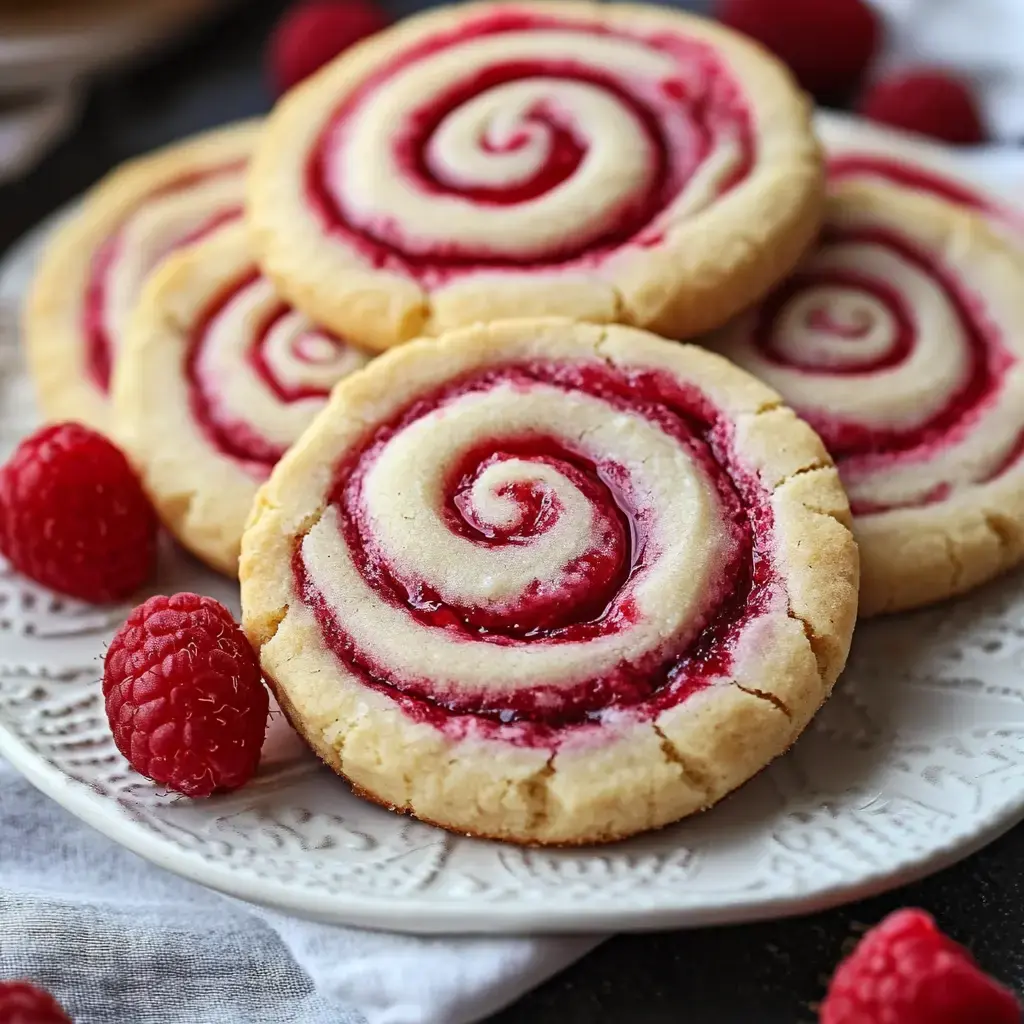
I’ve been making these Raspberry Swirl Cookies for years and they never fail to amaze me. The way the tender cream cheese dough wraps around that vibrant raspberry filling creates such beautiful swirls. Every time I bake them my kitchen fills with the most wonderful buttery sweet aroma. They’re truly one of my favorite cookies to share during the holidays.
What Makes These Special
These cookies are like little works of art that taste as amazing as they look. I love how the cream cheese makes the dough so incredibly tender it just melts in your mouth. That pop of raspberry adds such a lovely brightness. They’re fancy enough for special occasions but I often make them just because they’re too good to save for holidays.
Your Shopping List
Cream Cheese: Use full-fat cream cheese for a creamy dough texture; softened for easy mixing.
Butter: Unsalted butter ensures the balance of sweetness and richness.
Flour: Sifted all-purpose flour guarantees a smooth and pliable dough.
Raspberry Jam: Opt for high-quality, seedless jam for a consistent filling and beautiful swirls.
Let’s Create Together
Prepare the Dough
Cream together softened cream cheese and butter until smooth. Gradually add sifted flour and a pinch of salt, mixing until a dough forms. Chill the dough wrapped in plastic wrap for 30 minutes.
Roll and Add Jam
Roll the dough into a rectangle on a floured surface. Spread an even layer of raspberry jam, leaving a margin at the edges.
Roll into a Log
Carefully roll the dough into a tight log, starting from the jam-covered side. Chill the log briefly for clean slicing.
Bake the Cookies
Slice the log into cookies and bake at 180°C (350°F) for 12–15 minutes, or until edges turn golden.
Mix It Up
Sometimes I love switching things up by using different jams strawberry is amazing and blackberry adds such gorgeous color. A little lemon zest in the dough brightens everything up beautifully. My sister loves when I sprinkle chopped almonds over the jam before rolling it gives such nice crunch.
Keep Them Fresh
These cookies stay perfect in an airtight container for about a week. I often make extra and freeze them with parchment paper between layers they last for months that way. Just let them come to room temperature before serving they taste just as fresh as the day they were baked.
A Family Tradition
Every time I make these cookies I think of baking with my grandmother. The recipe has been passed down and tweaked over the years but that feeling of joy and connection remains. There’s something so special about sharing these treasured treats with new generations.
Perfect Pairings
These cookies are absolutely divine with a cup of earl grey tea or your favorite coffee. When I’m hosting during the holidays I arrange them on a pretty platter with other cookies. A light dusting of powdered sugar right before serving makes them look extra magical.
Helpful Tips
If your dough starts cracking while you roll it just let it warm up for a few minutes. Keep your surface lightly floured to prevent sticking. The secret to those perfect swirls is making sure your dough is nice and cold before slicing. Little tricks like these make such a difference.
Holiday Magic
There’s something so special about these cookies during the holidays. They look beautiful on any dessert table and everyone always asks for the recipe. I love watching people’s faces light up when they take their first bite it’s pure joy in cookie form.
Frequently Asked Questions
→ Why chill the dough twice?
The first chilling helps firm the dough for rolling, while the second chilling after forming the log makes it easier to slice cleanly.
→ Why leave a margin without jam?
The clean margin helps seal the log properly when rolling, preventing the jam from leaking during baking.
→ Can I use different jam flavors?
Yes, any seedless jam works well. Try strawberry, blackberry, or apricot for different variations.
→ Why use thread to slice?
Thread allows for clean cuts without compressing the dough, helping maintain the swirl pattern better than a knife.
→ Why dust with powdered sugar after cooling?
Adding powdered sugar while cookies are hot will cause it to melt. Waiting ensures an even, attractive coating.
Conclusion
These refined cookies combine a tender cream cheese dough with raspberry jam in a beautiful swirl pattern, finished with powdered sugar for a festive touch.
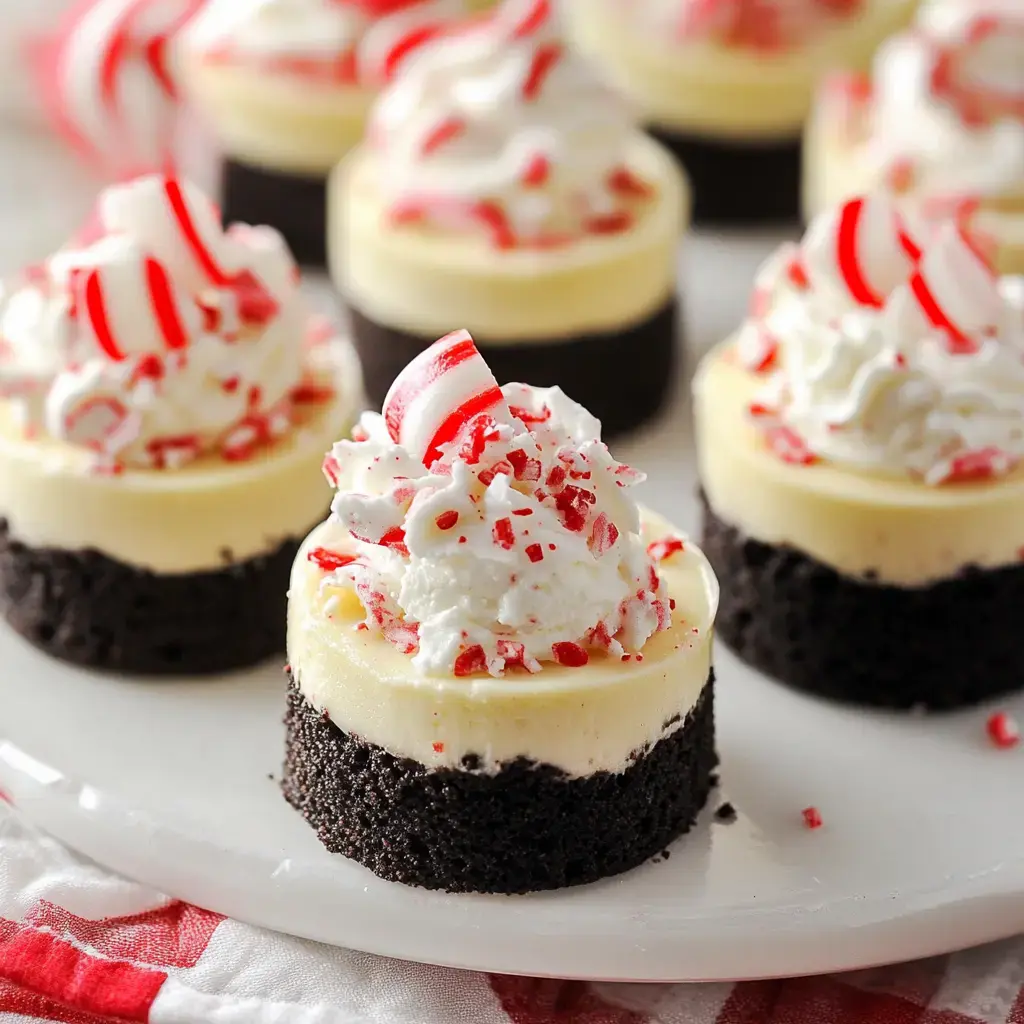
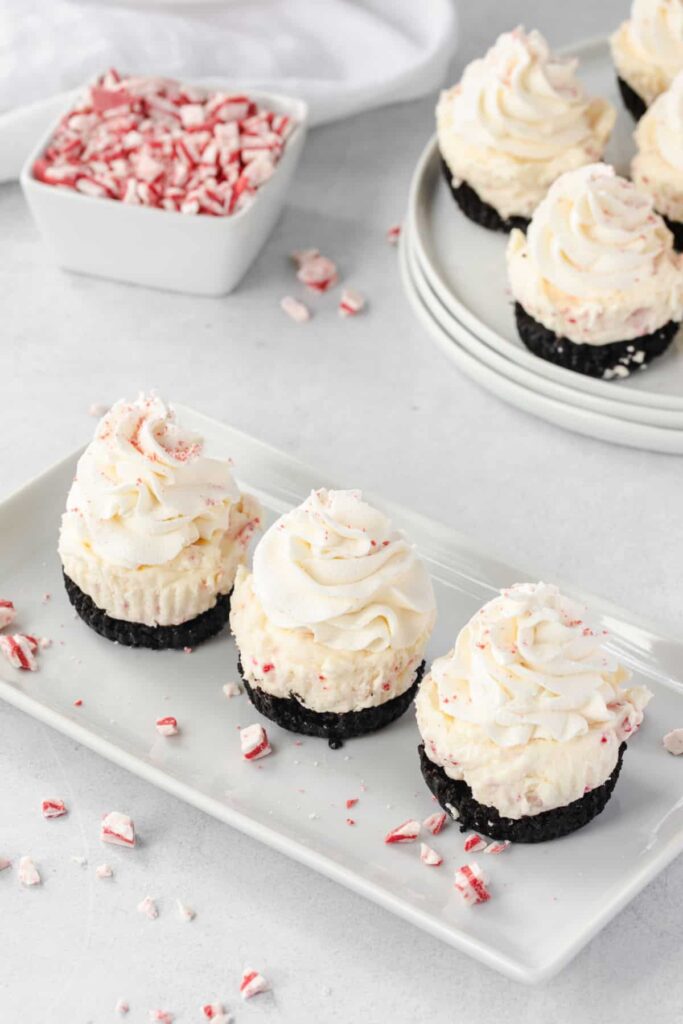
These Mini Peppermint Cheesecakes are my absolute favorite holiday dessert to make. I discovered this recipe a few years ago and have been perfecting it ever since. The combination of creamy cheesecake and cool peppermint is just magical. Every time I serve these at parties people can’t believe how adorable and delicious they are.
Why You’ll Fall in Love
I adore how these little cheesecakes combine three amazing flavors smooth creamy cheesecake rich chocolate and refreshing peppermint. Their mini size makes them perfect for parties plus you can dress them up however you like. My guests always get excited when they see these on the dessert table.
What You’ll Need
Oreos: 10 crushed Oreos for the crust, ensuring a rich chocolatey base.
Butter: 2 tablespoons melted, to bind the crust mixture.
Cream Cheese: 8 ounces full-fat, softened, for a smooth, creamy texture.
Sour Cream: 2 tablespoons, adding tang and richness to the filling.
Sugar: 1/3 cup granulated, to sweeten the filling.
Peppermint Extract: 1/2 teaspoon, for the perfect minty flavor.
Mini Chocolate Chips: 1/4 cup, for bursts of chocolate in every bite.
Peppermint Chips: 1/4 cup, adding a festive crunch and color.
Egg: 1 large, for structure and creaminess.
Whipped Cream: Homemade or store-bought, for the topping.
Candy Cane Kisses: For a decorative and delicious garnish.
Let’s Make Them Together
Prepare the Crust
Preheat oven to 350°F (175°C). Crush Oreos into fine crumbs, combine with melted butter, and press into a greased mini cheesecake pan. Bake for 8 minutes.
Make the Filling
Beat cream cheese, sugar, sour cream, and peppermint extract until smooth. Mix in the egg, followed by the peppermint and mini chocolate chips.
Bake the Cheesecakes
Pour filling over the cooled crusts, filling each cavity evenly. Bake for 20 minutes until set. Let cool for 30 minutes, then refrigerate for at least 2 hours.
Add Toppings
Pipe whipped cream onto chilled cheesecakes and garnish with Candy Cane Kisses. Serve immediately for the best flavor and presentation.
My Best Tips
Always use full-fat cream cheese it makes such a difference in the texture. I love chilling my bowl before making the whipped cream it whips up so much better. Sometimes I add a tiny drop of pink food coloring to make them extra festive. And if you can’t find peppermint chips Andes mints work beautifully too.
Keep Them Fresh
These little beauties stay perfect in the fridge for about 2 days in an airtight container. If you want to make them ahead you can freeze them without the whipped cream for up to a month. Just thaw them overnight in the fridge before adding the toppings.
What Makes Them Special
There’s something magical about the combination of that chocolatey Oreo crust creamy peppermint filling and pretty garnishes. They’re just the right size and look so festive on a holiday dessert table. Every time I make them they disappear in minutes.
Mix It Up
Sometimes I use graham crackers for the crust or try different extracts. A drizzle of melted chocolate over the whipped cream looks gorgeous and crushed candy canes add such nice crunch. You can really make these your own.
Make It Easy
I love that I can make the crust and filling ahead of time. While the cheesecakes are baking I get my whipped cream ready. The key to those pretty swirls is using a steady hand when piping. These little tricks make the whole process so much more enjoyable.
Frequently Asked Questions
→ Can I make these in a regular cupcake tin?
Yes, but double the crust and filling recipes, line the tin, and increase bake time to 25-30 minutes. Check for doneness by gently wiggling the pan.
→ Why should ingredients be room temperature?
Room temperature ingredients blend more smoothly and create a creamier texture without lumps in the finished cheesecake.
→ How long do these keep?
Store in refrigerator up to 2 days. Add whipped cream just before serving. Can be frozen up to a month if wrapped properly.
→ Why do the cheesecakes sink?
A slight sinking in the center is normal for these mini cheesecakes and creates the perfect well for whipped cream topping.
→ Can I use different toppings?
Yes, you can customize with different candies or toppings. Crushed candy canes or chocolate shavings work well.
Add merriment to your holiday table with these Peppermint Cheesecakes! Mini no bake cheesecakes are filled with crunchy bits of peppermint candy and topped with whipped cream in this festive and easy dessert.
Ingredients
Scale
For the Crust:
20Oreo cookies
5Tablespoonsunsalted buttermelted
For the Filling:
1cupcold heavy whipping cream
2packagescream cheese, softened8 ounce each
1 1/2cupswhite chocolate chips
1/2teaspoonpeppermint extract
1/2cupchopped Andes Peppermint Crunchplus additional for topping
Whipped creamfor topping
Instructions
Line two 12-cup muffin tins with cupcake liners.
In a food processor, pulse Oreos until they are fine crumbs. Stir in the melted butter.Fill each cupcake liner with 1 1/2 tablespoons of Oreo crumbs. Press firmly with the back of a spoon to pack in.
In a large mixing bowl, beat the whipping cream to stiff peaks.
In a separate mixing bowl, beat the cream cheese until smooth.
Melt white chocolate chips in a double boiler, or in the microwave in 30 second increments, stirring well each time. When most of the chocolate has melted, stir until smooth.
Immediately stir the white chocolate into the cream cheese mixture.Gently fold in the peppermint extract, chopped peppermint candies, and whipped cream.
Fill the cupcake liners with the cheesecake filling, using about ¼ cup of the cheesecake batter for each one.
Refrigerate at least 4 hours, or overnight.
Top with whipped cream and chopped Andes peppermints before serving.
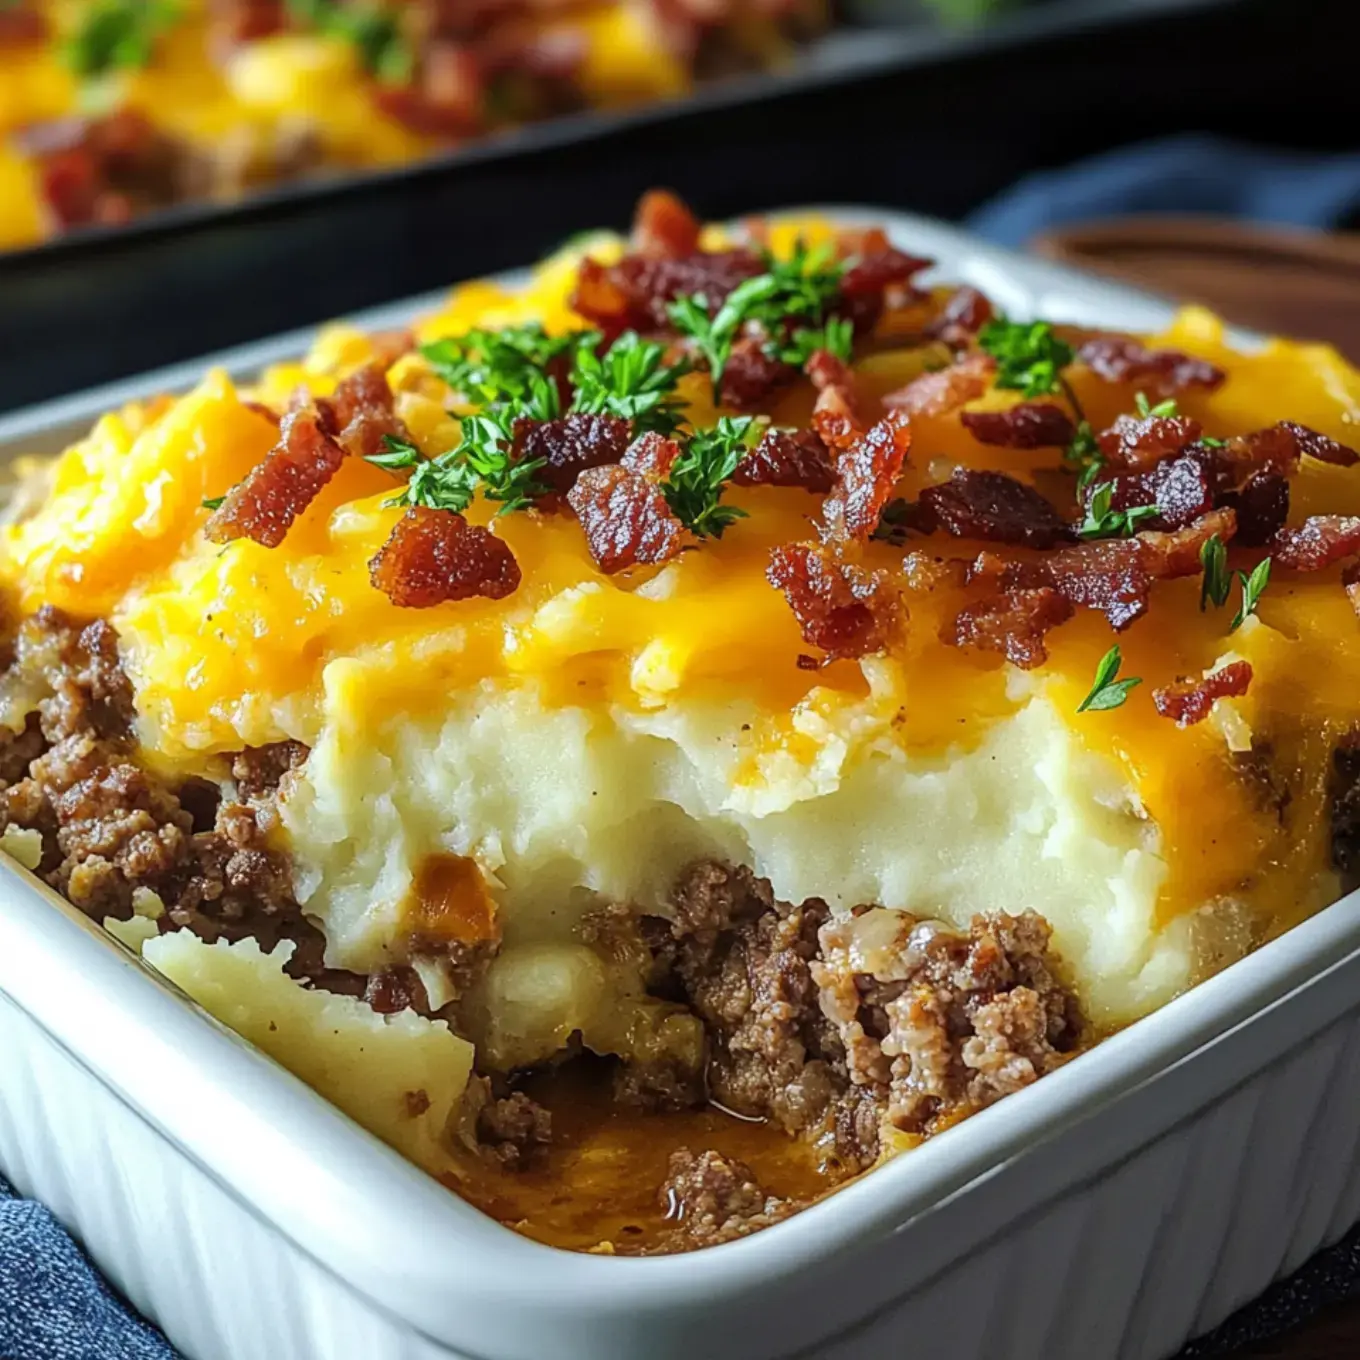
I’m so excited to share my Cheesy Loaded Meatloaf Casserole recipe with you! This is comfort food at its finest combining everything we love about classic meatloaf with layers of creamy mashed potatoes melty cheese and crispy bacon. Every time I make this my family gathers in the kitchen just to smell it baking.
Why This Recipe Is Special
What I love about this casserole is how it transforms simple ingredients into something extraordinary. It’s perfect for busy nights and even better it’s a brilliant way to use up leftover mashed potatoes. The layers of flavors make it so satisfying everyone always asks for seconds.
Everything You Need
Mashed Potatoes: Creamy and smooth, perfect for layering. Use leftovers or freshly prepared potatoes for best results.
Ground Beef: Lean ground beef ensures a flavorful and juicy base for the casserole.
Onion: Finely chopped for a subtle sweetness and added texture.
Minced Garlic: Fresh cloves, minced finely, enhance the savory flavor.
Worcestershire Sauce: Adds depth and a tangy umami kick to the meat mixture.
Brown Sugar: A touch of sweetness to balance the savory flavors.
Egg: Acts as a binder to hold the meat mixture together.
Italian Breadcrumbs: Provide structure and a subtle herbaceous flavor to the meat layer.
Sharp Cheddar Cheese: Freshly shredded for optimal melting and flavor.
Bacon: Crumbled or chopped for a smoky, savory topping.
Salt and Pepper: Adjust to taste for seasoning.
Let’s Make It Together
Prepare the Meat Mixture
Preheat your oven to 400°F (200°C). In a large bowl, mix ground beef, onion, garlic, Worcestershire sauce, brown sugar, breadcrumbs, egg, salt, and pepper until just combined. Avoid overmixing to prevent a dense texture.
Layer the Ingredients
Press the meat mixture evenly into an 8-inch square baking dish. Spread the mashed potatoes over the meat layer, ensuring an even distribution.
Add Toppings
Sprinkle shredded cheddar cheese and bacon bits evenly over the mashed potatoes for a rich, savory topping.
Bake
Cover the dish with aluminum foil and bake for 30 minutes. Remove the foil and continue baking for an additional 10 minutes or until the cheese is bubbly and golden.
Serve
Allow the casserole to rest for 10 minutes before slicing. Serve hot and garnish with fresh parsley if desired.
My Best Tips
Using fresh ingredients really makes a difference in this recipe. I’ve learned not to overmix the meat mixture it keeps everything nice and tender. That 10-minute rest after baking is crucial for perfect slices and it lets all those amazing flavors come together.
Make It Your Own
Sometimes I swap in ground turkey or cauliflower mash to lighten things up. Adding some spinach or peppers is a great way to sneak in extra vegetables. Try experimenting with different cheeses too each one brings its own special flavor.
Keep It Fresh
This casserole keeps beautifully in the fridge for about 4 days. When reheating I prefer using the oven to keep everything nice and crispy but the microwave works great for quick lunches too.
Perfect Pairings
We love serving this with some crisp green beans or a fresh garden salad to balance out the richness. Don’t forget some warm dinner rolls to soak up all that delicious cheesy goodness!
Plant-Based Options
You can easily make this vegetarian friendly by using lentils or meat alternatives in place of the beef. Vegan cheese alternatives work great too and mashed sweet potatoes make an amazing topping.
Leftover Magic
The leftovers are so versatile! Try stuffing them into bell peppers or wrapping them up in tortillas. They’re even amazing on top of baked sweet potatoes for a whole new meal.
Frequently Asked Questions
→ Can I make this ahead of time?
Yes, prepare the casserole and refrigerate until ready to bake. May need extra cooking time if starting from cold.
→ How long do leftovers keep?
Leftovers stay good for up to 3 days when stored covered in the refrigerator.
→ Can I use leftover mashed potatoes?
Yes, leftover mashed potatoes work well. You can enhance them by mixing in minced garlic for extra flavor.
→ Why cover with foil initially?
Foil helps the casserole cook evenly and prevents the cheese from burning before the meat is fully cooked.
→ Why remove foil at the end?
Removing the foil for the final minutes allows the cheese to bubble and brown for better texture and appearance.