Category: Appetizers

  • Fudgy Chocolate Cherry Thumbprint Cookies Recipe

    Fudgy Chocolate Cherry Thumbprint Cookies Recipe

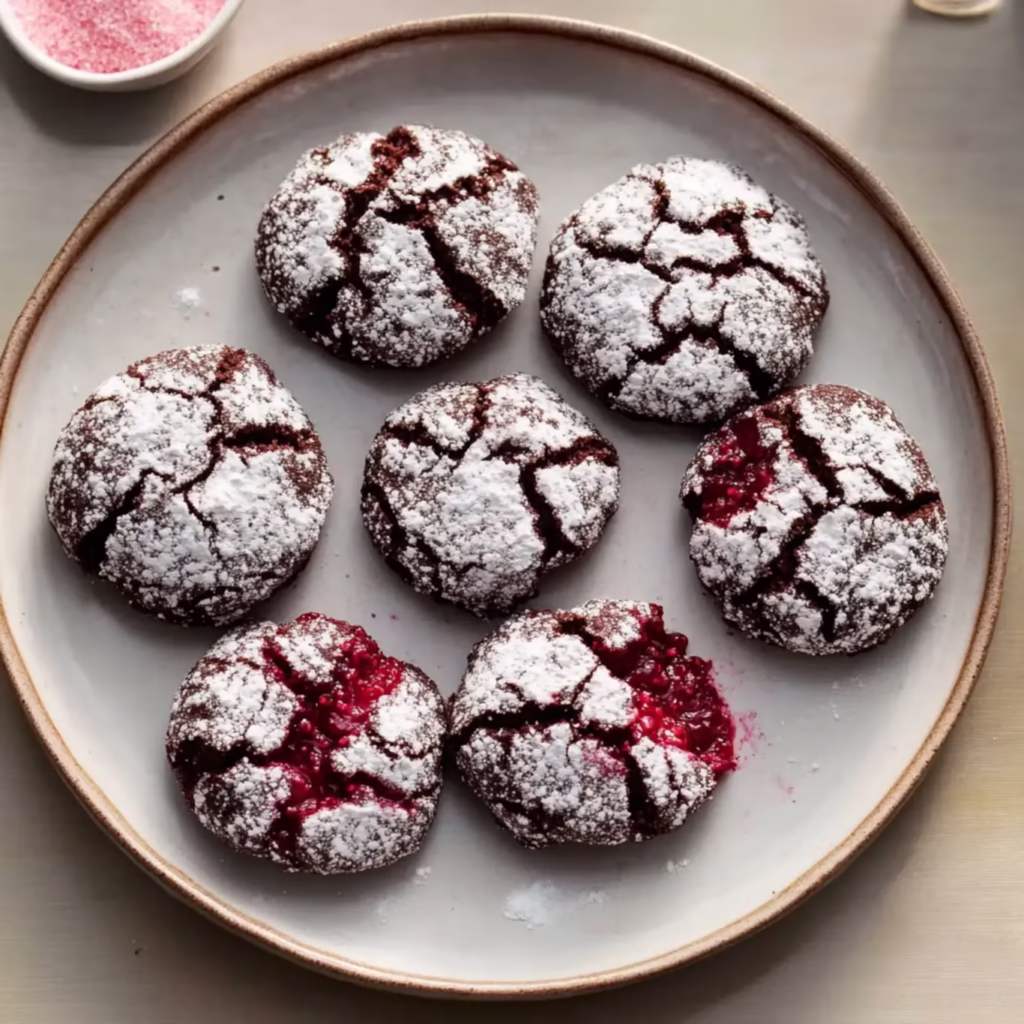
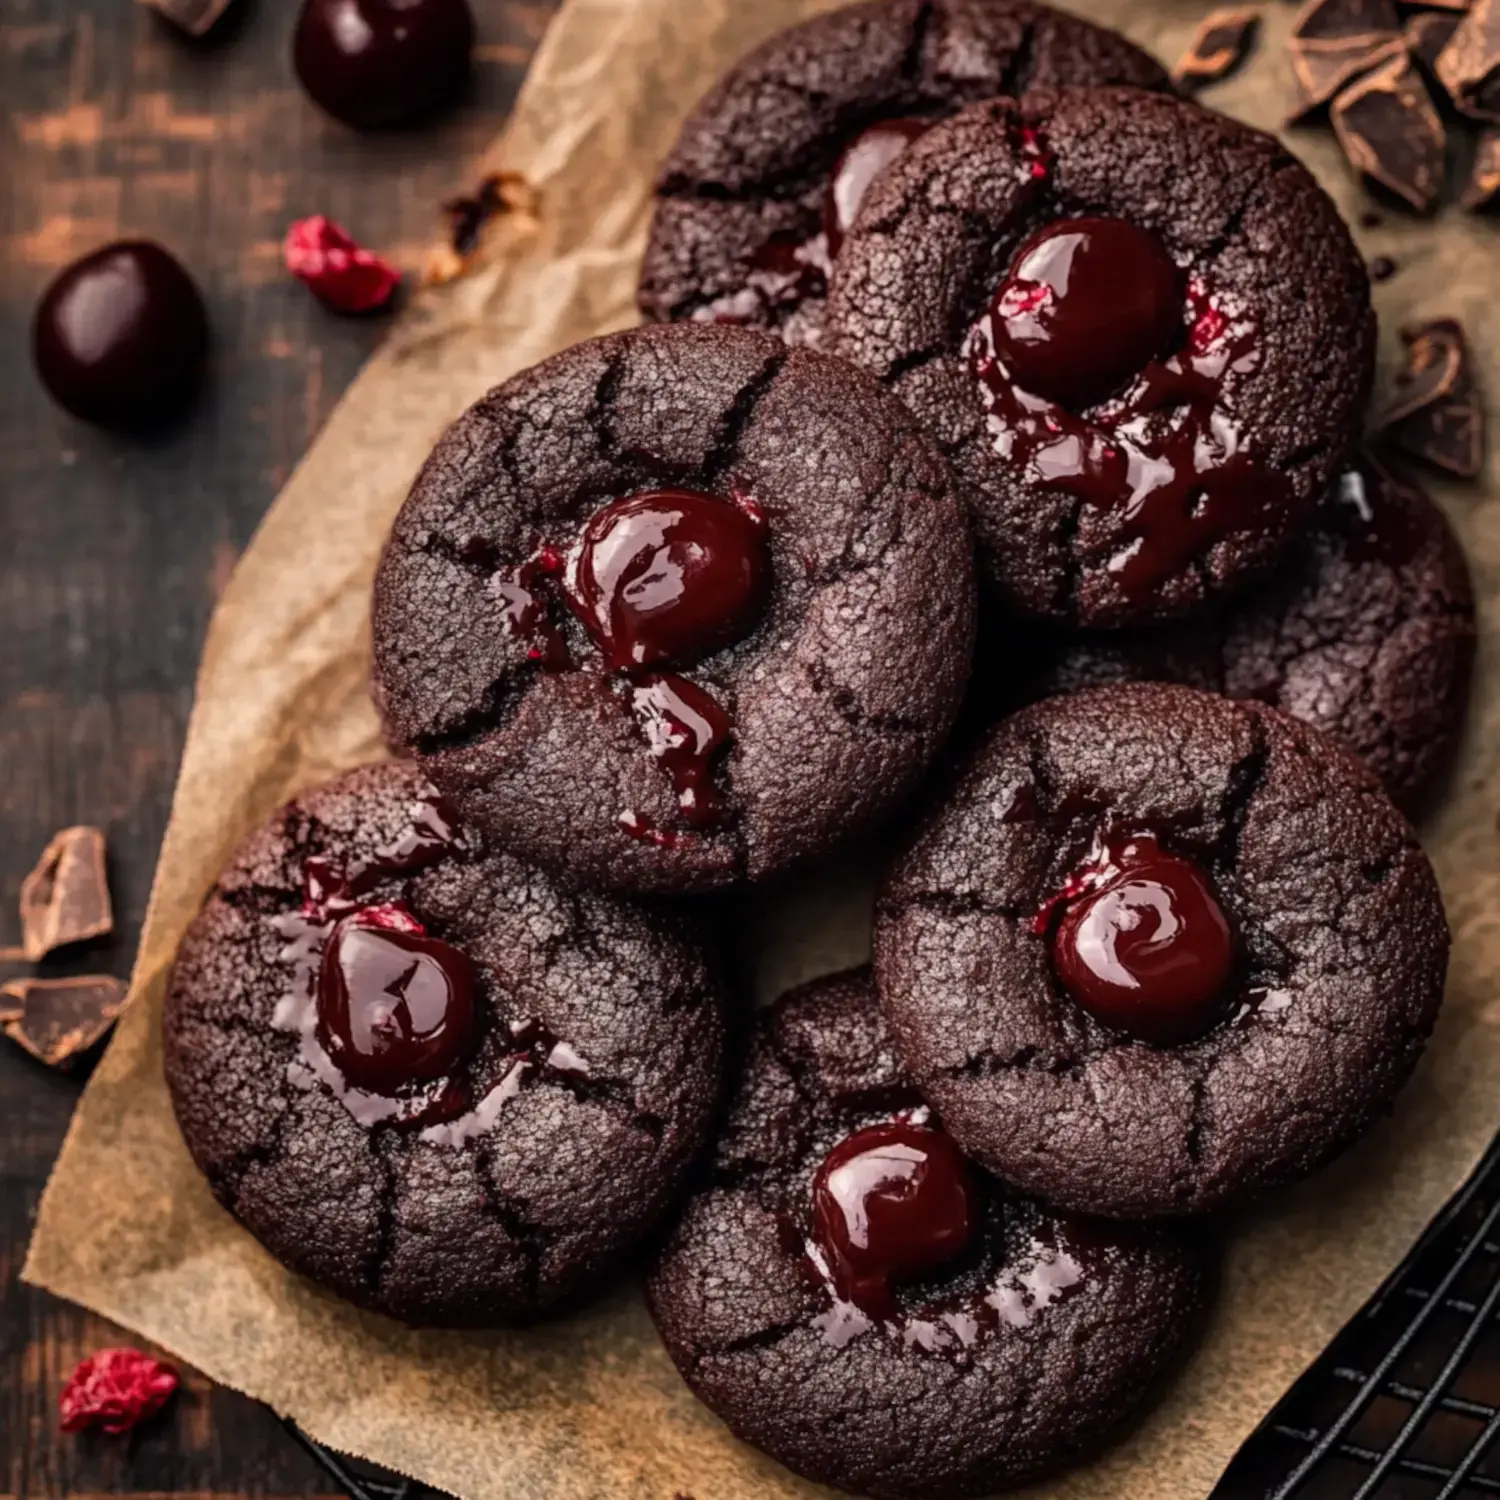
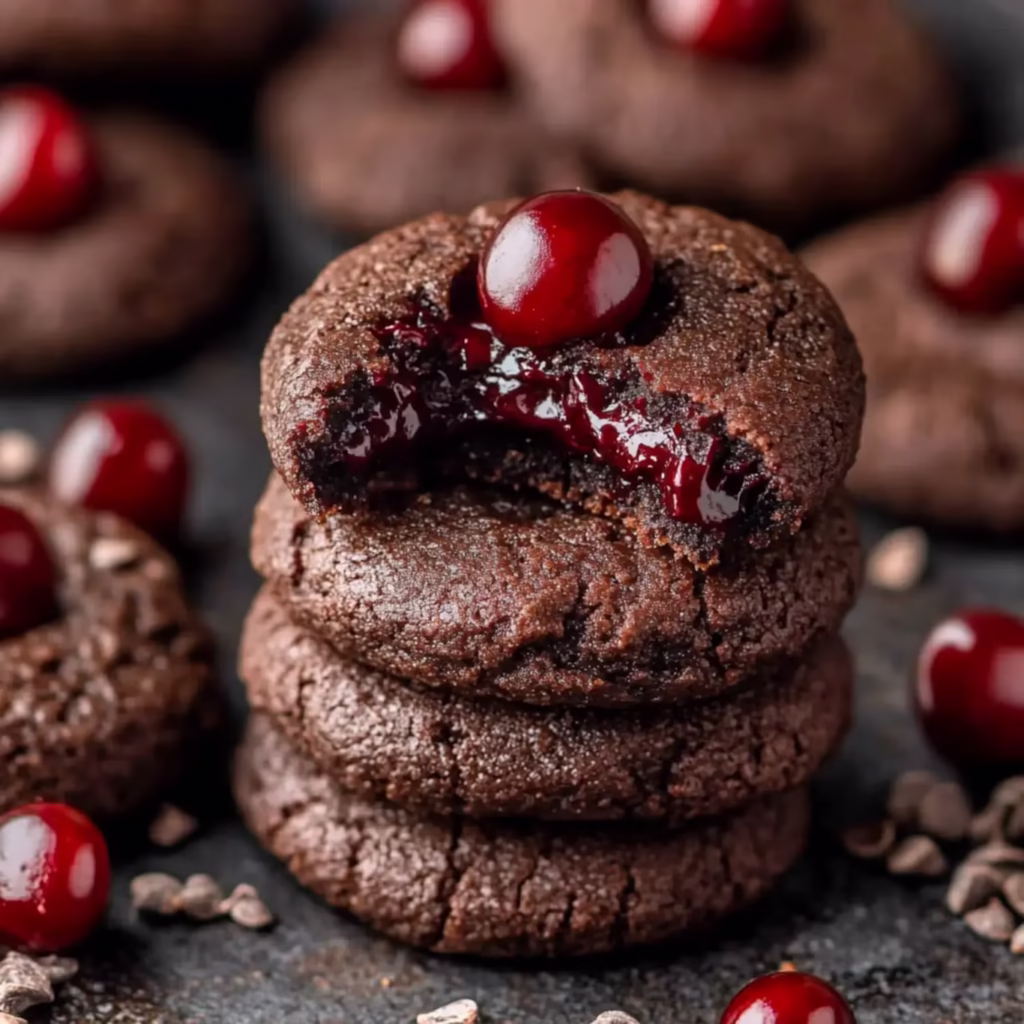
    I’m so excited to share my favorite chocolate cherry cookies with you! These are seriously the ultimate chocolate lover’s dream combining fudgy chocolate thumbprints with the most incredible chocolate cherry ganache. Every time I make them people can’t believe how rich and decadent they are.

    What Makes These Special

    These cookies are pure chocolate heaven! The Dutch-process cocoa makes them so deeply chocolatey and that texture is just perfect soft and fudgy with the most amazing chew. Plus that silky chocolate cherry ganache takes them to a whole new level. They’re surprisingly easy to make too!

    Everything You Need

    • Flour: All-purpose flour provides the ideal chewy texture for the cookies.
    • Unsweetened Cocoa Powder: Dutch-process cocoa powder ensures a rich, chocolatey taste.
    • Salt and Baking Powder: Enhance flavors and help the cookies bake perfectly.
    • Unsalted Butter: Softened butter adds moisture and richness to the dough.
    • Brown Sugar and White Sugar: A mix of sugars for a sweet, chewy texture.
    • Egg Yolks: Provide fat and structure to keep the cookies tender.
    • Vanilla Extract: Adds a hint of sweetness to complement the chocolate.
    • Dark Chocolate Chunks: Use high-quality chocolate for the ganache.
    • Cherry Preserves: Sweet, tangy preserves add a fruity balance to the ganache.
    • Heavy Cream: Essential for achieving smooth, velvety ganache.

    Let’s Make Some Magic

    Step 1 – Make the Cookie Dough
    Whisk together the flour, cocoa powder, salt, and baking powder in a bowl. In a separate large bowl, cream the butter and sugars with an electric mixer. Add the egg yolks and vanilla, mixing until light and fluffy. Slowly add the dry ingredients, mixing just until combined.
    Step 2 – Form the Cookies
    Scoop tablespoon-sized portions of dough, roll them into balls, and press an indent into each using a 1/4 teaspoon. Chill the dough balls for one hour to help the cookies maintain their shape.
    Step 3 – Bake
    Preheat the oven to 350°F (175°C). Bake the cookies in batches for 10-12 minutes. Immediately after baking, gently press the centers with the 1/4 teaspoon to redefine the indents. Use a circular cutter to reshape the cookies for a perfect round look. Let cool on a wire rack.
    Step 4 – Make the Chocolate Cherry Ganache
    Add chopped chocolate to a bowl. Heat the heavy cream until just boiling, pour it over the chocolate, and stir until smooth. Mix in the cherry preserves until well combined.
    Step 5 – Fill and Set
    Spoon about 1 teaspoon of ganache into the center of each cooled cookie. Chill for 10 minutes to allow the ganache to set. Serve and enjoy!

    My Best Tips

    Here’s what I’ve learned from making these countless times: Always measure your flour carefully preferably with a scale. Don’t skip chilling the dough it really helps them keep their shape. That 1/4 teaspoon trick for making the indents works so much better than using your thumb!

    Mix It Up

    These cookies are so versatile! Try using different chocolates or preserves to create new flavor combinations. Sometimes I’ll add holiday sprinkles or a chocolate drizzle for special occasions. A little almond extract in the ganache adds an amazing cherry-almond flavor!

    Keep Them Fresh

    These cookies stay perfect at room temperature for about 3 days in an airtight container or up to a week in the fridge. You can even freeze them for up to 2 months! I love making the dough ahead and freezing it then I can bake fresh cookies whenever the craving hits.

    Common Questions

    Yes you definitely need to chill the dough it’s crucial for perfect cookies! Store-bought cherry preserves work great in the ganache. Always use good quality chocolate bars for the ganache not chips they just don’t melt as smoothly. And while the ganache is amazing you can definitely use other fillings like chocolate spread or jam for a quick version.

    Frequently Asked Questions

    → Why do we need to chill the cookie dough?

    Chilling the dough prevents cookies from spreading too much during baking and helps maintain the thumbprint indent. The cold dough also creates a better texture, allowing cookies to stay thick and chewy.

    → Can I use regular cocoa powder instead of Dutch-process?

    While you can use regular cocoa powder, Dutch-process gives these cookies a deeper, richer chocolate flavor and darker color. If using regular cocoa, add 1/8 teaspoon of baking soda to balance the acidity.

    → What can I substitute for cherry preserves?

    You can use raspberry preserves, strawberry jam, or any fruit preserve you prefer. Just ensure it’s smooth and not too chunky to maintain the right ganache consistency. Strain if needed to remove any fruit pieces.

    → Why do my thumbprints lose their shape while baking?

    This is normal and why we re-press the indents while cookies are still hot. Make sure your initial indent is deep enough, and don’t skip chilling the dough. Using a measuring spoon helps make uniform indents.

    → Can these cookies be frozen?

    Yes, you can freeze the unfilled cookies for up to 3 months. Thaw completely at room temperature, then add the ganache filling fresh before serving. The ganache-filled cookies can be frozen but may lose some texture quality.

    Conclusion

    These special thumbprint cookies feature a fudgy chocolate cookie base filled with chocolate cherry ganache. Perfect for special occasions and chocolate lovers alike.

    Print
    clock clock iconcutlery cutlery iconflag flag iconfolder folder iconinstagram instagram iconpinterest pinterest iconfacebook facebook iconprint print iconsquares squares iconheart heart iconheart solid heart solid icon

    Fudgy Chocolate Cherry Thumbprint Cookies Recipe

    5 Stars 4 Stars 3 Stars 2 Stars 1 Star No reviews
    • Author: Hannah

    Description

    Rich chocolate thumbprint cookies filled with a luxurious chocolate cherry ganache. These fudgy cookies combine dark chocolate and sweet cherries for an irresistible treat.


    Ingredients

    Units Scale

    11/2 cups (188 g) all-purpose flour, spooned and leveled.

    1/2 cup (40 g) Dutch-process cocoa powder.

    1/2 tsp baking powder.

    1/2 tsp sea salt.

    3/4 cup (168 g) unsalted butter, softened.

    3/4 cup (165 g) light brown sugar, packed.

    1/4 cup (50 g) granulated white sugar.

    2 egg yolks, at room temperature.

    1 1/2 tsp vanilla extract.

    5 oz chocolate, chopped (Endangered Species Chocolate Vibrant Cherries + Dark Chocolate).

    1/4 cup + 2 tbsp (90 ml) heavy cream.

    1/4 cup (85 g) cherry preserves.


    Instructions

    Whisk flour, cocoa powder, salt and baking powder together in medium bowl. Set aside.

    Beat butter, brown sugar, and white sugar together with electric mixer on high speed until creamy.

    Mix in egg yolks and vanilla on medium speed until light and fluffy, about 1-2 minutes.

    Add dry ingredients to wet, mix until just combined. Scoop 32 portions, roll into balls, make indent with 1/4 tsp. Chill 1 hour.

    Bake at 350°F for 9-11 minutes. Re-press centers while hot, shape with cookie cutter if desired. Cool 5 minutes on pan.

    Pour hot cream over chopped chocolate, stir until combined. Mix in cherry preserves.

    Fill each cookie with 1 teaspoon ganache. Chill 10-15 minutes to set.


  • Chocolate Raspberry Crinkle Cookies with Real Raspberries

    Chocolate Raspberry Crinkle Cookies with Real Raspberries

    I’m thrilled to share my Chocolate Raspberry Crinkle Cookies recipe with you! These cookies are pure magic combining rich dark chocolate with bright raspberry flavor. Every time I make them people can’t believe how beautiful that raspberry-sugar coating looks with its festive crackled finish.

    Cookie Magic Inside

    What makes these cookies so special is their perfect balance of chocolate and fruit. The centers stay wonderfully fudgy while the raspberry adds such a lovely natural sweetness. I love that they’re easy enough for beginners but look totally impressive!

    Gather Your Ingredients

    • Butter: 1/2 cup, softened to room temperature for easy mixing.
    • Oil: Adds moisture for a fudgy texture.
    • Brown Sugar & Granulated Sugar: Combine for sweetness and chewiness.
    • Egg: One large egg to bind the dough.
    • Vanilla Extract: 1 tsp, or replace with raspberry liqueur for extra flavor.
    • Flour: 1 3/4 cups of all-purpose flour as the dough base.
    • Cocoa Powder: 1/2 cup natural cocoa for rich chocolate flavor.
    • Baking Soda: 1 tsp to help the cookies rise and puff.
    • Salt: A pinch to balance flavors.
    • Raspberry Preserves: 1/4 cup, providing real fruit flavor.
    • Confectioners’ Sugar: For rolling, creating the signature crinkle look.
    • Freeze-Dried Raspberries: Finely ground to mix with sugar for a fruity coating.

    Creating Cookie Joy

    Prepare the Dough
    Mix softened butter, oil, and sugars until creamy. Add the egg, vanilla, and raspberry preserves. Sift in flour, cocoa powder, baking soda, and salt, mixing until a sticky dough forms.
    Chill the Dough
    Cover and refrigerate for at least 3 hours or up to 3 days. Allow the dough to rest at room temperature for 30 minutes if chilling for longer than 3 hours.
    Shape the Cookies
    Scoop 1 1/2-tablespoon portions and roll into balls. Coat generously in the raspberry-confectioners’ sugar mixture.
    Bake
    Place coated dough balls on a parchment-lined baking sheet, spacing them 2 inches apart. Bake at 350°F (175°C) for 10–12 minutes, or until cracks form. Cool for 5 minutes before transferring to a rack.

    My Best Tips

    Don’t skip chilling the dough it’s crucial for keeping their shape! Be really generous with that raspberry sugar coating it makes them so pretty. I always use natural cocoa powder for the best chocolate flavor. And try to bake these on a dry day humidity can make the coating a bit sticky.

    Keep Them Fresh

    These cookies stay perfect for about a week in an airtight container. I love making extra to freeze they keep beautifully for up to 3 months. Just give them a fresh dusting of raspberry sugar when you’re ready to serve them again.

    Make Them Your Own

    Sometimes I’ll add orange zest for a citrusy kick or throw in some white chocolate chips. You can experiment with different jams too blackberry and cherry are amazing! A drizzle of dark chocolate on top makes them look extra fancy.

    Perfect For Sharing

    These cookies always steal the show at holiday parties! That beautiful crackled coating looks so festive on cookie platters. I love serving them with hot cocoa or coffee they make any gathering feel extra special.

    Frequently Asked Questions
    → Why is chilling the dough mandatory?
    The dough needs at least 3 hours of chilling because it’s very sticky and contains raspberry preserves. Chilling firms up the butter and allows the flour to hydrate, making the dough easier to handle and preventing excessive spreading during baking.
    → Can I use different types of raspberry products?
    The recipe specifically calls for raspberry preserves in the dough and freeze-dried raspberries for the coating. Regular dried raspberries won’t work for the coating as they need to be ground into powder. Fresh raspberries would add too much moisture.
    → How do I prevent the sugar coating from melting?
    Roll the dough balls very generously in the raspberry-sugar coating before baking. If needed, you can sift additional coating over cooled cookies. The coating naturally melts somewhat during baking to create the crinkle effect.
    → Can I make these cookies ahead?
    Yes, the dough can chill for up to 3 days before baking. Unbaked cookie dough balls freeze well for 3 months (without sugar coating). Baked cookies also freeze well for up to 3 months.
    → Why use both granulated and brown sugar?
    Granulated sugar creates the crisp exterior and helps with spreading, while brown sugar adds moisture and chewiness to the interior. Together they create the perfect soft-baked yet chewy texture.

    Print
    clock clock iconcutlery cutlery iconflag flag iconfolder folder iconinstagram instagram iconpinterest pinterest iconfacebook facebook iconprint print iconsquares squares iconheart heart iconheart solid heart solid icon

    Chocolate Raspberry Crinkle Cookies with Real Raspberries

    5 Stars 4 Stars 3 Stars 2 Stars 1 Star No reviews
    • Author: Hannah

    Description

    Soft-baked and chewy chocolate cookies with real raspberry preserves, rolled in a special raspberry-powdered sugar coating for extra flavor and visual appeal.


    Ingredients

    Units Scale

    1/2 cup (113g) unsalted butter, softened.

    1 Tablespoon vegetable oil, avocado oil, or olive oil.

    1/2 cup (100g) granulated sugar.

    1/2 cup (100g) packed light or dark brown sugar.

    1 large egg, at room temperature.

    1 teaspoon pure vanilla extract or raspberry liqueur.

    1 1/2 cups (188g) all-purpose flour.

    2/3 cup (56g) unsweetened natural cocoa powder.

    1 teaspoon baking soda.

    1/8 teaspoon salt.

    1/3 cup (100g) raspberry preserves.

    3/4 cup (90g) confectioners’ sugar.

    1/2 cup (13g) freeze-dried raspberries.


    Instructions

    Beat butter, oil, and sugars until fluffy, 2-3 minutes. Add egg and vanilla. Mix flour, cocoa, baking soda, and salt separately, then combine with wet ingredients and preserves.

    Cover dough and chill in refrigerator for at least 3 hours and up to 3 days.

    Let chilled dough sit at room temperature 10-20 minutes. Preheat oven to 350°F. Line baking sheets.

    Process freeze-dried raspberries into powder, sift out seeds. Mix with confectioners’ sugar.

    Roll 1.5 tablespoon dough balls, coat generously in raspberry-sugar mixture. Place 3 inches apart on sheets.

    Bake 12-14 minutes until edges set but centers soft. Cool 10 minutes on sheet, then transfer to rack.


  • Traditional Rosettes Cookie Recipe – Holiday Favorite

    Traditional Rosettes Cookie Recipe – Holiday Favorite

    Every winter when I pull out my rosette iron I’m filled with such joy. These delicate Scandinavian cookies have become my signature holiday treat. The way they transform from simple batter into intricate snowflakes and stars feels like pure magic in my kitchen. A light dusting of powdered sugar makes them sparkle just like fresh snow.

    Pure Holiday Magic

    These cookies bring something truly special to every gathering.

    • Beautiful Design: Each one looks like a little work of art right from your kitchen.
    • So Versatile: I love using them as both treats and decorations on my tree.
    • Family History: Making these connects me to generations of bakers who’ve shared this tradition.
    • Light as Air: Their crispy texture makes them different from any other holiday cookie.

    Time to Cook

    Prepare the Batter
    Whisk together the flour, milk, eggs, salt, and sugar until smooth. Let it rest for 30 minutes.
    Heat the Oil
    Preheat your frying oil to 375°F in a deep, heavy-bottomed pot or deep fryer.
    Heat the Rosette Iron
    Place the rosette iron in the hot oil for 1-2 minutes until fully heated.
    Dip and Fry
    Dip the hot iron into the batter, ensuring it doesn’t go over the top edge. Submerge the coated iron into the hot oil and fry until golden, about 30 seconds to 1 minute.
    Cool and Decorate
    Gently remove the rosette from the iron and let it drain on paper towels. Once cooled, dust with powdered sugar.

    Tips for Success

    • Keep your batter smooth and free of lumps for the best results.
    • Always heat the rosette iron before dipping it into the batter to ensure it sticks properly.
    • Maintain a steady oil temperature of 375°F to avoid soggy or unevenly cooked rosettes.

    My Kitchen Secrets

    • Oil Matters: Canola oil gives me the most consistent results.
    • Watch That Heat: My candy thermometer never leaves the pot while I’m frying.
    • Hot Iron Rules: A well heated iron makes perfect shapes every time.
    • Even Color: I give each one a gentle flip for perfect golden brown.
    • Patient Sugar: Waiting until they’re completely cool before sugaring makes all the difference.

    Sweet Memories

    Making rosettes takes me right back to watching my mom and Mrs. Homer in our kitchen every December. The smell of hot lard filled our house as they chatted and fried batch after batch. Those cookies hidden in the freezer were too tempting we kids always found ways to sneak a few leaving telltale sugar trails behind.

    Keeping Them Fresh

    I’ve learned to make these ahead and freeze them between layers of wax paper. Just hold off on the sugar until you’re ready to serve them. They keep beautifully for two months this way and taste just as crisp when thawed.

    What You’ll Need

    • A sturdy rosette iron mine has both star and snowflake patterns.
    • My favorite deep pan perfect for keeping steady heat.
    • A reliable candy thermometer for perfect temperature.
    • Plenty of paper towels and my cooling rack.
    • My grandmother’s sugar shaker makes the prettiest coating.
    Frequently Asked Questions
    → Why isn’t my batter sticking to the iron?

    Make sure the iron is hot enough before dipping in batter, but wipe off excess oil. The iron should be hot but not smoking.

    → Can I make these without a rosette iron?

    No, a special rosette iron is required for the distinctive pattern. These irons can be found in kitchen supply stores or online.

    → Why are my rosettes not crispy?

    Oil temperature needs to be consistently at 375°F. Too low temperature makes them soggy, too high makes them brown too quickly.

    → How do I store rosettes?

    Store in an airtight container and freeze for up to 2 months. Don’t dust with sugar until ready to serve.

    → Why are my rosettes sliding off the iron?

    Don’t dip the iron too deep in batter – it should only go up about 7/8 of the way. Also ensure batter isn’t too thin.

    Conclusion

    Traditional rosettes are delicate, crispy fried cookies made using a special iron. These festive treats are dusted with powdered sugar and perfect for holiday celebrations.

  • Easy Cranberry Orange Icebox Cookies Recipe

    Easy Cranberry Orange Icebox Cookies Recipe

    I’ve fallen in love with these Cranberry Orange Icebox Cookies. The way fresh orange zest brightens the buttery shortbread and those sweet-tart cranberries create little jewels throughout each slice. A sparkly sugar edge and delicate orange glaze make them simply irresistible.

    Pure Cookie Joy

    These cookies have become my holiday secret weapon. The dough comes together so easily and waiting in the fridge until I need it. That perfect balance of cranberry and orange creates something truly special while the slice-and-bake method makes holiday baking feel effortless.

    What You’ll Need

    • Cookie Base: My favorite shortbread ingredients create the perfect foundation.
    • Orange Magic: Fresh zest and juice bring such wonderful brightness.
    • Dried Cranberries: These little gems add color and flavor.
    • Sparkly Sugar: Rolling the logs creates such beautiful edges.
    • Simple Glaze: Just orange juice and powdered sugar finish everything perfectly.

    Let’s Start Baking

    Mix Your Dough
    Everything comes together in one bowl creating this wonderfully fragrant mixture.
    Shape and Rest
    Rolling into logs and chilling gives us that perfect texture.
    Add Some Sparkle
    That roll in coarse sugar makes such magic.
    Time to Bake
    Slicing reveals those beautiful cranberry speckled cookies.
    Final Touch
    A drizzle of orange glaze makes them absolutely perfect.

    Pure Holiday Magic

    What I love most about these cookies is how they bring together simple ingredients in such a beautiful way. They’re perfect for sharing during the holidays and the make-ahead option means I can focus on enjoying time with family and friends.

    Keeping Them Fresh

    These beauties stay wonderful in an airtight container for about a week. Sometimes I’ll make extra dough logs and keep them in the freezer ready for unexpected guests or last-minute cookie cravings.

    Mix It Up

    Sometimes I drizzle these with white chocolate instead of the orange glaze or add lemon zest for a different citrus note. Adding chopped pecans or walnuts creates wonderful texture. That sparkly sugar coating is optional but it adds such a lovely festive touch.

    Perfect Partners

    These cookies feel right at home next to other holiday favorites on cookie platters. I love serving them with afternoon tea or coffee the bright orange flavor shines beautifully. They always catch everyone’s eye with those pretty cranberry specks throughout.

    My Kitchen Secrets

    That good chill time makes all the difference in getting clean slices. I always use fresh orange zest never dried and roll those logs in sugar right before slicing. Letting the cookies cool completely before glazing keeps everything looking picture perfect.

    The Magic of Chilling

    Chilling these cookies isn’t just about convenience it’s what gives them that perfect texture. The butter firms up creating cookies that hold their shape with slightly crisp edges and tender centers. It’s what makes icebox cookies so special.

    What Others Say

    Every time someone tries these cookies they become part of their holiday tradition too. Like Maryn who shared how gorgeous and delicious they turned out especially with that sugary edge and orange glazed top. Her excitement about making them again speaks volumes.

    Planning Ahead

    Having those prepared dough logs in the freezer feels like a gift to my future self. Just a quick thaw in the fridge and I can have fresh-baked cookies anytime. It makes holiday baking so much more enjoyable when you can spread out the work.

    Sharing the Love

    These cookies make such wonderful gifts tucked into pretty tins or boxes. Something about their festive appearance and bright flavors makes them perfect for sharing during the holidays. They’re a heartfelt way to show someone you care.Frequently Asked Questions

    → Why chill the dough?
    Chilling is mandatory as it firms up the dough for clean slicing and helps develop the orange flavor. Overnight chilling gives the best flavor results.
    → Can I make these ahead?
    Yes, the dough logs can be refrigerated for up to 5 days or frozen for 3 months. Baked cookies also freeze well for up to 3 months.
    → Can I use fresh cranberries?
    Dried cranberries work best as fresh ones would add too much moisture. Make sure to chop them finely for even distribution.
    → What’s the best way to slice them?
    Use a sharp knife and rotate the log slightly between cuts to prevent flat sides. If dough crumbles, let it warm slightly.
    → Can I substitute the orange glaze?
    Yes, you can dip in or drizzle with melted white or dark chocolate instead of the orange glaze for a different flavor combination.

    Print
    clock clock iconcutlery cutlery iconflag flag iconfolder folder iconinstagram instagram iconpinterest pinterest iconfacebook facebook iconprint print iconsquares squares iconheart heart iconheart solid heart solid icon

    Easy Cranberry Orange Icebox Cookies Recipe

    5 Stars 4 Stars 3 Stars 2 Stars 1 Star No reviews
    • Author: Hannah

    Description

    Buttery shortbread-style cookies filled with dried cranberries and orange zest, finished with a simple orange glaze. Perfect for make-ahead baking.


    Ingredients

    Units Scale

    3/4 cup unsalted butter, softened.

    2/3 cup granulated sugar.

    1 large egg, room temperature.

    1 teaspoon vanilla extract.

    2 cups plus 2 tablespoons all-purpose flour.

    1/4 teaspoon salt.

    2 tablespoons orange juice.

    1 teaspoon orange zest.

    3/4 cup finely chopped dried cranberries.

    Coarse sugar for rolling.

    1 cup confectioners’ sugar.

    2 tablespoons orange juice for icing.


    Instructions

    Beat butter and sugar until creamy. Add egg and vanilla. Mix in flour and salt, then orange juice, zest, and cranberries.

    Form dough into two 7-8 inch logs, about 2.5 inches diameter.

    Wrap logs in plastic and refrigerate at least 3 hours or up to 5 days.

    Heat oven to 350°F. Line baking sheets with parchment.

    Roll logs in coarse sugar if desired.

    Cut each log into 12 slices. Bake 13-15 minutes until edges are light brown.

    Cool 5 minutes on pan, then transfer to wire rack.

    Whisk confectioners’ sugar and orange juice. Drizzle over cooled cookies.


    Notes

    Dough can be made ahead and frozen.

    Longer chill time enhances orange flavor.

    Can substitute chocolate for glaze.

  • Easy Strawberry Kiss Cookies – Perfect Valentine’s Day Treat

    Easy Strawberry Kiss Cookies – Perfect Valentine’s Day Treat

    My Strawberry Kiss Cookies story began during Valentine’s season when I wanted to create something both pretty and delicious. Now they’ve become our family’s favorite sweet treat for special occasions. The way that soft sugar cookie base wraps around cream cheese then gets crowned with a strawberry kiss creates pure magic in every bite. Plus they’re just so pretty with their sparkly sugar coating.

    Pure Sweet Joy

    What I love most about these cookies is how quickly they come together with just a handful of ingredients. That combination of chewy cookie and creamy chocolate makes everyone smile. They’ve saved countless parties and celebrations in my house from Valentine’s Day to baby showers.

    Everything You’ll Need

    • Cookie Mix: One box of Funfetti makes life easier and prettier.
    • Cream Cheese: Makes everything perfectly soft and puffy.
    • Fresh Egg: Just one brings it all together.
    • Sparkly Sugar: Pink or white both look magical.
    • Strawberry Kisses: That perfect sweet finishing touch.

    Let’s Make Some Magic

    Creating Our Dough
    Mix everything together until it’s perfectly soft and smooth. A little chill time makes it easier to handle when it’s feeling sticky.
    The Pretty Part
    Scoop out little portions and roll them in that sparkly sugar watching them shimmer.
    Baking Time
    Into the oven they go just until their edges set but centers stay soft and pillowy.
    The Sweet Finish
    Let them cool just a bit then press those pretty pink kisses right in the center pure sweetness.

    My Kitchen Secrets

    Pop that dough in the fridge if it’s being stubborn about sticking. Keep your hands and scoop sugared for easier rolling. If you want those kisses to stay perfectly shaped let the cookies cool completely first. And don’t be afraid to play with different colors and flavors to match your celebration.

    Keeping Them Fresh

    These little beauties stay perfect for about four days in a good container right on your counter. Need them to last longer? The fridge keeps them happy for a week. I often make extra to freeze they’re like having a sweet surprise waiting for future celebrations.

    Common Questions Solved

    While butter can work in a pinch cream cheese really does make the fluffiest cookies. I love how easy they are to store whether on the counter for quick treats or in the freezer for later. They always taste just as wonderful as the day they were baked.

    Making Them Extra Special

    Sometimes I roll them in colorful sprinkles instead of sugar so festive. Those tiny heart sprinkles make them extra sweet for Valentine’s Day. During holidays I’ll match the sugar to the season red and green for Christmas pastels for Easter.

    Perfect Partners

    A cup of hot cocoa alongside makes everything cozier. When we’re celebrating I love serving them with pink lemonade or sparkling punch. They look beautiful on a dessert table next to chocolate-covered strawberries creating the sweetest display.

    Mix It Up Your Way

    Feel free to swap in different kiss flavors dark chocolate makes them extra rich caramel adds such warmth. A tiny splash of almond extract in the dough creates something magical. Sometimes I mix strawberry powder into the sugar coating for extra berry flavor.

    Why Everyone Loves Them

    There’s something special about these cookies beyond just how pretty they are. That perfect balance of soft cookie sparkly coating and creamy chocolate center makes them irresistible. They’re simple enough for everyday but special enough for celebrations truly the best of both worlds.

    Frequently Asked Questions

    → How do I prevent the kisses from melting too much?

    The cooling time before adding kisses determines how much they’ll melt. Wait 3-5 minutes for soft kisses, or let cookies cool completely for firm kisses.

    → What if my dough is too sticky?

    You can chill the dough for 30-60 minutes to make it easier to handle. Use sanding sugar to coat your hands and scoop like flour when rolling.

    → How long do these cookies keep?

    Store at room temperature for 3-4 days, refrigerate for up to a week, or freeze for 2-3 months. Bring chilled cookies to room temperature before serving.

    → Can I use different kisses?

    Yes, you can substitute regular chocolate kisses or other flavored varieties. The strawberry ones are festive for Valentine’s Day but not required.

    → Why add cream cheese to cookie mix?

    Cream cheese makes the cookies softer and adds richness to the premade mix. It also helps create a better texture than using the mix alone.

    Conclusion

    These shortcut cookies combine funfetti cookie mix with cream cheese for a soft base, coated in festive sprinkles and topped with melty strawberry kisses. Perfect for Valentine’s Day or any special occasion.


    Print
    clock clock iconcutlery cutlery iconflag flag iconfolder folder iconinstagram instagram iconpinterest pinterest iconfacebook facebook iconprint print iconsquares squares iconheart heart iconheart solid heart solid icon

    Easy Strawberry Kiss Cookies – Perfect Valentine's Day Treat – My Home Made Recipe

    5 Stars 4 Stars 3 Stars 2 Stars 1 Star No reviews
    • Author: Hannah

    Description

    Quick and festive cookies made with funfetti cookie mix and cream cheese, rolled in sprinkles and topped with strawberry Hershey’s kisses.


    Ingredients

    Units Scale

    16 ounces Funfetti Sugar Cookie Mix.

    4 ounces cream cheese, softened.

    1 large egg.

    1/2 cup pink or white sanding sugar or nonpareils.

    18 Hershey’s Strawberry Ice Cream Cone Kisses.


    Instructions

    Heat oven to 375°F. Line baking sheet with parchment paper.

    Beat cookie mix, cream cheese and egg until combined into soft dough.

    Scoop 1½ tablespoon dough balls and roll in sugar or nonpareils. Optional: chill dough 30-60 minutes if too sticky.

    Place cookies 1½ inches apart on sheet. Bake 8-12 minutes until edges set.

    Cool cookies 3-5 minutes, then press a Strawberry Kiss into center of each cookie.

    Transfer to cooling rack to cool completely or serve warm.