Category: Main Dishes

  • Perfect Roast Turkey Recipe – Holiday Classic with Herb Butter

    Perfect Roast Turkey Recipe – Holiday Classic with Herb Butter

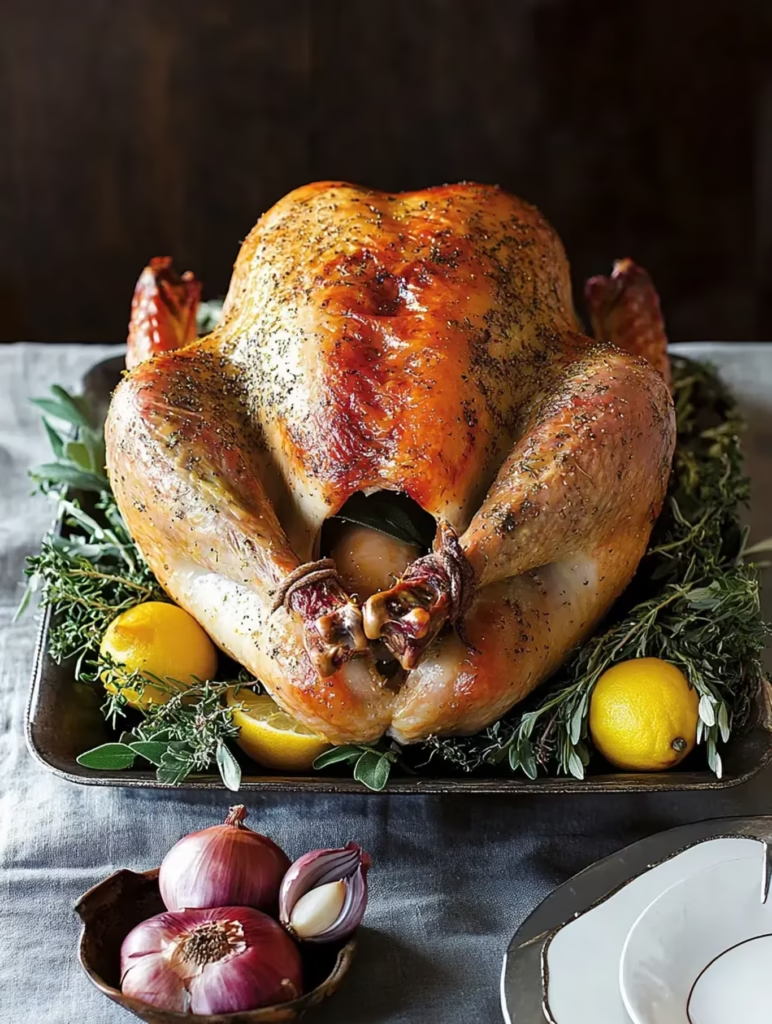
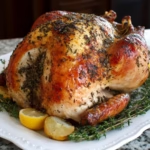
    After years of holiday dinners, I’ve finally mastered the perfect roast turkey! It’s juicy inside, golden-brown outside, and packed with flavor from fresh herbs, lemon, and garlic. Don’t worry if you’ve never roasted a turkey before – I’ll walk you through every step to make your holiday dinner amazing.

    The Secret To Success

    Here’s what makes this turkey special – a generous amount of herb butter under and over the skin keeps everything moist, while aromatics stuffed inside add incredible flavor. My family says it’s better than anything they’ve had at restaurants, and honestly, it’s not complicated at all!

    What You’ll Need

    • Turkey: Get a fresh one if you can, or make sure yours is completely thawed.
    • Butter: Grab unsalted – you want to control the salt yourself.
    • Fresh Herbs: I use rosemary, thyme, and sage from my garden.
    • Lemon: Makes everything taste brighter.
    • Onion and Garlic: These add amazing flavor from the inside out.
    • Salt and Pepper: Kosher salt and fresh ground pepper make a difference.

    Let’s Make That Bird

    Getting Started
    Pull your turkey out early – it needs an hour to lose that chill. Meanwhile, grab your biggest roasting pan and crank the oven to 350°F. Take out all the goodies inside the turkey (save them for gravy!). Pat that bird dry like you mean it – inside and out. A dry turkey makes crispy skin!
    The Magic Butter
    Here’s where the flavor magic happens. Soften that butter and mix in finely chopped herbs, lemon zest, a pinch of salt, and pepper. Now comes the fun part – gently work your fingers under the skin of the breast meat to create a pocket. Go slow, you don’t want to tear the skin. This is where that flavored butter’s going to make everything delicious.
    Seasoning Time
    Quarter your onion, peel some garlic cloves, and grab a handful of herbs. Stuff all of that into the cavity – it’s like making the turkey its own flavor steamer. Now massage that herb butter under the skin, getting it as even as you can. Rub the rest all over the outside. Season everything generously with salt and pepper – don’t be shy!
    Into The Oven
    Set your turkey on the rack breast-side up. No need to truss unless you want to – I find it cooks more evenly untrussed. Now, here’s my timing trick: figure about 13 minutes per pound for an unstuffed bird. Pop it in and let it do its thing. After the first hour, start basting every 30 minutes with those amazing pan juices.
    The Waiting Game
    Your turkey’s done when a meat thermometer reads 165°F in the thickest part of the thigh (avoid hitting bone). If the skin starts getting too dark before it’s done, just tent it loosely with foil. The hardest part? Letting it rest for 30 minutes before carving. Trust me – this keeps all those juices in the meat where you want them!

    My Best Turkey Tips

    Let me share what I’ve learned from years of turkey disasters turned triumphs! First, never skip thawing properly – I put mine in the fridge for 24 hours for every 4 pounds. Always use a meat thermometer – don’t trust those pop-up timers. I stick mine in the thickest part of the thigh, away from bone. If your turkey’s browning too fast, just tent the darker spots with foil. And here’s my secret – I rub soft butter all over the skin right before it goes in the oven for extra crispiness.

    Saving Those Leftovers

    Turkey sandwiches are great, but let me tell you how to keep that meat perfect for days! Slice off what you need right after dinner, then wrap the rest in foil before it cools completely – this keeps it from drying out. Pop it in an airtight container and it’ll stay good in the fridge for 4 days. Want to freeze some? Cut it into portions, wrap well, and it’ll be delicious for quick dinners up to 3 months later. Just add a splash of broth when reheating.

    Making Memories

    You know what’s funny? My first turkey was a disaster – dried out, barely brown, kind of sad looking. But now it’s become my thing – everyone fights over who gets to host Thanksgiving just to get my turkey! There’s something special about pulling a perfectly golden bird out of the oven while everyone oohs and aahs. It’s more than just dinner – it’s tradition, family, and memories all wrapped up in one delicious package.

    The Extra Touches

    Want to really wow your guests? I love tucking herbs under the skin along with the butter – it looks beautiful and adds more flavor. Sometimes I stuff a quartered apple in the cavity along with the other aromatics – gives everything a subtle sweetness. And don’t forget to save those pan drippings – they make the most amazing gravy! Just strain out the bits and simmer with some flour and stock.

    Your New Holiday Star

    Look, roasting a whole turkey might seem scary at first, but I promise you’ve got this! Follow these steps, take your time, and you’ll end up with a bird that’ll make you proud. There’s nothing like seeing everyone’s faces when you bring it to the table. And the best part? Those amazing leftovers – if you have any!

    Frequently Asked Questions

    → How long does it take to thaw a turkey?

    Allow 24 hours per 5 pounds when thawing in the refrigerator. Add an extra day for safety. Thawed turkey keeps 2 days in fridge.

    → Should I truss the turkey legs?

    Optional – trussing improves appearance but can slow cooking of thighs. Skip trussing for more even cooking.

    → How do I know when turkey is done?

    Thigh should reach 175°F and breast 165°F in thickest parts. Always check multiple spots with meat thermometer.

    → Why put butter under the skin?

    Butter under skin keeps breast meat moist while allowing skin to brown. Be gentle to avoid tearing skin.

    → How long should turkey rest?

    Let rest 30-60 minutes before carving. This allows juices to redistribute for moist meat.


    Print
    clock clock iconcutlery cutlery iconflag flag iconfolder folder iconinstagram instagram iconpinterest pinterest iconfacebook facebook iconprint print iconsquares squares iconheart heart iconheart solid heart solid icon

    Perfect Roast Turkey Recipe – Holiday Classic with Herb Butter

    5 Stars 4 Stars 3 Stars 2 Stars 1 Star 5 from 1 review
    • Author: Hannah

    Description

    Create a beautiful holiday turkey with rich herb butter, fresh aromatics, and foolproof instructions for perfectly cooked, juicy meat.


    Ingredients

    Units Scale

    1014 lb turkey, fresh or thawed.

    3/4 cup unsalted butter, softened.

    2 tsp lemon zest.

    1 tbsp fresh thyme leaves.

    1 tbsp chopped fresh rosemary.

    1 medium yellow onion, quartered.

    8 garlic cloves, smashed.

    1/2 bunch fresh parsley.

    Kosher salt.

    Black pepper.


    Instructions

    1- Allow turkey to rest at room temperature for one hour before beginning preparation process.

    2- Position oven rack just below center and preheat to 350°F near end of resting time.

    3- Remove giblets and neck, then thoroughly pat turkey dry inside and out with paper towels.

    4- Mix softened butter with lemon zest, thyme, and rosemary until well combined.

    5- Carefully separate skin from breast meat using wooden spoon handle, keeping skin intact.

    6- Spread one-third of herb butter under skin on each breast, smoothing from outside.

    7- Rub remaining butter all over turkey exterior, then season generously with salt and pepper.

    8- Fill cavity with quartered onion, smashed garlic, and fresh parsley sprigs.

    9- Place in roasting pan on rack and optionally tie legs with kitchen twine. Roast until thigh reaches 175°F and breast 165°F, about 14-15 minutes per pound.

    10- Tent with foil if browning too quickly during cooking process.

    11- Let rest 30-60 minutes before carving to retain juices.


  • Easy Grinch Rice Krispie Treats for Christmas

    Easy Grinch Rice Krispie Treats for Christmas

    Need a holiday treat that’ll make everyone’s heart grow three sizes? These Grinch Rice Krispie Treats are pure Christmas magic! I started making these with my kids during our annual Grinch movie night and now they’re our most requested holiday dessert. They’re gooey marshmallowy squares with a fun green twist that would make even the Grinch himself smile!

    Why These Are So Fun

    These treats take our favorite crispy squares and give them a playful Whoville makeover! Every time I make them for school parties or holiday gatherings the kids go wild for that bright green color and those sweet little hearts. Best part? They come together in a flash perfect for last minute holiday magic.

    Grab These Ingredients

    • Marshmallows: Grab the minis they melt like a dream!
    • Butter: Real butter makes everything better.
    • Rice Krispies: Any brand works just fine.
    • Green Candy Melts: For that perfect Grinchy color.
    • Coconut Oil: Makes our topping smooth and shiny.
    • Vanilla: Just a splash for extra yum.
    • Green Food Color: To make them extra Grinchy.
    • Heart Sprinkles: Big and small for that growing heart!

    Let’s Make Some Magic

    Marshmallow Time
    Pop your butter and marshmallows in a big pot and watch them get all melty and smooth. Add that splash of vanilla and enough green color to make the Grinch proud!
    Get Crispy
    Pour in those Rice Krispies and stir until every piece is coated in green goodness. Your arms might get tired but keep going!
    Press To Impress
    Dump everything into your buttered pan and press it down nice and even. I use wax paper to keep my hands clean works like a charm!
    The Fun Part
    Melt those green candy melts with a touch of coconut oil until silky smooth then spread it all over the top. Quick! Add those heart sprinkles before it sets.
    Almost There
    Pop the whole thing in the fridge just long enough to set up about 20 minutes then cut into squares and watch them disappear!

    My Best Tips

    Don’t skimp on greasing that pan trust me sticky Rice Krispies are no fun to clean! That coconut oil in the topping? Total game changer makes it spread like silk. And always keep extra heart sprinkles handy they love to roll away!

    Mix It Up

    Sometimes I cut these into Christmas trees or big hearts. Try different colored candy melts for other holidays red for Valentine’s Day is adorable! You can even match the sprinkles to birthday themes or baby showers.

    Keep Them Fresh

    These stay perfect for three days in an airtight container if they last that long! Want to plan ahead? Wrap them up tight and freeze them for up to six weeks. Just let them come back to room temp before serving they’re much better that way.

    Frequently Asked Questions

    → How long do they take to set?

    About 20 minutes in the refrigerator.

    → Can I make these ahead?

    Yes, store in airtight container up to 3 days.

    → Why add coconut oil to candy melts?

    It helps thin the coating for smoother spreading.

    → Can I use regular chocolate?

    Candy melts work best for coating and setting.

    → How do I prevent sticking?

    Grease pan and use nonstick spray on hands/spatula.

    Print
    clock clock iconcutlery cutlery iconflag flag iconfolder folder iconinstagram instagram iconpinterest pinterest iconfacebook facebook iconprint print iconsquares squares iconheart heart iconheart solid heart solid icon

    Easy Grinch Rice Krispie Treats for Christmas

    5 Stars 4 Stars 3 Stars 2 Stars 1 Star No reviews
    • Author: Hannah

    Description

    Fun green Rice Krispie treats topped with melted candy coating and heart sprinkles. A festive no-bake Christmas treat kids will love.


    Ingredients

    Units Scale

    10 ounces mini marshmallows.

    4 tablespoons butter, plus more for pan.

    1 teaspoon vanilla extract.

    5 1/2 cups rice krispie cereal.

    14 drops green food coloring.

    12 ounces green candy melts.

    1 teaspoon coconut oil.

    2 tablespoons heart sprinkles.


    Instructions

    1- Grease 9×13 inch pan with butter.

    2- Melt marshmallows and butter over medium heat, stirring often.

    3- Add vanilla and green food coloring.

    4- Stir in cereal until coated.

    5- Press into prepared pan using greased hands or spatula.

    6- Melt candy melts, stir in coconut oil.

    7- Spread over treats, top with heart sprinkles.

    8- Refrigerate 20 minutes until set.

    9- Cut into squares.


  • 3-Ingredient Brisket Recipe – Easy Slow Cooked Dinner

    3-Ingredient Brisket Recipe – Easy Slow Cooked Dinner

    My grandmother taught me this three-ingredient brisket recipe years ago and it’s become our family’s comfort food hero. Just brisket, ketchup, and onion soup mix turn into something magical after a slow roast in the oven. The meat gets so tender you barely need a knife while that sauce turns into pure gold. Every time I make it, the kitchen fills with memories of Sunday dinners at grandma’s house.

    What Makes This Special

    Nothing beats the simplicity here. Three things from your pantry work kitchen magic, creating meat so tender it falls apart. The sauce gets thick and rich—sweet from ketchup, savory from that soup mix. Best part? You can make it ahead, pop it in the freezer, and warm it up when life gets busy. Perfect for those nights when you want home cooking without the fuss.

    Grab These Ingredients

    • The Star: Get a nice big brisket, around 6 to 8 pounds—try for the point cut, it’s extra tender.
    • The Sauce Makers: Two bottles of your favorite ketchup and a packet of onion soup mix.
    • Just Add: A cup of water helps everything come together into that perfect sauce.

    Let’s Get Cooking

    First Things First
    Get your oven warming to 275°F—nice and slow is our friend here.
    Prep The Good Stuff
    Put your brisket in a big pan, mix up ketchup, soup mix, and water, then pour it all over. Flip that meat around—make sure it’s coated good.
    Low and Slow
    Cover everything tight with foil—we want all those juices staying put. Let it roast about 7 or 8 hours until your fork slides in like butter.
    The Finish Line
    Give it a good rest—1 or 2 hours—then slice it against the grain, about half an inch thick.

    Kitchen Wisdom

    That point cut makes everything melt in your mouth, so grab it if you can. Wrap that foil tight—no steam escaping means juicy meat. Taking time to let it rest before slicing keeps all those good juices locked in—trust me, it’s worth the wait.

    Serving Time

    This brisket loves sitting next to creamy mashed potatoes or some buttery dinner rolls. That sauce tastes amazing over rice or noodles, too. For big family dinners, I serve it with potato kugel, green beans, and a fresh salad—just like my grandma used to.


    Save It For Later

    Leftovers stay good in the fridge about 5 days—pop them in a good container. Want to freeze some? Slice it up, sauce and all, it’ll keep for 3 months. Just remember to thaw it slow in the fridge for two days. Truth is, it tastes even better the next day when those flavors really sink in.

    Mix It Up

    Any cut of brisket works here, but that point cut’s my favorite. Sometimes I throw in red pepper flakes when we want some heat or slip some sliced onions under the meat. Every cook adds their own touch—that’s what makes family recipes special.

    Make It Yours

    Play around with it—toss in some fresh herbs near the end, splash in some wine or beef broth. Keep it simple or dress it up, either way this recipe never lets you down. That’s the beauty of good cooking—it grows with you, becomes part of your story.

    Frequently Asked Questions

    → Why let it rest so long?

    Long rest time allows juices to redistribute and meat to firm slightly for clean slicing. Cutting too soon makes meat fall apart.

    → Why slice against the grain?

    Cutting across muscle fibers (against grain) makes meat more tender to eat. Slicing with grain results in chewy, stringy texture.

    → Can I use lean brisket?

    Point or deckle cuts with more marbling work best. Lean flat cuts can become dry during long cooking.

    → Can I cook it faster?

    Low and slow cooking is essential for tender meat. Higher temperatures toughen the meat. No shortcuts for proper brisket.

    → How do I freeze leftovers?

    Slice cooled meat, store with sauce in airtight container up to 3 months. Thaw in fridge overnight before reheating.


    Print
    clock clock iconcutlery cutlery iconflag flag iconfolder folder iconinstagram instagram iconpinterest pinterest iconfacebook facebook iconprint print iconsquares squares iconheart heart iconheart solid heart solid icon

    3-Ingredient Brisket Recipe – Easy Slow Cooked Dinner

    5 Stars 4 Stars 3 Stars 2 Stars 1 Star No reviews
    • Author: Hannah

    Description

    A tender beef brisket coated in a tangy sauce made from just ketchup and onion soup mix. Simple preparation with impressive results.


    Ingredients

    Units Scale

    68 lb brisket (point or deckle cut).

    24 oz bottle ketchup.

    1 oz package Lipton Onion Soup Mix.

    1 cup water.


    Instructions

    Heat oven to 275°F. Place brisket in roasting pan.

    Mix ketchup, onion soup mix and water. Pour over brisket to coat.

    Cover tightly with foil, cook 7-8 hours until tender but not falling apart.

    Let rest 1-2 hours before slicing.

    Cut against grain into 1/2 inch slices.


  • Garlic Knot Salmon – Easy Parmesan Crusted Fish

    Garlic Knot Salmon – Easy Parmesan Crusted Fish

    This garlic knot salmon changed my weeknight dinner game forever. In just 20 minutes, tender salmon transforms under a blanket of crispy, garlicky breadcrumbs and melty parmesan. I started making it for quick family dinners, but now it’s my go-to when friends come over—everyone thinks I spent hours in the kitchen.

    Why Everyone Loves This

    The magic happens when garlic butter meets parmesan and crispy breadcrumbs on top of perfectly cooked salmon. Simple ingredients turn into something that tastes like it came from a fancy restaurant. Clean up takes minutes since everything roasts on one pan. I love recipes that look impressive but keep things easy in the kitchen.

    What You’ll Need

    • The Good Butter: 4 tablespoons of real butter—no substitutes here; it makes all the difference in flavor and richness.
    • Fresh Flavors: 3 cloves of garlic, grated right before cooking, and a handful of bright fresh parsley.
    • The Crunch: Light, airy panko breadcrumbs and freshly grated parmesan create that perfect crispy topping.
    • Star of the Show: 4 beautiful salmon fillets, about 6 ounces each—make sure they’re completely thawed if frozen.
    • Final Touches: Good kosher salt and fresh lemon wedges bring everything together.

    Let’s Cook

    Get Started
    Crank your oven to 425°F, grab your biggest baking dish—make sure those fillets have room to breathe.
    Butter Magic
    Melt that beautiful butter, mix in your fresh garlic, split it between two bowls—one for the fish, one for topping.
    Make It Crispy
    Stir panko and parmesan into one bowl of garlic butter until it looks like wet sand.
    Build Those Fillets
    Pat your salmon super dry, season with salt, brush with garlic butter, then pile on that crispy topping.
    Into The Oven
    Let them roast 12-16 minutes until they hit that perfect 135°F inside. Finish with fresh parsley and lemon wedges.

    Kitchen Secrets

    Always start with evenly sized salmon pieces—they’ll cook at the same rate. Really pack that breadcrumb mixture on top; nobody wants it falling off mid-bite. I use a meat thermometer to hit that perfect 135°F every time. Pat those fillets dry before anything else touches them—seasonings stick better, and you’ll get better browning.

    What Goes With It

    This salmon loves company. Sometimes I roast vegetables right alongside it; other nights it sits pretty on top of creamy mashed potatoes. A bright green salad makes everything feel light and fresh. Don’t forget some crusty bread to soak up all that amazing garlic butter that pools on the plate—pure heaven.

    Saving For Later

    Pop any leftovers in an airtight container—they’ll stay good in the fridge for three days. Warm them gently in a 300°F oven or quick bursts in the microwave—just don’t overdo it. Sometimes I flake the cold leftovers over salad for lunch or toss them into pasta—makes meal prep feel fancy.

    Switch Things Up

    This recipe works magic on other fish too—try it with cod or halibut. Some nights I swap the parsley for fresh dill or throw in some chives. Want some heat? Add chili flakes to your breadcrumbs. Got gluten-free friends? Use those special breadcrumbs instead of panko—works just as beautifully.


    Make It Yours

    Play with the flavors—add smoky paprika to the breadcrumbs or drizzle honey over the fish before baking. Try different cheeses—swap in nutty asiago or rich gruyere. That’s the fun part about cooking—making each recipe your own. My sister adds lemon zest to her breadcrumbs, my neighbor doubles the garlic—everyone puts their own spin on it, and they’re all delicious.

    Frequently Asked Questions

    → What’s ideal salmon temperature?

    135°F for medium doneness. Use thermometer to check thickest part. Cooking time varies with fillet thickness.

    → Why pat salmon dry?

    Removing moisture helps breadcrumbs stick better and ensures crispy topping.

    → Can I use skin-on salmon?

    Yes, place skin-side down in dish. Skin helps keep fish moist during cooking.

    → Why press breadcrumbs lightly?

    Light pressure helps topping stick while cooking. Too much pressure will compress and prevent crispiness.

    → What if breadcrumbs fall off?

    Simply scoop up and pile back on top before baking. They’ll stick better once the butter melts.

    Conclusion

    A simple and delicious salmon recipe featuring a crispy Parmesan-panko topping, perfect for a quick and flavorful meal.


    Print
    clock clock iconcutlery cutlery iconflag flag iconfolder folder iconinstagram instagram iconpinterest pinterest iconfacebook facebook iconprint print iconsquares squares iconheart heart iconheart solid heart solid icon

    Garlic Knot Salmon – Easy Parmesan Crusted Fish

    5 Stars 4 Stars 3 Stars 2 Stars 1 Star No reviews
    • Author: Hannah

    Description

    Salmon fillets topped with garlic butter, crispy panko and Parmesan topping. Finished with fresh parsley and lemon.


    Ingredients

    Units Scale

    4 tablespoons butter, melted.

    3 cloves garlic, minced.

    1/4 cup panko breadcrumbs.

    1/4 cup grated Parmesan.

    4 (6 oz) salmon fillets.

    1/2 teaspoon kosher salt.

    2 tablespoons minced parsley.

    4 lemon wedges.


    Instructions

    Heat oven to 425°F. Mix butter and garlic, add half to baking dish.

    Mix remaining garlic butter with panko and Parmesan.

    Pat salmon dry, season with salt, place in dish skin-side down.

    Pile breadcrumb mixture on fillets, press lightly.

    Cook 12-16 minutes until 135°F internal temp and topping is crisp.

    Top with remaining butter and parsley, serve with lemon.


  • Easy Air Fryer Hot Dogs – Perfect Crispy Results

    Easy Air Fryer Hot Dogs – Perfect Crispy Results

    I discovered air fryer hot dogs one hectic baseball practice night, and they’ve become our family’s favorite quick dinner fix. The outside gets perfectly crispy while staying juicy inside—better than grilled or boiled. Now my kids beg for these instead of drive-through, and I can have dinner ready before they finish their homework.

    Your New Favorite Way

    No more watching the grill or waiting for water to boil. Pop them in the air fryer, and they come out perfect every time with that satisfying snap when you bite in. Clean up takes seconds, and you won’t heat up the whole kitchen. Even my pickiest eater gives these two thumbs up.

    Everything You Need

    • The Stars: Pick good quality hot dogs—natural casing gives you that perfect snap.
    • The Buns: Fresh, soft rolls ready for a quick toast if you like them warm.
    • For Serving: Your favorite toppings, from classic ketchup and mustard to fancy stuff.
    • Extra Fun: Cheese slices, diced onions, or whatever makes your hot dog dreams come true.

    Let’s Get Cooking

    Prep Your Air Fryer
    Give the basket a quick spritz of oil, get it warming to 400°F.
    Load Them Up
    Lay your hot dogs in with space between them for crispy all around.
    Cook Time
    Let them go for about 5 minutes, giving them a quick roll halfway if you want.
    Bun Time
    Want toasted buns? Pop them in for 30 seconds right at the end.


    Make Them Perfect

    Get the good hot dogs—they’re worth it for that perfect snap. Don’t crowd your basket; each dog needs its space to get crispy. Keep an eye on those buns while toasting—they go from perfect to burnt in seconds.

    Serving Fun

    Set up a toppings bar with chips, coleslaw, and all the fixings. Try something different like creamed corn or cheesy cauliflower on the side. Let everyone build their own dream dog with diced onions, jalapeños, or a scoop of chili.

    Save Some For Later

    Tuck any leftover dogs in the fridge—they’ll stay good for 3 days. A quick 3-minute trip through the air fryer at 350°F brings back the snap. Toast those buns fresh, though—they’re always better that way.

    Mix It Up

    Add cheese slices right before they finish cooking for melty goodness. Switch up your buns—try pretzel rolls or brioche for fancy hot dog vibes. Pile on sauerkraut, BBQ sauce, or mashed avocado—whatever makes you happy.

    Your Style Your Way

    Get wild with your toppings—wrap them in bacon, add caramelized onions, pile on the jalapeños. Go Chicago style with all the fixings, or smother them in chili and cheese. That’s the beauty of hot dogs—they’re perfect for making exactly how you like them.

    Frequently Asked Questions

    → Why use top-cut buns?

    Top-cut buns stand up better in the air fryer for even toasting. They’re also more stable when adding toppings.

    → Do I need to preheat?

    Not required but can follow manual instructions for preheating if desired. Hot dogs cook quickly either way.

    → Why work in batches?

    Don’t overcrowd the basket. Space allows air circulation for even cooking and proper crisping.

    → How do I know they’re done?

    Hot dogs should be glistening and slightly browned in spots. Buns should be lightly toasted with crispy edges.

    → Can I skip the cooking spray?

    Spray prevents sticking and helps achieve even browning. Highly recommended for best results.

    Conclusion

    Air frying hot dogs provides a quick, crispy result that’s perfect for a fast and delicious meal. By using the right technique, you can achieve evenly cooked, glistening hot dogs with perfectly toasted buns.


    Print
    clock clock iconcutlery cutlery iconflag flag iconfolder folder iconinstagram instagram iconpinterest pinterest iconfacebook facebook iconprint print iconsquares squares iconheart heart iconheart solid heart solid icon

    Easy Air Fryer Hot Dogs – Perfect Crispy Results

    5 Stars 4 Stars 3 Stars 2 Stars 1 Star No reviews
    • Author: Hannah

    Description

    Quick and easy air fried hot dogs with toasted buns, optional melted cheese, and classic toppings. Perfect crispy results every time.


    Ingredients

    Scale

    4 hot dogs.

    4 hot dog buns (top-cut preferred).

    4 slices cheddar cheese (optional).

    Nonstick cooking spray.

    Mustard for serving.

    Ketchup for serving.

    Pickles for serving.


    Instructions

    Spray air fryer basket with nonstick spray.

    Air fry hot dogs at 350°F for 5 minutes until glistening and lightly browned.

    Place hot dogs in buns, air fry 2 at a time for 90 seconds.

    If using cheese, add slice to bun before dog, air fry 90 seconds until melted.

    Top with mustard, ketchup, pickles as desired.


  • Baby Back Ribs Sheet Pan with Sweet and Tangy Pineapple Glaze

    This Baby Back Ribs Sheet Pan recipe is a delicious and easy way to enjoy tender ribs with a sweet and tangy pineapple glaze. With the addition of bell peppers and served over white rice, it’s a complete meal that’s perfect for family dinners or gatherings.

    INGREDIENTS
    20 oz Can of Pineapple: For the glaze and topping on the ribs.
    Rice Vinegar (1 cup): Adds a tangy depth to the glaze.
    Vegetable Oil (1 cup): Smooth base for the glaze.
    Soy Sauce (2 tbsp): Enhances the savory flavor.
    Fresh Ginger (¼ cup, minced): Adds a spicy and warm flavor.
    Ketchup (1 cup): Adds body and sweetness to the glaze.
    Honey (2 tbsp): Balances the tangy vinegar with sweetness.
    Garlic (5 cloves, minced): Boosts savory notes in the glaze.
    Cornstarch (2 tbsp): Thickens the glaze to a syrupy consistency.
    Baby Back Ribs (3.5 lbs): The main star, seasoned and tenderized.
    Salt and Pepper: For seasoning the ribs.
    Red and Green Bell Peppers: Diced, add color and texture.
    Sesame Seeds (2 tsp): For garnish and added crunch.
    Fresh Scallions (2 tbsp, sliced): Adds a fresh flavor as garnish.
    White Rice: Cooked, for serving with the dish.
    Instructions
    Step 1:
    Preheat the oven to 275°F (140°C).
    Step 2:
    Strain the pineapple juice from the can and reserve the fruit. In a large saucepan, combine the pineapple juice, rice vinegar, vegetable oil, soy sauce, ginger, ketchup, honey, garlic, and cornstarch. Whisk until well blended.
    Step 3:
    Heat the saucepan over high heat for about 10 minutes, stirring continuously, until the glaze reduces by half and reaches a thick, honey-like consistency. Remove from heat and divide the glaze in half.
    Step 4:
    Place the baby back ribs on a baking sheet. Season with salt and pepper on both sides, then brush half of the glaze over the ribs.
    Step 5:
    Cover the ribs tightly with aluminum foil and bake for 2 hours, or until the ribs are tender.
    Step 6:
    After 2 hours, remove the ribs from the oven and increase the oven temperature to 400°F (200°C). Uncover the ribs and add the diced red and green bell peppers to the baking sheet.
    Step 7:
    Pour the remaining glaze over the bell peppers and toss to coat. Arrange the reserved pineapple pieces on top of the ribs.
    Step 8:
    Return the baking sheet to the oven and bake for an additional 20 minutes, until the peppers are softened.
    Serving and Storage Tips
    Serving Suggestions: Serve the sliced ribs over a bed of white rice for a complete meal. Garnish with sesame seeds and freshly sliced scallions for added flavor and presentation.
    Storage: Store any leftovers in an airtight container in the refrigerator for up to 3 days.
    Reheating: Reheat in the oven at 350°F (175°C) until warmed through, or microwave in short intervals, adding a splash of water to keep the meat moist.
    Helpful Notes
    Customize the Heat: For a spicier version, add a dash of red pepper flakes to the glaze.
    Adjust Glaze Thickness: For a thicker glaze, let it reduce a bit longer on the stove, stirring frequently to avoid burning.
    Pineapple Variation: Fresh pineapple can be used in place of canned for a slightly tangier flavor.
    Tips from Well-Known Chefs
    Balance Sweet and Tangy: Adding a bit of honey to the glaze balances the acidity from the vinegar and pineapple.
    Cook Low and Slow: Baking the ribs at a low temperature ensures they stay tender and juicy.
    Why You’ll Love This Recipe
    This sheet pan meal is easy to prepare yet packed with rich, tangy flavors.
    The sweet pineapple glaze complements the savory ribs for a delightful balance.
    It’s a complete meal, served with rice and vegetables, ideal for family dinners.
    Variations
    Vegetable Substitutes: Swap the bell peppers with zucchini or snap peas for a different flavor and texture.
    Try a Smoky Twist: Add a teaspoon of smoked paprika to the glaze for a subtle, smoky flavor.
    Use Pork Shoulder: If you don’t have ribs, this recipe works well with pork shoulder, adjusting the cooking time as needed.

    Print
    clock clock iconcutlery cutlery iconflag flag iconfolder folder iconinstagram instagram iconpinterest pinterest iconfacebook facebook iconprint print iconsquares squares iconheart heart iconheart solid heart solid icon

    Baby Back Ribs Sheet Pan with Sweet and Tangy Pineapple Glaze

    5 Stars 4 Stars 3 Stars 2 Stars 1 Star No reviews
    • Author: Hannah

    Description

    A flavorful Baby Back Ribs Sheet Pan recipe with a pineapple glaze, bell peppers, and served with rice. Perfect for an easy dinner that’s sure to impress!


    Ingredients

    Units Scale

    20 oz diced pineapple (565 g), 1 can.

    1 cup rice vinegar (240 mL).

    1 cup vegetable oil (240 mL).

    2 tablespoons soy sauce.

    1/4 cup fresh ginger (10 g), grated or minced.

    1 cup ketchup (260 g).

    2 tablespoons honey.

    5 cloves garlic, minced.

    2 tablespoons cornstarch.

    3 1/2 lb baby back ribs (1.5 kg), 1 rack.

    1 tablespoon salt.

    1 tablespoon pepper.

    2 red bell peppers, seeded and diced.

    2 green bell peppers, seeded and diced.

    2 teaspoons sesame seeds.

    2 tablespoons fresh scallions, sliced.

    White rice, cooked, for serving.


    Instructions

    1- Preheat the oven to 275°F (140°C).

    2- Strain the pineapple juice from the can into a large saucepan and set aside the pineapple chunks. Add rice vinegar, vegetable oil, soy sauce, ginger, ketchup, honey, garlic, and cornstarch. Whisk together and cook over high heat for 10 minutes until the glaze thickens to the consistency of honey. Divide the glaze in half.

    3- Place the baby back ribs on a baking sheet, season both sides with salt and pepper, and brush with half of the glaze.

    4- Cover the ribs tightly with aluminum foil and bake for 2 hours, or until tender.

    5- Remove the ribs from the oven and increase the oven temperature to 400°F (200°C). Remove the foil.

    6- Add the diced red and green bell peppers to the baking sheet. Pour the reserved glaze over the peppers and toss to coat. Place the reserved pineapple on top of the ribs.

    7- Bake for an additional 20 minutes, until the peppers are softened.

    8- Slice the ribs and garnish with sesame seeds and scallions. Serve warm with a side of white rice.


  • Easy White Chocolate Peppermint Pie – Perfect Holiday Dessert

    Easy White Chocolate Peppermint Pie – Perfect Holiday Dessert

    Get ready to fall in love with my White Chocolate Peppermint Pie a dreamy holiday dessert that combines a rich chocolatey Oreo crust with the most luscious peppermint cheesecake filling you can imagine. It’s refreshingly minty indulgently creamy and absolutely perfect for the festive season. I love serving it both chilled and frozen it’s like having two amazing desserts in one.

    What Makes This Pie Special

    This isn’t just any holiday pie it’s pure winter wonderland in every slice. The way that creamy peppermint filling plays with the crunchy Oreo crust is absolutely magical. What I really love is how easy it is to make ahead perfect for those busy holiday gatherings when you want something spectacular without the last minute fuss.

    Everything You’ll Need

    • Oreo Cookies: These create our perfectly chocolatey base crushed into fine crumbs.
    • Unsalted Butter: Melted to hold that beautiful crust together.
    • Cream Cheese: Make sure it’s softened for the smoothest filling.
    • White Chocolate Chips: When melted they add such wonderful richness.
    • Peppermint Extract: Just enough for that perfect holiday flavor.
    • Frozen Whipped Topping: This makes our filling incredibly light and fluffy.
    • Heavy Whipping Cream: For that gorgeous cloud like topping.
    • Powdered Sugar: Sweetens our whipped cream just right.
    • Peppermint Candies: Crushed for the prettiest festive garnish.
    • White Chocolate Shavings: Optional but they make everything look so elegant.

    Let’s Make the Pie

    Start with the Base
    Heat your oven to 350°F then turn those Oreos into fine crumbs mix with melted butter and press into your pie plate. A quick 8-10 minute bake and let it cool completely.
    Create the Filling
    Beat that cream cheese until it’s silky smooth then mix in your melted white chocolate and peppermint extract. Gently fold in the whipped topping pour it all into your cooled crust then into the fridge for at least 2 hours.
    Add the Finishing Touch
    Whip up your cream with powdered sugar and a hint of extract until it’s perfect for piping. Spread or pipe it over your chilled pie then sprinkle with those crushed candies and chocolate shavings.

    My Best Tips

    Want that perfect crust? Baking makes it extra crunchy but chilling works too if you prefer it softer. Start light with the peppermint extract you can always add more to taste. For those picture perfect slices warm your knife first and if you’re craving something extra special try freezing it for an ice cream pie effect.

    Mix It Up

    Feel like trying something different? Skip the peppermint and use vanilla extract instead or swirl in some raspberry sauce for a fun twist. No time to bake? Just chill that crust instead. And if you’re feeling fancy whip up your own cream instead of using store bought the extra effort really shows.

    Keep It Fresh

    This beauty stays perfect in the fridge for up to 5 days or freeze it for a couple months if you’re planning ahead. When serving from frozen let it soften just a bit to get that dreamy creamy texture back.

    Make It Shine

    Let’s talk presentation those crushed peppermint candies and white chocolate shavings on top aren’t just pretty they add such wonderful texture. Want to make it extra special? Add a drizzle of chocolate or caramel sauce. I love arranging mini candy canes around the edge too it makes everyone smile when they see it.

    Frequently Asked Questions
    → Does the crust need to be baked?
    No, this can be a no-bake pie. The crust can be refrigerated for 15-20 minutes instead of baking, though baking gives a crunchier texture.
    → Can I freeze this pie?
    Yes, freezing for a couple hours or overnight helps the pie hold together and gives it a nice texture, though it’s not required.
    → How strong is the peppermint flavor?
    Start with less peppermint extract and adjust to taste. Mix all ingredients before adding more to avoid overpowering peppermint flavor.
    → What’s the best way to cut this pie?
    Use a warm, wet, sharp knife for clean, straight cuts through both filling and crust.
    → How long does this pie keep?
    Store in the refrigerator for up to 5 days. The pie can also be frozen for longer storage.

    Print
    clock clock iconcutlery cutlery iconflag flag iconfolder folder iconinstagram instagram iconpinterest pinterest iconfacebook facebook iconprint print iconsquares squares iconheart heart iconheart solid heart solid icon

    Easy White Chocolate Peppermint Pie – Perfect Holiday Dessert

    5 Stars 4 Stars 3 Stars 2 Stars 1 Star No reviews
    • Author: Hannah

    Description

    A festive dessert combining white chocolate and peppermint in a creamy cheesecake filling, all nestled in an Oreo cookie crust.


    Ingredients

    Units Scale

    25 chocolate cream-filled cookies (Oreos).

    4 tablespoons unsalted butter, melted.

    8 ounce block cream cheese, softened.

    1 1/2 cups white chocolate chips, melted.

    1 teaspoon peppermint extract.

    8 ounce container frozen whipped topping, thawed.

    1 cup heavy whipping cream.

    1/4 cup powdered sugar.

    1/4 teaspoon peppermint extract (or vanilla extract).

    1/4 cup crushed peppermint candies.

    White chocolate shavings (optional).


    Instructions

    1- Process Oreos into crumbs, mix with melted butter. Press into pie plate and bake at 350°F for 8-10 minutes.

    2- Beat cream cheese until smooth, mix in melted white chocolate and peppermint extract. Fold in whipped topping.

    3- Pour filling into cooled crust. Refrigerate 2 hours to set.

    4- Whip cream with powdered sugar and extract until stiff peaks form.

    5- Spread or pipe whipped cream on pie. Garnish with crushed peppermint and white chocolate shavings.


  • Mini Peppermint Cheesecakes – Perfect Holiday Treats

    Mini Peppermint Cheesecakes – Perfect Holiday Treats

    These Mini Peppermint Cheesecakes are my absolute favorite holiday dessert to make. I discovered this recipe a few years ago and have been perfecting it ever since. The combination of creamy cheesecake and cool peppermint is just magical. Every time I serve these at parties people can’t believe how adorable and delicious they are.

    Why You’ll Fall in Love

    I adore how these little cheesecakes combine three amazing flavors smooth creamy cheesecake rich chocolate and refreshing peppermint. Their mini size makes them perfect for parties plus you can dress them up however you like. My guests always get excited when they see these on the dessert table.

    What You’ll Need

    • Oreos: 10 crushed Oreos for the crust, ensuring a rich chocolatey base.
    • Butter: 2 tablespoons melted, to bind the crust mixture.
    • Cream Cheese: 8 ounces full-fat, softened, for a smooth, creamy texture.
    • Sour Cream: 2 tablespoons, adding tang and richness to the filling.
    • Sugar: 1/3 cup granulated, to sweeten the filling.
    • Peppermint Extract: 1/2 teaspoon, for the perfect minty flavor.
    • Mini Chocolate Chips: 1/4 cup, for bursts of chocolate in every bite.
    • Peppermint Chips: 1/4 cup, adding a festive crunch and color.
    • Egg: 1 large, for structure and creaminess.
    • Whipped Cream: Homemade or store-bought, for the topping.
    • Candy Cane Kisses: For a decorative and delicious garnish.

    Let’s Make Them Together

    Prepare the Crust
    Preheat oven to 350°F (175°C). Crush Oreos into fine crumbs, combine with melted butter, and press into a greased mini cheesecake pan. Bake for 8 minutes.
    Make the Filling
    Beat cream cheese, sugar, sour cream, and peppermint extract until smooth. Mix in the egg, followed by the peppermint and mini chocolate chips.
    Bake the Cheesecakes
    Pour filling over the cooled crusts, filling each cavity evenly. Bake for 20 minutes until set. Let cool for 30 minutes, then refrigerate for at least 2 hours.
    Add Toppings
    Pipe whipped cream onto chilled cheesecakes and garnish with Candy Cane Kisses. Serve immediately for the best flavor and presentation.

    My Best Tips

    Always use full-fat cream cheese it makes such a difference in the texture. I love chilling my bowl before making the whipped cream it whips up so much better. Sometimes I add a tiny drop of pink food coloring to make them extra festive. And if you can’t find peppermint chips Andes mints work beautifully too.

    Keep Them Fresh

    These little beauties stay perfect in the fridge for about 2 days in an airtight container. If you want to make them ahead you can freeze them without the whipped cream for up to a month. Just thaw them overnight in the fridge before adding the toppings.

    What Makes Them Special

    There’s something magical about the combination of that chocolatey Oreo crust creamy peppermint filling and pretty garnishes. They’re just the right size and look so festive on a holiday dessert table. Every time I make them they disappear in minutes.

    Mix It Up

    Sometimes I use graham crackers for the crust or try different extracts. A drizzle of melted chocolate over the whipped cream looks gorgeous and crushed candy canes add such nice crunch. You can really make these your own.

    Make It Easy

    I love that I can make the crust and filling ahead of time. While the cheesecakes are baking I get my whipped cream ready. The key to those pretty swirls is using a steady hand when piping. These little tricks make the whole process so much more enjoyable.

    Frequently Asked Questions

    → Can I make these in a regular cupcake tin?
    Yes, but double the crust and filling recipes, line the tin, and increase bake time to 25-30 minutes. Check for doneness by gently wiggling the pan.
    → Why should ingredients be room temperature?
    Room temperature ingredients blend more smoothly and create a creamier texture without lumps in the finished cheesecake.
    → How long do these keep?
    Store in refrigerator up to 2 days. Add whipped cream just before serving. Can be frozen up to a month if wrapped properly.
    → Why do the cheesecakes sink?
    A slight sinking in the center is normal for these mini cheesecakes and creates the perfect well for whipped cream topping.
    → Can I use different toppings?
    Yes, you can customize with different candies or toppings. Crushed candy canes or chocolate shavings work well.

    Print
    clock clock iconcutlery cutlery iconflag flag iconfolder folder iconinstagram instagram iconpinterest pinterest iconfacebook facebook iconprint print iconsquares squares iconheart heart iconheart solid heart solid icon

    Mini Peppermint Cheesecakes – Perfect Holiday Treats

    5 Stars 4 Stars 3 Stars 2 Stars 1 Star No reviews
    • Author: Hannah

    Description

    Add merriment to your holiday table with these Peppermint Cheesecakes! Mini no bake cheesecakes are filled with crunchy bits of peppermint candy and topped with whipped cream in this festive and easy dessert.


    Ingredients

    Scale

    For the Crust:

    • 20 Oreo cookies
    • 5 Tablespoons unsalted butter melted

    For the Filling:

    • 1 cup cold heavy whipping cream
    • 2 packages cream cheese, softened 8 ounce each
    • 1 1/2 cups white chocolate chips
    • 1/2 teaspoon peppermint extract
    • 1/2 cup chopped Andes Peppermint Crunch plus additional for topping
    • Whipped cream for topping

    Instructions

    • Line two 12-cup muffin tins with cupcake liners.
    • In a food processor, pulse Oreos until they are fine crumbs. Stir in the melted butter. Fill each cupcake liner with 1 1/2 tablespoons of Oreo crumbs. Press firmly with the back of a spoon to pack in.
    • In a large mixing bowl, beat the whipping cream to stiff peaks.
    • In a separate mixing bowl, beat the cream cheese until smooth.
    • Melt white chocolate chips in a double boiler, or in the microwave in 30 second increments, stirring well each time. When most of the chocolate has melted, stir until smooth.
    • Immediately stir the white chocolate into the cream cheese mixture. Gently fold in the peppermint extract, chopped peppermint candies, and whipped cream.
    • Fill the cupcake liners with the cheesecake filling, using about ¼ cup of the cheesecake batter for each one.
    • Refrigerate at least 4 hours, or overnight.
    • Top with whipped cream and chopped Andes peppermints before serving.

  • Cheesy Loaded Meatloaf Casserole – Easy Family Dinner

    Cheesy Loaded Meatloaf Casserole – Easy Family Dinner

    I’m so excited to share my Cheesy Loaded Meatloaf Casserole recipe with you! This is comfort food at its finest combining everything we love about classic meatloaf with layers of creamy mashed potatoes melty cheese and crispy bacon. Every time I make this my family gathers in the kitchen just to smell it baking.

    Why This Recipe Is Special

    What I love about this casserole is how it transforms simple ingredients into something extraordinary. It’s perfect for busy nights and even better it’s a brilliant way to use up leftover mashed potatoes. The layers of flavors make it so satisfying everyone always asks for seconds.

    Everything You Need

    • Mashed Potatoes: Creamy and smooth, perfect for layering. Use leftovers or freshly prepared potatoes for best results.
    • Ground Beef: Lean ground beef ensures a flavorful and juicy base for the casserole.
    • Onion: Finely chopped for a subtle sweetness and added texture.
    • Minced Garlic: Fresh cloves, minced finely, enhance the savory flavor.
    • Worcestershire Sauce: Adds depth and a tangy umami kick to the meat mixture.
    • Brown Sugar: A touch of sweetness to balance the savory flavors.
    • Egg: Acts as a binder to hold the meat mixture together.
    • Italian Breadcrumbs: Provide structure and a subtle herbaceous flavor to the meat layer.
    • Sharp Cheddar Cheese: Freshly shredded for optimal melting and flavor.
    • Bacon: Crumbled or chopped for a smoky, savory topping.
    • Salt and Pepper: Adjust to taste for seasoning.

    Let’s Make It Together

    Prepare the Meat Mixture
    Preheat your oven to 400°F (200°C). In a large bowl, mix ground beef, onion, garlic, Worcestershire sauce, brown sugar, breadcrumbs, egg, salt, and pepper until just combined. Avoid overmixing to prevent a dense texture.
    Layer the Ingredients
    Press the meat mixture evenly into an 8-inch square baking dish. Spread the mashed potatoes over the meat layer, ensuring an even distribution.
    Add Toppings
    Sprinkle shredded cheddar cheese and bacon bits evenly over the mashed potatoes for a rich, savory topping.
    Bake
    Cover the dish with aluminum foil and bake for 30 minutes. Remove the foil and continue baking for an additional 10 minutes or until the cheese is bubbly and golden.
    Serve
    Allow the casserole to rest for 10 minutes before slicing. Serve hot and garnish with fresh parsley if desired.

    My Best Tips

    Using fresh ingredients really makes a difference in this recipe. I’ve learned not to overmix the meat mixture it keeps everything nice and tender. That 10-minute rest after baking is crucial for perfect slices and it lets all those amazing flavors come together.

    Make It Your Own

    Sometimes I swap in ground turkey or cauliflower mash to lighten things up. Adding some spinach or peppers is a great way to sneak in extra vegetables. Try experimenting with different cheeses too each one brings its own special flavor.

    Keep It Fresh

    This casserole keeps beautifully in the fridge for about 4 days. When reheating I prefer using the oven to keep everything nice and crispy but the microwave works great for quick lunches too.

    Perfect Pairings

    We love serving this with some crisp green beans or a fresh garden salad to balance out the richness. Don’t forget some warm dinner rolls to soak up all that delicious cheesy goodness!

    Plant-Based Options

    You can easily make this vegetarian friendly by using lentils or meat alternatives in place of the beef. Vegan cheese alternatives work great too and mashed sweet potatoes make an amazing topping.

    Leftover Magic

    The leftovers are so versatile! Try stuffing them into bell peppers or wrapping them up in tortillas. They’re even amazing on top of baked sweet potatoes for a whole new meal.

    Frequently Asked Questions

    → Can I make this ahead of time?

    Yes, prepare the casserole and refrigerate until ready to bake. May need extra cooking time if starting from cold.

    → How long do leftovers keep?

    Leftovers stay good for up to 3 days when stored covered in the refrigerator.

    → Can I use leftover mashed potatoes?

    Yes, leftover mashed potatoes work well. You can enhance them by mixing in minced garlic for extra flavor.

    → Why cover with foil initially?

    Foil helps the casserole cook evenly and prevents the cheese from burning before the meat is fully cooked.

    → Why remove foil at the end?

    Removing the foil for the final minutes allows the cheese to bubble and brown for better texture and appearance.


    Print
    clock clock iconcutlery cutlery iconflag flag iconfolder folder iconinstagram instagram iconpinterest pinterest iconfacebook facebook iconprint print iconsquares squares iconheart heart iconheart solid heart solid icon

    Cheesy Loaded Meatloaf Casserole – Easy Family Dinner

    5 Stars 4 Stars 3 Stars 2 Stars 1 Star No reviews
    • Author: Hannah

    Description

    A hearty casserole combining classic meatloaf with mashed potatoes, topped with melted cheese and crispy bacon for the ultimate comfort food.


    Ingredients

    Units Scale

    3 cups mashed potatoes.

    1 tablespoon Worcestershire sauce.

    1/2 cup chopped white onion.

    1 large egg.

    1/3 cup crumbled bacon.

    3 cloves garlic, minced.

    1 pound lean ground beef.

    2 tablespoons brown sugar.

    1 cup Italian breadcrumbs.

    1 1/2 cups sharp cheddar cheese.

    Salt and pepper to taste.


    Instructions

    Preheat oven to 400°F.

    Combine beef, garlic, onion, Worcestershire sauce. Add salt, pepper, egg and breadcrumbs.

    Press meat into 8-inch pan. Top with mashed potatoes, cheese and bacon.

    Cover with foil and bake 30 minutes. Remove foil and bake 10 more minutes until cheese bubbles.


  • Easy Crack Chicken Sliders – Perfect Party Food

    Easy Crack Chicken Sliders – Perfect Party Food

    In my kitchen these Crack Chicken Sliders bring pure party joy to life. The way creamy ranch chicken bacon and melty cheddar nestle into those sweet Hawaiian rolls creates something magical. That buttery parmesan glaze turning golden in the oven promises deliciousness in every bite.

    What Makes These Special

    The magic of these sliders lies in those perfect flavor combinations. Sweet rolls cradle creamy savory filling while that parmesan butter creates the most incredible golden top. They’ve become my go-to recipe for gatherings because they’re so simple to make yet always disappear first.

    What You’ll Need

    • Good Chicken: Tender shredded pieces form our base.
    • Ranch Dressing: Brings that signature tangy zip.
    • Cream Cheese: Creates pure creamy comfort.
    • Fresh Onions: Green onions add such lovely bite.
    • Crispy Bacon: Crumbled for smoky goodness.
    • Sharp Cheddar: Melts into pure happiness.
    • Sweet Rolls: Those Hawaiian ones work beautifully.
    • Rich Butter: Creates our magical glaze.
    • Special Seasonings: My perfect blend for the topping.
    • Fresh Parmesan: That final savory touch.

    Let’s Start Building

    Roll Prep
    I start by splitting those rolls keeping them connected for easy assembly.
    Creamy Mix
    All our filling ingredients come together into something absolutely wonderful.
    Layer Time
    That filling spreads beautifully topped with extra cheese before the roll tops go on.
    Glaze Magic
    My butter mixture with all those seasonings and parmesan creates the perfect finish.
    Golden Dreams
    Into the oven they go coming out beautifully golden and bubbly.

    My Kitchen Secrets

    Rotisserie chicken makes these sliders so easy and I always keep pre-shredded cheese on hand for quick assembly. Sometimes I’ll add jalapeños for friends who love heat. Making them ahead lets me enjoy party time instead of being stuck in the kitchen.

    Mix It Up

    I love playing with different cheeses in these sometimes using spicy pepper jack or creamy mozzarella. Pulled pork makes a wonderful variation and that touch of cayenne for heat lovers creates such excitement.

    Keeping Them Fresh

    Though they rarely last long these sliders keep nicely in the fridge for a couple days. A quick warm in the microwave or air fryer brings back that fresh-baked magic. Even when the rolls soften a bit the flavors just keep getting better.

    Perfect for Gathering

    These sliders shine at every gathering from game days to holiday parties. The way everyone can just pull apart what they want makes sharing so easy and those flavors never fail to bring smiles.

    Fresh Ideas

    Sometimes I’ll add a touch of barbecue sauce for smoky sweetness or try different rolls for variety. That Italian twist with marinara and mozzarella creates something completely new but equally delicious.

    Perfect Partners

    We love serving these alongside crisp salads or creamy coleslaw that fresh crunch balances everything perfectly. Setting out some special dipping sauces makes them even more fun for parties.

    Planning Ahead

    Having that chicken mixture ready in the fridge makes assembly so quick. It’s my secret for stress-free entertaining knowing I can pop these in the oven just before guests arrive.

    Pure Joy

    These sliders really do bring something special to the table. The way those flavors come together with that golden buttery top creates pure comfort food magic. They’re simple yet somehow elegant making every gathering feel extra special.

    Frequently Asked Questions

    → Can I make these ahead?
    Assemble everything except the butter spread up to a day ahead. Add butter mixture and bake just before serving.
    → What’s the best way to shred chicken?
    Use rotisserie chicken or cook chicken breasts until tender, then shred using two forks while warm for easiest shredding.
    → Why cover with foil first?
    Foil helps cheese melt and filling heat through without burning the tops. Remove at the end for golden brown buns.
    → Can I use different cheese?
    While cheddar works best, you can use other melting cheeses like monterey jack or a Mexican blend.
    → How do I store leftovers?
    Store in airtight container in fridge up to 3 days. Reheat in oven or microwave until warm.

    Print
    clock clock iconcutlery cutlery iconflag flag iconfolder folder iconinstagram instagram iconpinterest pinterest iconfacebook facebook iconprint print iconsquares squares iconheart heart iconheart solid heart solid icon

    Easy Crack Chicken Sliders – Perfect Party Food

    5 Stars 4 Stars 3 Stars 2 Stars 1 Star No reviews
    • Author: Hannah

    Description

    Quick and easy cheesy chicken sliders with ranch and bacon on sweet Hawaiian rolls. Perfect for parties or game day.


    Ingredients

    Units Scale

    16 ounces cream cheese, softened.

    1 packet ranch dressing mix.

    2 teaspoons onion powder.

    1 teaspoon black pepper.

    1/3 cup green onion, sliced.

    2 1/2 cups shredded chicken breast.

    12 ounces crumbled bacon.

    2 1/2 cups shredded cheddar cheese.

    12 Hawaiian rolls.

    6 tablespoons butter, melted.

    2 tablespoons parmesan cheese.

    2 teaspoons fresh chives, chopped.


    Instructions

    Preheat oven to 350°F, prepare baking dish.

    Melt cream cheese in pot over medium heat.

    Mix in seasonings, remove from heat.

    Stir in chicken, bacon, 1 cup cheddar.

    Layer bottom rolls, chicken mixture, remaining cheese.

    Add top rolls, brush with butter.

    Sprinkle with parmesan and chives.

    Bake covered 25 minutes, uncovered 5-8 minutes.

    Rest 5 minutes before cutting.