Author: Hannah

  • Grinch Cupcakes

    Grinch Cupcakes


    A chocolate cupcake with bright green frosting, whimsically resembling a Grinch-style Christmas tree, is topped with a small red heart. It sits on a decorative red plate, while other similar Grinch-themed cupcakes are blurred in the background.

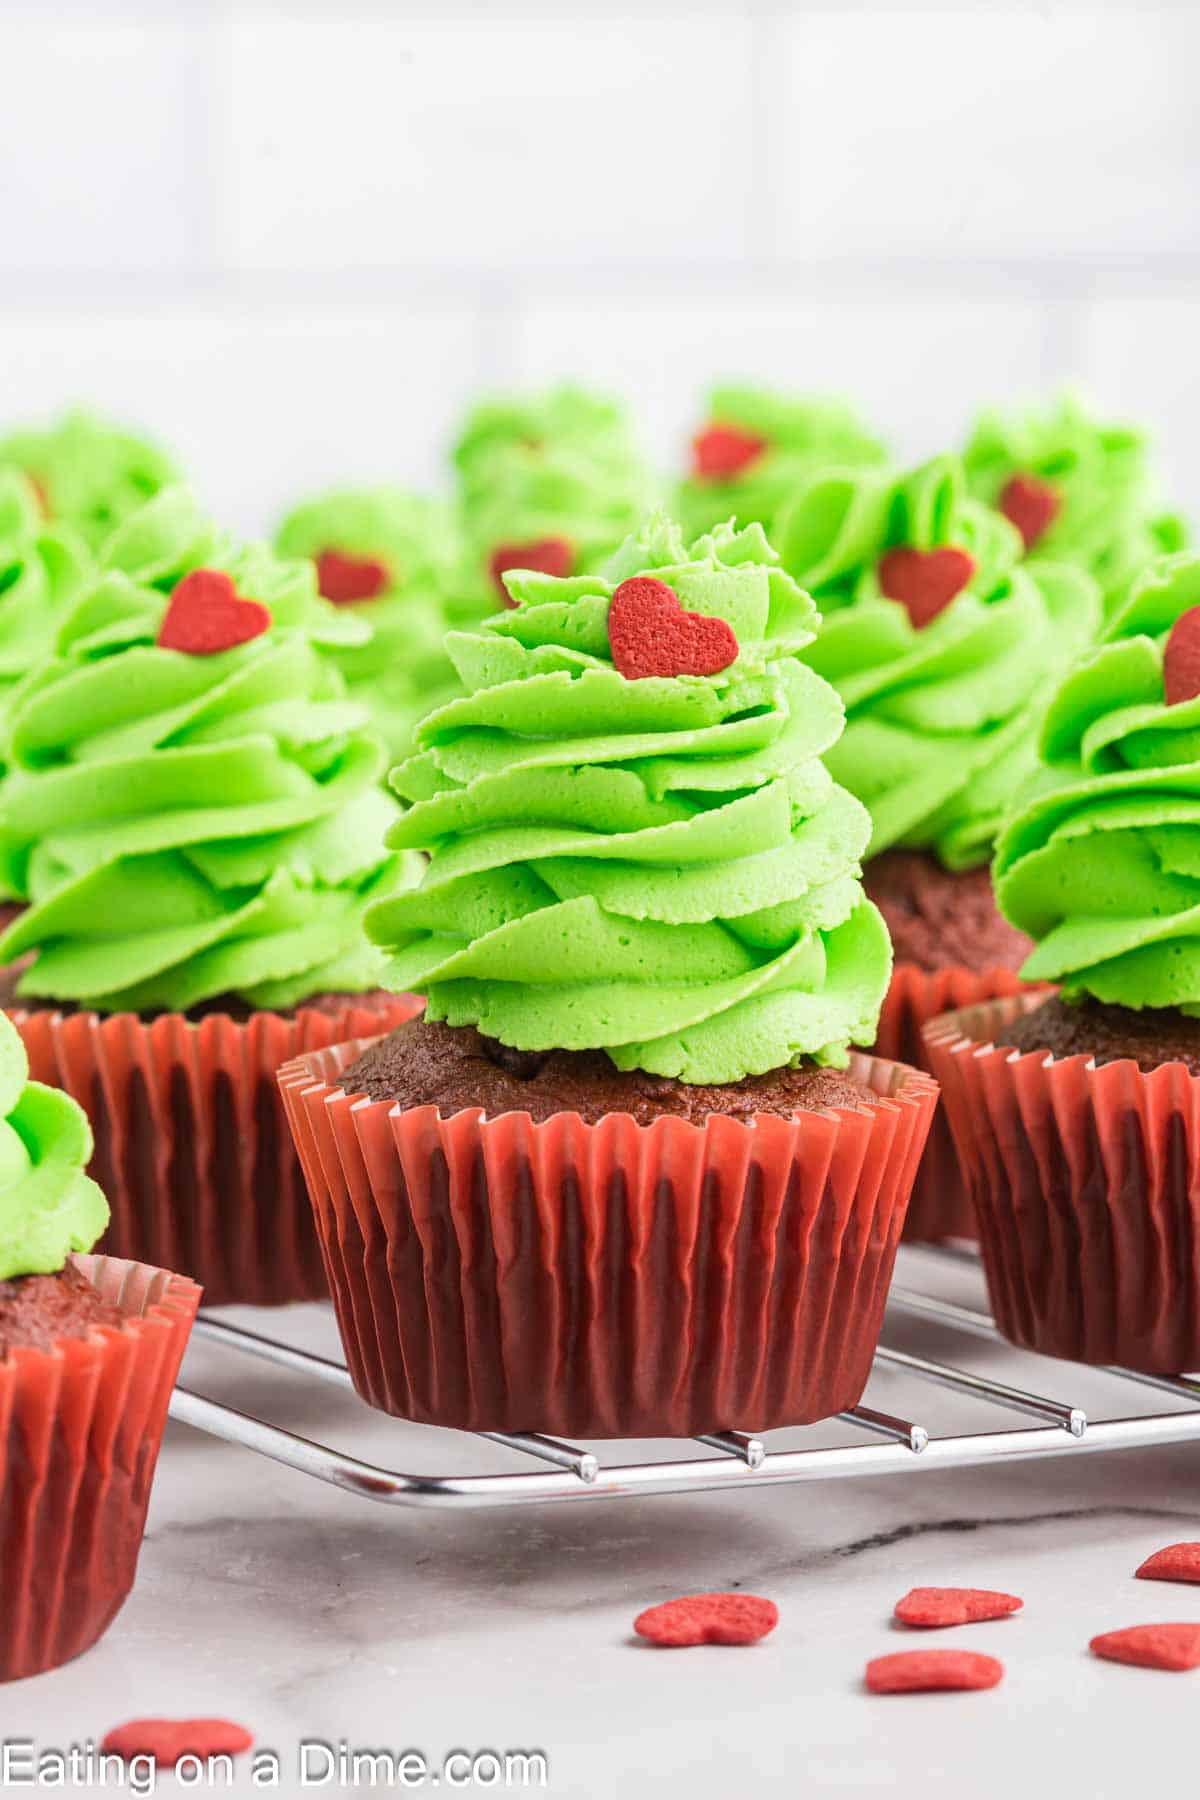
    Why We Love Making Grinch Cupcakes

    Grinch desserts are always a family favorite. The combination of the bright green color with the red velvet cake makes these cupcakes always on the list.

    They are perfect served on your dessert tray for an impressive dessert. If you have Grinch fans in your family, this is the perfect dessert to make.

    Ingredients


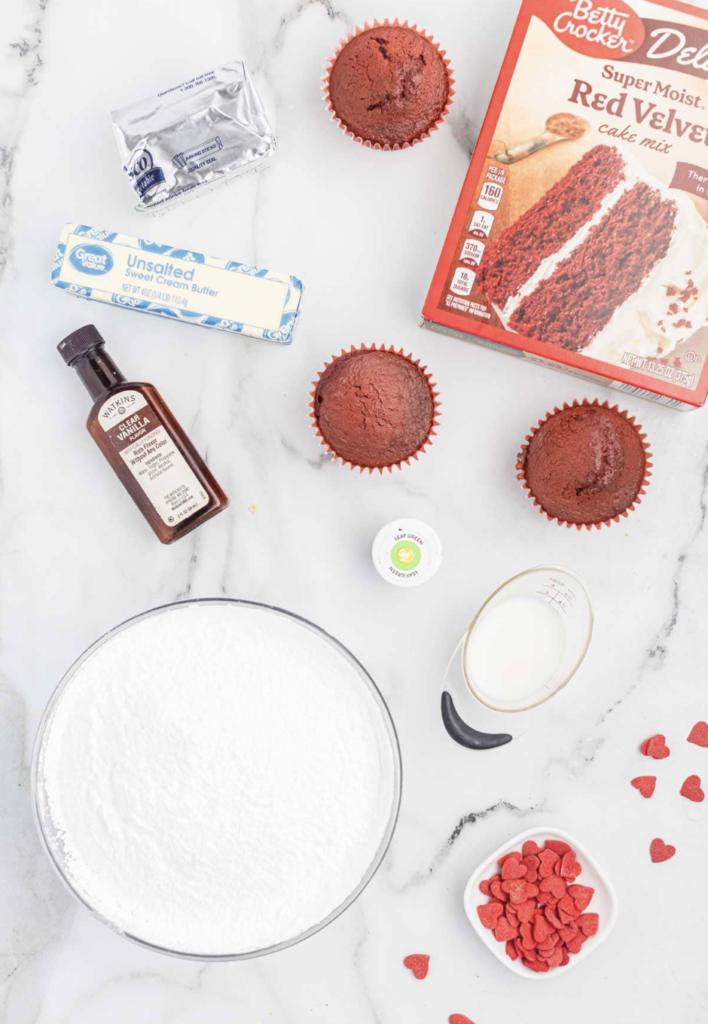
    • Red Velvet Cake Mix – Plus the ingredients to prepare the cake mix based on the package instructions
    • Red Cupcake Liners – Use any liners that you prefer
    • Butter – Make sure butter is softened at room temperature
    • Red Heart Sprinkles – You can also use red hot candies or red sprinkles

    Scroll to the bottom for the full recipe in the recipe card.

    Variations Ideas

    • Change Cake Mix – You can make this recipe with a white cake mix or a yellow cake mix. Use what you prefer.
    • Frosting – You can also top this holiday treat with a cream cheese frosting. We have even made these cupcakes with white frosting and red frosting and added eyebrows with black icing to create a Grinch face.
    • Addition – For even more flavor you can add in peppermint extract or chocolate chips for a delicious variations.

    Expert Tips

    • Adding Sprinkles – Make sure to add the sprinkles immediately after you frosting the cupcakes as they will not stick if the frosting has already fully set.
    • Muffin Tins – We like to use paper liners in the cupcake pans before pouring in the cupcake batter. This helps with cleanup and I usually like to pick ones that are fun and festive.
    • Piping Frosting – The best way to frost the cupcakes is by using a piping bag. There are many types of piping tips to change the way your frosting looks. So it is fun to be creative and use what you prefer.
    • Cool Cupcakes – We recommend allowing the baked cupcakes to cool on a wire rack before frosting. This will prevent them cupcakes from crumbling and causing the frosting to melt.

    How Long to Bake Cupcakes

    Since we are using a cake mix, we bake the cupcakes according to the instructions on the box. I always check cupcakes with a toothpick to ensure that they are fully cooked.

    Insert the toothpick in the center of the cupcake, if the toothpick comes out clean then the cupcakes are finished baking.


    Can I Make Red Velvet Cake From Scratch?

    We like using a Red Velvet Cake Mix for a quick and easy dessert. But you can make this cupcake recipe with this Easy Red Velvet Cupcake recipe.

    It is easy to combine the dry ingredients such as all purpose flour, baking soda, cocoa powder, salt and sugar with the unsalted butter, oil and eggs. You probably already have everything to make these for your next Christmas Party.

    Frequently Asked Questions

    How to Make Grinch Green Icing?

    We love making the green icing from scratch as it is easy to do and made with simple ingredients. To give it that perfect green color, we recommend gel food coloring. It gives it the best vibrate color without watering down the icing.

    How to Store Leftover Cupcakes

    Store the leftover cupcakes in an airtight container at room temperature. They will stay fresh for up to 1 week.

    Can I Freeze Cupcakes?

    If you plan on freezing the cupcakes, we recommend freezing without the frosting. Place the room temperature unfrosted cupcakes in a freezer safe container. We recommend placing a sheet of parchment paper in between the layers to prevent the cupcakes from sticking. They will stay fresh for up to 3 months. When ready to enjoy, thaw the cupcakes at room temperature, top with frosting then they are ready to serve. The perfect dessert to make ahead of time.


    Print
    clock clock iconcutlery cutlery iconflag flag iconfolder folder iconinstagram instagram iconpinterest pinterest iconfacebook facebook iconprint print iconsquares squares iconheart heart iconheart solid heart solid icon

    Grinch Cupcakes

    5 Stars 4 Stars 3 Stars 2 Stars 1 Star No reviews
    • Author: Hannah

    Description

    If you looking for the perfect dessert recipe to make this holiday season, make these Grinch Cupcakes. Start with a cake mix for an easy holiday dessert. 


    Ingredients

    Scale

    For the Cupcakes:

    • 1 Red Velvet Cake Mix
    • *Plus the ingredients to prepare the cake mix based on the package instructions
    • Red Cupcake Liners

    For the Frosting:

    • 1/2 cup Solid Vegetable Shortening
    • 1/2 cup Butter softened at room temperature
    • 1 tsp Clear Vanilla Extract
    • 4 cups Confectioners’ Sugar sifted
    • 2 Tbsp Milk
    • Green Gel Food Coloring

    For the Decorations:

    • Red Heart Sprinkles

    Instructions

    • Prepare the red velvet cake mix based on the cupcake instructions using the red cupcake liners and allow the cupcakes to cool completely at room temperature.
    • In a large bowl, cream together the shortening and butter until combined and smooth.
    • Then slowly add in the confectioners’ sugar (1 cup at a time) on low speed until well combined.
    • Then stir in the vanilla extract and milk until combined. Then add a few drops of the green food coloring until the frosting is a bright green color (like the color of the grinch).
    • Then use a 1M piping tip and a decorator’s bag, fill it with the green frosting.
    • Gently frosting each cupcake.  You want to slowly build up the frosting on top of the cupcake using a circular motion.
    • Then place a red heart on the top of each cupcake.
    • Then the cupcakes are ready to serve and enjoy!


    Notes

    Store the leftover cupcakes in an airtight container at room temperature for up to 1 week. 

    Make sure to add the sprinkles immediately after you frosting the cupcakes as they will not stick if the frosting has already fully set.

  • Razzmatazz Dip – Sweet and Savory Party Appetizer

    Razzmatazz Dip – Sweet and Savory Party Appetizer

    I created this Dazzling Razzmatazz Dip for my first holiday party as a host and it’s become my signature appetizer. That gorgeous red topping from hot pepper raspberry preserves catches everyone’s eye especially when I serve it in a little pumpkin. The way sweet spicy and savory flavors come together makes this dip absolutely unforgettable.

    A Perfect Party Starter

    The magic of this dip lies in its balance of flavors. Sweet raspberry preserves melt into sharp cheddar while crunchy pecans add the perfect texture. Every time I serve it someone asks for the recipe and I love watching their surprise when they learn how simple it is to make.

    Grab These Ingredients

    • Green onions: 6 fresh ones chopped up including those flavorful green tops.
    • Pecans: 2 cups roughly chopped for wonderful crunch.
    • Sharp cheddar cheese: 2 cups freshly grated makes all the difference.
    • Mayonnaise: 3/4 cup just enough to bring everything together.
    • Hot Pepper Raspberry Preserves: 1 jar this is our star ingredient.

    Let’s Make it Together

    Blend The Base
    In my favorite mixing bowl I combine those fresh green onions crunchy pecans and freshly grated cheddar. A generous scoop of mayo brings it all together into this amazing mixture.
    Layer With Love
    I spread this gorgeous mixture into my prettiest dish making sure it’s nice and even. Then comes the best part that beautiful layer of hot pepper raspberry preserves on top.
    Time to Chill
    Into the fridge it goes giving all those wonderful flavors time to get to know each other. Trust me the wait is worth it.

    Ready to Serve

    I love setting this out with a variety of dippers. Fritos are my favorite but pretzel chips and crackers work beautifully too. During fall I hollow out a sweet little pumpkin to use as my serving bowl it makes such a stunning presentation.

    Mix It Up Your Way

    Some nights I switch things up with different preserves apricot is amazing and cranberry adds such festive flair. A sprinkle of fresh herbs on top makes it look extra special. When my health conscious friends visit I use light mayo and they never know the difference.

    Keep It Fresh

    This dip stays perfect in the fridge for about three days in a good container. Make sure that beautiful preserve layer is spread evenly and covered well. The flavors actually get better after a day together.

    Save Time While Hosting

    When I’m hosting a big gathering I prep the base mixture the night before. It sits happily in the fridge until party time. Just before guests arrive I add that gorgeous preserve topping and watch eyes light up when they see it. Such an easy way to create something special.

    Perfect Partners

    I love setting this dip out with colorful veggies like crisp celery and rainbow carrots. Sometimes I’ll add toasted bread slices or crostini nearby. It’s become the star of my cheese boards too the flavors play so nicely with everything else on the plate.

    Holiday Magic

    This isn’t just a dip it’s part of what makes celebrations special in my home. That beautiful red color the way it sparkles on the table and those amazing flavors coming together. It’s like serving joy by the spoonful.

    Dress It Up

    My favorite way to serve this is in a sweet little pumpkin I’ve hollowed out. Sometimes I’ll sprinkle extra chopped pecans around the edges or tuck fresh herb sprigs nearby. These little touches make it feel extra special.

    Your Own Twist

    My kitchen has become a testing ground for different versions. Apricot preserves give it a sunny sweetness while cranberry adds holiday charm. Sometimes I swap the pecans for toasted walnuts when that’s what’s in my pantry. Every version brings its own magic.

    Why It Works

    There’s something about the way creamy tangy and crunchy come together in each bite. Whether I’m hosting a casual game night or a fancy holiday dinner this dip fits right in. It’s become the appetizer my friends request most often.

    Work Smart Not Hard

    I’ve learned to chop my green onions and pecans whenever I have a spare moment they keep perfectly in the fridge. When it’s time to make the dip everything’s ready to go. These little prep tricks make hosting so much easier.

    Perfect For Any Party

    From Thanksgiving dinner to Christmas Eve gatherings this dip brings warmth and joy to every occasion. It’s fancy enough for your best holiday china but casual enough for watching football with friends. That’s what makes it so special in my kitchen.

    Frequently Asked Questions

    → Can I make this ahead?

    Yes, you can prepare this dip a day in advance. Keep refrigerated and add the raspberry preserves just before serving.

    → What should I serve with this dip?

    This dip pairs well with crackers, toasted baguette slices, or sturdy vegetables like celery and carrots.

    → Can I use different preserves?

    While hot pepper raspberry preserves give the signature flavor, you can experiment with other sweet-spicy preserves for variation.

    → How long does it keep?

    The dip will keep in the refrigerator for 3-4 days when stored in an airtight container.

    → Can I use different nuts?

    While pecans provide the best texture and flavor, you could substitute with chopped walnuts or almonds if needed.

    Print
    clock clock iconcutlery cutlery iconflag flag iconfolder folder iconinstagram instagram iconpinterest pinterest iconfacebook facebook iconprint print iconsquares squares iconheart heart iconheart solid heart solid icon

    Razzmatazz Dip – Sweet and Savory Party Appetizer

    5 Stars 4 Stars 3 Stars 2 Stars 1 Star No reviews
    • Author: Hannah

    Description

    A layered party dip combining sharp cheddar, pecans, and green onions topped with spicy raspberry preserves for a unique sweet and savory appetizer.


    Ingredients

    Units Scale

    6 green onions, chopped.

    2 cups pecans, chopped.

    2 cups sharp cheddar cheese, shredded.

    3/4 cup mayonnaise.

    1 jar hot pepper raspberry preserves.


    Instructions

    Combine green onions, pecans, cheese, and mayonnaise in medium bowl until well mixed.

    Spread mixture into 9×13 dish and top with raspberry preserves.

    Refrigerate until ready to serve.


  • Tangy Pink Grapefruit Dessert Bars Recipe

    Tangy Pink Grapefruit Dessert Bars Recipe

    Transform a simple grapefruit into something magical with these delightfully tangy Grapefruit Shortbread Bars. Each bite combines buttery shortbread with a silky smooth grapefruit curd, creating an unexpected twist on traditional citrus bars that will make you rethink grapefruit as just a breakfast fruit.

    The first time I made these bars, they disappeared so quickly I barely had time to take a picture. My family couldn’t believe the bright, tangy flavor came from grapefruit – they expected lemon but were delighted by the unique citrus twist.

    Essential Ingredients

    • Ruby Red Grapefruit: Choose firm, heavy fruit for best juice and zest yield
    • Unsalted Butter: Room temperature for proper creaming in shortbread
    • Fresh Eggs: Provide structure and richness to the curd
    • All-Purpose Flour: Creates tender shortbread base
    • Granulated Sugar: Balances the natural tartness
    • Fresh Grapefruit Zest: Essential for intense citrus flavor
    •  

    Detailed Instructions

    Prepare the Pan (5 minutes):
    Line 9×13 baking pan with parchment, creating overhang. Crease paper at corners for clean fit. Spray lightly with cooking spray. Preheat oven to 350°F.
    Create Shortbread Base (15 minutes):
    Beat room temperature butter until creamy. Add sugar gradually, mixing until light and fluffy. Mix in flour and salt just until combined. Press dough evenly into prepared pan. Bake until lightly golden, about 15-20 minutes.
    Prepare Grapefruit Curd (10 minutes):
    Whisk eggs and sugar until well combined. Add flour gradually to prevent lumps. Stir in grapefruit zest and juice. Mix until smooth and evenly colored.
    Final Assembly and Baking (25-30 minutes):
    Pour curd over warm shortbread. Smooth top with spatula. Bake until curd is set but still jiggly. Cool completely before cutting. Dust with powdered sugar before serving.

    Growing up, grapefruit was always ‘grown-up food’ in our house, served simply with a sprinkle of sugar. Now, transforming it into these elegant bars brings back those memories while creating something entirely new and sophisticated.

    Storage and Making Ahead

    • Store in an airtight container for several days
    • Layer with parchment if stacking
    • Dust with powdered sugar before serving.

    Temperature Matters

    • Cold butter won’t cream properly for shortbread
    • Overly warm ingredients can cause curd to separate
    • Take ingredients out an hour before starting

    Serving Suggestions

    • Pair with fresh berries or whipped cream
    • Serve alongside Earl Grey tea
    • Add a thin drizzle of white chocolate for special occasions

    Seasonal Adaptations

    • Peak season during winter months
    • Year-round option with store-bought fruit
    • Choose heavy grapefruits for best juice yield

    These grapefruit bars have become my signature dessert, proving that sometimes the most unexpected combinations create the most memorable treats. Whether served at a fancy gathering or enjoyed with afternoon tea, they never fail to surprise and delight guests with their unique flavor profile.

    Frequently Asked Questions

    → Why use the parchment paper sling method?
    It makes removing the bars from the pan easy and ensures clean cuts without sticking.
    → How do I know when the filling is done?
    The filling should be lightly browned and no longer jiggly in the center, about 18-20 minutes.
    → Why beat the butter and sugar for so long?
    Beating for 3 minutes creates a light, fluffy texture essential for the shortbread crust.
    → How should I store these bars?
    Store in an airtight container with parchment between layers to prevent sticking.
    → Can I use bottled grapefruit juice?
    Fresh juice is best since you’ll need the zest from the grapefruit anyway.

    Print
    clock clock iconcutlery cutlery iconflag flag iconfolder folder iconinstagram instagram iconpinterest pinterest iconfacebook facebook iconprint print iconsquares squares iconheart heart iconheart solid heart solid icon

    Tangy Pink Grapefruit Dessert Bars Recipe

    5 Stars 4 Stars 3 Stars 2 Stars 1 Star No reviews
    • Author: Hannah

    Description

    Bright and tangy grapefruit bars with a buttery shortbread crust, perfect for citrus lovers seeking something unique.


    Ingredients

    Units Scale

    → Crust

    1/2 cup butter, at room temperature

    1/2 cup sugar

    1 cup all purpose flour

    1/8 teaspoon salt

    → Grapefruit Filling

    2 large eggs

    3/4 cup sugar

    3 tablespoons all-purpose flour

    1 grapefruit, zested and juiced (need 1/4 cup juice)

    Powdered sugar for dusting


    Instructions

    Heat oven to 350°F. Create parchment paper sling in 8×8 inch pan using two overlapping pieces.

    Beat butter and sugar until light and fluffy, about 3 minutes. Mix in flour and salt. Press evenly into pan.

    Bake until lightly browned, 15-18 minutes. Remove and set aside.

    Whisk eggs and sugar for 1 minute until slightly thick. Add flour, grapefruit juice and zest. Pour over warm crust.

    Bake until lightly browned and set, 18-20 minutes. Cool completely, then cut into 16 squares.


  • Easy Greek Tomato Fritters (Tomatokeftedes)

    Easy Greek Tomato Fritters (Tomatokeftedes)

    A beloved treasure from the sun-drenched island of Santorini, Tomatokeftedes (Greek Tomato Fritters) transform ripe, juicy tomatoes into crispy, herb-flecked bites of Mediterranean sunshine. These golden-brown fritters capture the essence of Greek summer cooking – simple ingredients elevated through thoughtful preparation and fresh herbs.

    I discovered these fritters during a cooking class in Santorini, and they’ve become my go-to recipe for summer entertaining. Even my vegetable-shy nephew devours these, asking for “those crispy tomato things” at every family gathering.

    Essential Ingredients Guide

    • Tomatoes: Choose ripe, fragrant tomatoes – they’re the star of the show
    • Fresh Herbs: Parsley, dill, and mint create that authentic Greek flavor profile
    • Flour: All-purpose works best, but chickpea flour makes an excellent gluten-free option
    • Onion: Red onion adds sweetness and beautiful color
    • Garlic: Fresh cloves only – their flavor is essential
    • Lemon Zest: Adds brightness and enhances all other flavors

    Step-by-Step Instructions

    Tomato Preparation (15 minutes):
    Dice tomatoes into small, uniform pieces. Place in colander and salt lightly. Let drain for 10 minutes to remove excess moisture. Pat gently with paper towels.
    Creating the Base (10 minutes):
    Finely chop herbs, onion, and garlic. Mix with drained tomatoes. Add lemon zest and fresh ground pepper. Stir gently to combine.
    Forming the Batter (5 minutes):
    Gradually add flour and baking powder. Mix until just combined – don’t overmix. Batter should be thick but still slightly wet. Let rest for 5 minutes.
    Frying Process (20 minutes):
    Heat olive oil in a heavy-bottomed pan. Drop spoonfuls of batter carefully. Fry until golden brown, about 3 minutes per side. Drain on paper towels.

    My Greek grandmother taught me to add a pinch of cinnamon to the batter – it’s subtle but adds an intriguing depth that makes people ask, “What’s your secret?”

    Each time I make these fritters, I’m transported back to that sunny Santorini kitchen, where I learned that the best Greek cooking is about respecting simple ingredients and letting them shine.

    Final Thoughts: These Tomatokeftedes have become my signature appetizer, earning their place at everything from casual summer gatherings to elegant dinner parties. They remind us that the most memorable dishes often come from humble ingredients transformed through tradition and care. Whether served with tzatziki for dipping or enjoyed on their own, these fritters bring a taste of Greek hospitality to any table.

    Frequently Asked Questions

    → Can I make these fritters ahead of time?
    While best served fresh and hot, you can make the mixture a few hours ahead and keep it refrigerated until ready to fry.
    → What’s the best way to ensure crispy fritters?
    Make sure your oil is hot enough before frying and don’t overcrowd the pan. Drain on paper towels after frying to maintain crispiness.
    → What can I serve with these fritters?
    They pair well with tzatziki, hummus, or a simple squeeze of lemon juice. Great as part of a mezze platter.
    → Can I use different herbs?
    Yes, you can experiment with mint, oregano, or basil, though dill and parsley are traditional in this Greek recipe.
    → How do I store leftover fritters?
    Store in an airtight container in the refrigerator for up to 2 days. Reheat in a hot oven to restore crispiness.

    Print
    clock clock iconcutlery cutlery iconflag flag iconfolder folder iconinstagram instagram iconpinterest pinterest iconfacebook facebook iconprint print iconsquares squares iconheart heart iconheart solid heart solid icon

    Easy Greek Tomato Fritters (Tomatokeftedes)

    5 Stars 4 Stars 3 Stars 2 Stars 1 Star No reviews
    • Author: Hannah

    Description

    Traditional Greek tomato fritters made with fresh tomatoes, herbs, and lemon zest, fried until golden and crispy. A perfect vegan appetizer or snack.


    Ingredients

    Units Scale

    → Main Ingredients

    2 large tomatoes (around 250g), finely chopped

    1/2 red onion, finely chopped

    2 large garlic cloves, minced

    Zest of 1 lemon

    85g plain flour

    1/2 teaspoon baking powder

    1/2 bunch dill (around 10g), finely chopped

    1/2 bunch parsley (around 15g), finely chopped

    1/2 teaspoon salt, or to taste

    Black pepper, to taste

    Olive oil for frying


    Instructions

    Finely chop the tomatoes and place them in a large mixing bowl.

    Add the chopped onions, minced garlic, lemon zest and fresh herbs to the tomatoes. Then mix in the flour, baking powder, salt and pepper until you have a cohesive dough.

    Cover the bottom of a frying pan with olive oil and warm it over medium heat.

    Drop heaping tablespoons of the mixture into the hot oil. Fry each fritter for a couple of minutes until golden brown, then flip and cook the other side until equally browned.

    Remove from pan and serve while hot and crispy.


  • Homemade Sticky Chinese Chicken Wings

    Homemade Sticky Chinese Chicken Wings

    These sticky Chinese chicken wings carry the legacy of family traditions and countless kitchen experiments, perfected through generations until every bite delivers that ideal balance of sweet, savory, and aromatic flavors. The magic lies in how the marinade transforms during baking, concentrating into a glossy glaze that coats each wing with intense flavor. After years of family debates and kitchen testing, we’ve discovered that the key to perfect wings lies not just in the ingredients, but in the timing of each step.

    Through countless family gatherings and celebrations, this recipe has evolved into something that brings everyone to the table, eager to claim their share of these irresistible wings.

    Essential Ingredients Selection

    • Chicken Wings: Choose medium-sized wings with good meat coverage. Fresh is best, but if using frozen, thaw completely and pat thoroughly dry. Look for wings with unblemished skin and no freezer burn
    • Shaoxing Wine: The backbone of the marinade’s complexity. Select authentic Shaoxing wine (not “cooking wine”) when possible. The bottle should be dark amber and feel heavy
    • Hoisin Sauce: Choose a thick, glossy hoisin with no separation. Lee Kum Kee brand provides the most consistent results

    Detailed Cooking Instructions

    Wing Preparation:
    Pat wings completely dry with paper towels. Remove any loose bits of skin or fat. Check for and remove any stray feathers. If whole wings, separate at joints. Let come to room temperature. Season lightly with salt and pepper. Prepare baking sheet with double layer of foil.
    Marinade Development:
    Combine Shaoxing wine and hoisin first. Whisk until completely smooth. Add remaining liquid ingredients gradually. Incorporate five-spice powder. Mix until thoroughly combined. Reserve 1/3 cup for basting. Taste and adjust seasonings. Marinade should be balanced and complex.
    Marination Process:
    Place wings in large bowl. Pour marinade over wings. Toss to coat completely. Arrange wings in single layer. Let rest 10-15 minutes exactly. Turn wings halfway through. Don’t over-marinate or wings get too salty. Prepare oven during this time.
    The Crucial Baking Stage:
    Preheat oven to 375°F. Line baking sheet with heavy-duty foil. Add layer of parchment for easy cleanup. Arrange wings with space between. Start skin-side down. Bake 25 minutes. Turn and baste with reserved marinade. Continue baking, basting every 15 minutes.

    Growing up, watching my mother make these wings taught me that patience in the basting process makes all the difference. She would carefully turn each wing, ensuring every surface got its share of the developing glaze.

    Understanding Glaze Development

    The transformation from marinade to sticky glaze happens gradually. The sugars in the hoisin and any added sweeteners need time to caramelize properly without burning.

    These wings have become our family’s celebration food, appearing at every gathering and special occasion. The way they fill the house with their aromatic promise, how they bring everyone to the kitchen to “check if they’re done yet” – it’s more than just cooking, it’s creating memories around food that makes people happy.

    Frequently Asked Questions

    → Can I marinate the wings longer than 1 hour?
    No, it’s best to limit marinating to 1 hour maximum. The salt in the marinade can draw out too much moisture if left longer, making the wings drier and the marinade too watery.
    → Why line the tray with both foil and paper?
    The double lining makes cleanup much easier as the sticky marinade can be quite difficult to clean off. The foil protects your tray while the paper prevents sticking.
    → Can I make these wings less spicy?
    Yes, you can reduce or omit the chili garlic sauce entirely. The wings will still be flavorful from the other marinade ingredients.
    → How do I store and reheat leftovers?
    Leftovers keep well for 3-4 days in the fridge. Simply reheat in the microwave when ready to eat.
    → Can I use whole chicken wings?
    Yes, but you’ll need 1.75kg/3.4lb of whole wings to account for the weight of the wing tips that will be discarded. Cut them into wingettes and drumettes before cooking.

    Print
    clock clock iconcutlery cutlery iconflag flag iconfolder folder iconinstagram instagram iconpinterest pinterest iconfacebook facebook iconprint print iconsquares squares iconheart heart iconheart solid heart solid icon

    Homemade Sticky Chinese Chicken Wings

    5 Stars 4 Stars 3 Stars 2 Stars 1 Star No reviews
    • Author: Hannah

    Description

    These sticky Chinese Chicken Wings feature a perfectly balanced marinade that creates an irresistible glaze, making them the ultimate party food.


    Ingredients

    Units Scale

    → Main

    1.5 kg chicken wings, cut into drumettes and wingettes

    → Marinade

    1/2 teaspoon toasted sesame oil

    2 tablespoons lemon juice

    2 tablespoons Chinese cooking wine (Shaoxing wine)

    2 tablespoons light soy sauce

    2 tablespoons brown sugar or honey

    1 1/2 tablespoons hoisin sauce

    1 1/2 tablespoons oyster sauce

    1/4 cup ketchup

    1 tablespoon chilli garlic sauce

    4 cloves garlic, minced

    1 tablespoon ginger, finely grated

    1/2 teaspoon five spice powder

    → Garnishes

    Finely sliced shallots/scallions

    Sesame seeds

    Coriander/cilantro leaves

    Finely sliced fresh chili


    Instructions

    Combine all marinade ingredients in a bowl and mix well.

    Toss chicken wings with marinade in a large bowl. Let sit for 10 minutes, but no longer than 1 hour to prevent wings from becoming too salty.

    Preheat oven to 180°C/350°F. Line a baking tray with foil, then place greaseproof paper on top.

    Place wings on prepared tray, shaking off excess marinade but reserving it. Arrange wings with some space between them, using two trays if needed.

    Bake for 45-50 minutes, basting with reserved marinade and pan juices at 25 minutes and again at 35 minutes.

    Wings are done when meat easily pulls from bone and they’re sticky with slightly charred edges. Garnish with chosen toppings and serve hot.


    Notes

    This family recipe has been perfected over years, with many marinade ingredients being adaptable while maintaining similar flavors.

    The wings should be sticky, dark red/golden color when done, with meat easily pulling from the bone.

  • Easy Air Fryer Stuffed Mushrooms – Quick Appetizer Recipe

    Easy Air Fryer Stuffed Mushrooms – Quick Appetizer Recipe

    These air fryer stuffed mushrooms make the perfect party appetizer or delicious snack. Crimini mushrooms filled with a savory mix of cheese, colorful peppers, and herbs become wonderfully golden and tender in the air fryer.

    Essential Ingredients

    • Crimini mushrooms: Look for ones about 2 inches wide
    • Fresh mozzarella and Parmesan cheese: For creamy and savory flavor
    • Colorful bell peppers and onions: Add sweetness and crunch
    • Fresh herbs: Cilantro or parsley work great
    • Simple seasonings: Salt, pepper, and paprika

    Step-by-Step Instructions

    1. Mushroom Prep:
    Wipe mushrooms clean (don’t wash). Remove stems with a gentle twist. Press edges to widen the cavity. Toss with oil, balsamic vinegar, salt, and pepper.
    2. Make the Filling:
    Finely dice the vegetables. Mix with grated cheeses. Add herbs and seasonings. Taste and adjust salt if needed.
    3. Filling the Mushrooms:
    Spoon mixture into each cap. Pack it in well but don’t overstuff. Leave room at edges. Place them on a tray as you go.
    4. Air Frying:
    Heat air fryer to 320°F. Place mushrooms in basket. Don’t overcrowd – leave space. Cook 9-10 minutes until golden. Check halfway through.

    Common Issues and Solutions

    • Soggy mushrooms? Make sure to dry them well after cleaning
    • Filling falling out? Pack it in more firmly
    • Not browning? Give them an extra minute or two
    • Too watery? Avoid wet vegetables like tomatoes

    Storage and Reheating

    • Keep in fridge up to 4 days
    • Reheat in air fryer 2-3 minutes
    • Microwave works too – about 45 seconds
    • Don’t freeze – texture suffers

    Making Ahead

    • Clean and prep mushrooms early
    • Make filling up to a day ahead
    • Stuff just before cooking
    • Best served warm from the air fryer

    These mushrooms are always a hit at parties. I love making a big batch because they disappear quickly and people always ask for the recipe. They’re easy enough for everyday snacking but special enough for company.

    Fun Variations to Try

    • Make them Italian-Style: Switch to Italian seasoning, use basil instead of cilantro, add sun-dried tomatoes, top with extra Parmesan
    • Go Greek: Mix in crumbled feta, add chopped Kalamata olives, use oregano and dill, finish with a lemon squeeze
    • Add Some Heat: Include diced jalapeños, sprinkle with red pepper flakes, add a dash of cayenne, mix in pepper jack cheese
    • Make Them Fancy: Top with crab meat, add chopped shrimp, use fresh herbs, drizzle with truffle oil

    Perfect Pairings

    • Serve with crisp white wine
    • Great alongside a green salad
    • Add to an appetizer platter
    • Pair with crusty bread

    The Next Day

    • Chop up leftovers for omelets
    • Add to pasta dishes
    • Top a salad
    • Mix into rice or quinoa

    These little bites are so versatile – once you master the basic recipe, you can get creative with different cheese and herb combinations. They’re perfect for meal prep too since they reheat beautifully.

    Frequently Asked Questions

    → Why shouldn’t I wash mushrooms in water?
    Mushrooms are like sponges and will absorb water, which can make them soggy. Instead, use a damp cloth to gently wipe them clean.
    → Can I make these ahead of time?
    You can clean and stuff the mushrooms up to 24 hours ahead. Store them covered in the refrigerator and air fry just before serving.
    → What’s the best cheese to use?
    While mozzarella is recommended, any good melting cheese works well. Try cheddar, monterey jack, or a cheese blend.
    → How do I know when they’re done?
    The mushrooms should be dark brown and tender, and the cheese should be melted and slightly golden on top.
    → Can I make these spicier?
    Yes! Add more jalapeños or use a spicier chili powder. You can also add red pepper flakes to the filling.

  • Homemade Mardi Gras King Cake Recipe – Better Than Bakery

    Homemade Mardi Gras King Cake Recipe – Better Than Bakery

    A festive brioche crown adorned with vibrant sugars and hiding a lucky surprise – the Mardi Gras King Cake transforms a rich, sweet dough into a celebration of New Orleans tradition. This homemade version captures all the joy and symbolism of the carnival season while delivering a tender, flavorful treat that surpasses any store-bought variety.

    I made this for a Mardi Gras party last year, and watching guests search their slices for the hidden baby brought as much joy as the delicious cake itself. The secret? Taking time with the brioche dough development for perfect texture.

    Essential Ingredients and Selection

    • All-Purpose Flour: Creates the perfect tender crumb
    • Active Dry Yeast: Ensures proper rise
    • Butter: Use high quality for rich flavor
    • Eggs: Provide richness and structure
    • Colored Sugar: Green, purple, and gold for tradition
    • Fillings: Choose between cinnamon or cream cheese

    Step-by-Step Instructions

    1. Dough Development
    Proof yeast properly, Mix ingredients gradually, Knead until smooth and elastic
    2. Filling Preparation
    Make filling while dough rises, Spread evenly for consistent flavor, Seal edges carefully
    3. Shaping and Assembly
    Roll dough to uniform thickness, Twist strands carefully, Form perfect oval shape

    Symbolism and Tradition

    Understanding the symbolism behind this dish can deepen your appreciation. The vibrant colors represent faith, justice, and power, adding a layer of meaning to its festive appearance. The circular shape is a nod to the kings’ crown, emphasizing its royal inspiration. The hidden baby inside symbolizes luck and prosperity, making the discovery a moment of joy and significance.

    Make-Ahead Options

    Planning ahead can simplify your baking process and ensure optimal results. Prepare the dough the night before and refrigerate it after the first rise. When you’re ready to bake, shape the dough fresh and proceed with baking for the best flavor and texture.

    Temperature Control

    Maintaining proper temperature is essential for successful baking. Warm the milk to 110-115°F to activate the yeast effectively, and ensure the eggs are at room temperature for smooth blending. For perfectly baked bread, the internal temperature should reach 190-195°F.

    Storage Solutions

    Proper storage keeps your bread fresh and delicious. At room temperature, it will stay fresh for 2-3 days. For longer storage, freeze unfrosted bread for up to two months. When ready to serve, reheat gently to restore its softness and flavor.

    My family’s secret is adding a touch of orange zest to the dough – it adds a subtle citrus note that complements both filling options.

    After perfecting this recipe through many Mardi Gras seasons, I’ve found that success lies in patience and attention to detail. The way the enriched dough develops its flavor during rising while the filling melds with the bread creates a celebration-worthy treat. Whether served for Carnival season or any festive occasion, this King Cake proves that traditional recipes can bring both delicious results and meaningful connections to culture and community.

    Historical and Cultural Significance

    The King Cake tradition dates back to European customs, specifically from Spain and France, before making its way to New Orleans. Medieval celebrations of Epiphany featured similar cakes, each region developing its own variation. In New Orleans, the tradition evolved alongside Mardi Gras celebrations, becoming an integral part of Carnival season that runs from January 6th (Epiphany) through Fat Tuesday. The custom of hiding a small trinket, traditionally a dried bean before the modern plastic baby, represents both the infant Jesus and the idea of prosperity for the coming year.

    Understanding Brioche Dough Development

    The foundation of a perfect King Cake lies in its rich brioche dough. Unlike standard bread dough, brioche contains a high proportion of butter and eggs, making it challenging to develop proper gluten structure. The dough requires careful temperature control – ingredients should be between 68-72°F for optimal development. Cold butter will not incorporate properly, while warm ingredients can lead to greasy, heavy dough. Kneading time is crucial; the dough should pass the windowpane test, stretching thin enough to see light through without tearing.

    Mastering the Filling Variations

    The traditional cinnamon filling combines brown sugar, butter, and high-quality Ceylon cinnamon for the most complex flavor profile. The butter should be just soft enough to create a spreadable paste when mixed. For cream cheese filling, temperature control is vital – room temperature cream cheese ensures no lumps form when mixing. The addition of vanilla beans rather than extract creates subtle flavor notes throughout. Each filling requires specific spreading techniques to prevent leakage during baking.

    Shaping Techniques for Perfect Presentation

    The characteristic oval shape requires precise rolling and twisting. Start with a rectangle exactly 10×16 inches for optimal thickness. When cutting lengthwise, use a pizza wheel for clean edges rather than pulling with a knife. The twist technique involves keeping consistent tension while braiding – too loose results in gaps, too tight causes uneven baking. Creating the oval requires joining ends at a 45-degree angle for seamless connection.

    Color and Decoration Methodology

    Traditional Mardi Gras colors each carry specific meaning: purple represents justice, green symbolizes faith, and gold signifies power. When applying colored sugars, work in sections while frosting is still wet. Create clean dividing lines between colors by using a paper template. The sugar crystals should be precisely sized – too fine disappears into the frosting, too coarse doesn’t adhere properly.

    Frequently Asked Questions

    → Why does this recipe make two king cakes?
    The traditional size works best split into two cakes. You can freeze one for later, or share with friends and family – perfect for Mardi Gras celebrations!
    → Can I make this ahead of time?
    Yes! You can refrigerate the dough overnight and bake fresh the next day. You can also freeze the finished cake for up to 3 months.
    → What’s the best filling to use?
    Both the cinnamon and cream cheese fillings are traditional. You can even make one of each since the recipe makes two cakes!
    → Why is my dough sticky?
    The dough should be soft but workable. If it’s too sticky, gradually add more flour, up to 1 cup extra, but keep it as soft as possible for the best texture.
    → Where do I get the colored sugar and baby?
    Find them at craft stores like Michaels or Joann’s, or make your own colored sugar using food coloring and regular sugar.

    Print
    clock clock iconcutlery cutlery iconflag flag iconfolder folder iconinstagram instagram iconpinterest pinterest iconfacebook facebook iconprint print iconsquares squares iconheart heart iconheart solid heart solid icon

    Homemade Mardi Gras King Cake Recipe – Better Than Bakery

    5 Stars 4 Stars 3 Stars 2 Stars 1 Star No reviews
    • Author: Hannah

    Description

    A festive homemade King Cake with sweet brioche dough and choice of fillings, decorated in traditional Mardi Gras colors. Makes two cakes!


    Ingredients

    Units Scale

    → Dough

    1 cup milk

    1/4 cup salted butter

    1 1/2 teaspoons salt

    2/3 cup warm water

    1/2 cup granulated sugar, divided

    1 tablespoon active dry yeast

    2 large eggs, beaten

    2 teaspoons vanilla extract

    5 to 5 1/2 cups all-purpose flour (705-776g)

    → Cinnamon Filling Option

    2/3 cup brown sugar

    1/3 cup granulated sugar

    1/2 cup all-purpose flour (68g)

    2 teaspoons ground cinnamon

    4 tablespoons salted butter, melted

    → Cream Cheese Filling Option

    8 ounces cream cheese, softened

    2 cups powdered sugar

    2 tablespoons salted butter, softened

    1 teaspoon vanilla extract

    → Frosting

    2 cups powdered sugar

    3 tablespoons milk

    1 tablespoon salted butter, melted

    1 teaspoon lemon juice

    1 teaspoon vanilla extract


    Instructions

    Heat milk and butter until warm, add salt. In separate bowl, combine warm water, 1 tablespoon sugar, and yeast. Let sit until foamy, 5-10 minutes.

    Mix yeast mixture with remaining sugar, eggs, vanilla, and flour gradually. Knead with dough hook 5 minutes or by hand 8-10 minutes until soft dough forms. Place in oiled bowl and let rise 1-2 hours.

    For cinnamon filling, mix sugars, flour, cinnamon, and butter. For cream cheese filling, beat cream cheese, powdered sugar, butter, and vanilla until smooth.

    Divide dough in half. Roll each into 10×16-inch rectangle, cut lengthwise. Add filling, roll into logs, twist together, form oval. Let rise 30-45 minutes.

    Bake at 350°F for 25-30 minutes until golden and internal temperature reaches 190-195°F. Cool completely.

    Make frosting by beating ingredients until smooth. Hide baby figurine in cake, drizzle with frosting, and sprinkle with colored sugar while wet.


    Notes

    Recipe makes TWO king cakes – enjoy one now and freeze one for later

    Can be made ahead and refrigerated overnight before baking

    Keeps 2-3 days at room temperature or 1 week refrigerated

    Can be frozen for up to 3 months

  • Blueberry Cheesecake Egg Rolls – Easy Dessert Recipe

    Blueberry Cheesecake Egg Rolls – Easy Dessert Recipe

    A delightful fusion of creamy cheesecake and fresh blueberries wrapped in a crispy shell creates this innovative dessert that combines the best of Eastern and Western culinary traditions. Each bite delivers a perfect balance of textures – from the satisfying crunch of the wrapper to the silky cheesecake filling and bursting blueberries.

    After numerous test batches, I discovered that chilling the filling slightly before assembly makes rolling much easier and creates cleaner, more professional-looking rolls.

    Essential Ingredients Selection Guide

    • Cream cheese: Full-fat, room temperature for smoothest filling. Philadelphia works best
    • Blueberries: Fresh or frozen work equally well – wild blueberries offer intense flavor
    • Egg roll wrappers: Look for fresh ones in refrigerated section. Avoid frozen if possible
    • Sweetened condensed milk: Creates perfect sweetness and texture
    • Lemon juice: Fresh only – bottled lacks brightness
    • Oil: Choose neutral oils with high smoke points like canola or vegetable
    Detailed Step-by-Step Instructions
    Perfect blueberry jam:
    Combine berries, sugar, and lemon in saucepan. Cook over medium heat, stirring occasionally. Mash some berries while leaving others whole. Mix cornstarch with cold water until smooth. Add to berries and cook until thickened. Cool completely before using.
    Silky cheesecake filling:
    Ensure cream cheese is fully softened. Beat until completely smooth with no lumps. Add sweetened condensed milk gradually. Mix in vanilla and lemon zest. Chill slightly to firm up.
    Assembly technique:
    Position wrapper like a diamond. Place filling 1/3 up from bottom corner. Add cooled blueberry jam on top. Fold bottom corner over filling. Fold in sides tightly. Roll away from you, keeping tension. Seal with beaten egg wash.
    Frying process:
    Heat oil to 350°F (use thermometer). Fry 2-3 rolls at a time. Turn frequently for even browning. Remove when golden brown. Drain on paper towels. Dust with powdered sugar while warm.

    My journey with these egg rolls started when I was experimenting with fusion desserts. The moment I realized that egg roll wrappers could become the perfect vessel for cheesecake was a game-changer in my dessert repertoire.

    Temperature Control

    Managing temperatures is crucial for success:

    • Oil should stay between 350-375°F
    • Fillings should be chilled but not cold
    • Serve within 30 minutes of frying for optimal crispiness
    • Cool just enough to handle safely

    Make-Ahead Strategies

    Components can be prepared in advance:

    • Make blueberry filling up to 3 days ahead
    • Prepare cheesecake mixture 1 day before
    • Assembled (unfried) rolls can be frozen
    • Keep wrappers covered until ready to use

    Variations and Creativity

    This recipe welcomes experimentation:

    • Try different berries or fruit combinations
    • Add chocolate chips or nutella
    • Incorporate crushed cookies or nuts
    • Experiment with different extracts

    After countless batches of these dessert egg rolls, I’ve come to appreciate how this fusion creation brings joy to everyone who tries them. The way the crispy wrapper shatters to reveal the creamy filling, while the warm blueberries provide bursts of flavor, creates an unforgettable dessert experience. Whether you’re serving them at a party or enjoying them as a special treat, these rolls prove that creativity in the kitchen can lead to something truly magical.

    Frequently Asked Questions

    → Can I bake these instead of frying?
    Yes, bake at 400°F until toasted, turning occasionally. Note that texture will be different from fried version.
    → Can I use different fruits?
    Yes, substitute strawberries, raspberries, or other fruits using the same jam-making method.
    → How do I prevent wrapper from drying out?
    Keep unused wrappers in sealed bag or cover with barely damp paper towel while working.
    → Can I make these ahead?
    Best served fresh and warm. The filling can be made ahead and stored separately.
    → Why won’t my egg rolls seal?
    Make sure to use enough egg wash on the final corner and press firmly to seal.

    Print
    clock clock iconcutlery cutlery iconflag flag iconfolder folder iconinstagram instagram iconpinterest pinterest iconfacebook facebook iconprint print iconsquares squares iconheart heart iconheart solid heart solid icon

    Blueberry Cheesecake Egg Rolls – Easy Dessert Recipe

    5 Stars 4 Stars 3 Stars 2 Stars 1 Star No reviews
    • Author: Hannah

    Description

    Crispy fried egg roll wrappers filled with creamy cheesecake mixture and homemade blueberry jam for a unique dessert fusion.


    Ingredients

    Units Scale

    → Filling

    1 block (8 oz) cream cheese, softened

    1/2 cup sweetened condensed milk

    1 cup powdered sugar

    15 egg roll wrappers

    → Blueberry Jam

    1 cup blueberries, fresh or thawed frozen

    1/3 cup granulated sugar

    Juice of half a lemon

    1/4 teaspoon vanilla

    1 tablespoon cornstarch

    1 1/2 tablespoons water


    Instructions

    Simmer blueberries, sugar, lemon juice, and vanilla in a pot until sugar dissolves and berries start bursting. Mix cornstarch and water, add to pot and cook until thickened. Let cool.

    Beat cream cheese, sweetened condensed milk, and powdered sugar until smooth.

    Place wrapper diamond-style, add 1 1/2 tablespoons cream cheese filling and blueberry jam in horizontal line. Fold bottom corner up, wrap in sides, then continue rolling. Seal final corner with beaten egg.

    Deep fry in 2 inches of hot oil in batches until brown and bubbly. Drain on paper towels.

    Sprinkle with powdered sugar and serve.


    Notes

    A creative dessert version of egg rolls filled with cheesecake mixture and homemade blueberry jam. Can be fried or baked at 400°F.

    Can substitute different cream cheese flavors or fruit jams. Thaw egg roll wrappers overnight before using.

    Tools You’ll Need

    Electric hand mixer

    Mixing bowls

    Small pot

    Citrus juicer

    Paper towels

  • Perfect Steak Sandwich with Creamy Horseradish Sauce – My Home Made Recipe

    Perfect Steak Sandwich with Creamy Horseradish Sauce – My Home Made Recipe

    Juicy grilled steak, perfectly seasoned and sliced thin, nestled in crusty ciabatta bread with grilled onions and a creamy horseradish sauce creates the ultimate steak sandwich. Each bite delivers the perfect balance of tender meat, sweet charred onions, and zesty sauce that brings everything together.

    I first created this recipe when looking for an easy yet impressive way to serve steak at casual gatherings. The combination of tender skirt steak and zesty horseradish sauce has since become my go-to for everything from game day to quick weeknight dinners.

    Essential Ingredients

    • Skirt steak: Its loose grain structure absorbs marinade beautifully and cooks quickly
    • Fresh horseradish: Provides bright heat that cuts through the richness of the meat
    • Ciabatta bread: The sturdy texture holds up to juicy steak without getting soggy
    • Red onions: Their natural sweetness intensifies when grilled
    • Quality mayonnaise: Creates the base for a creamy, rich sauce

    Steps Instructions

    1. Perfect the Marinade
    Begin by combining olive oil with a robust blend of spices – cumin, smoked paprika, and fresh garlic create layers of flavor. Massage this mixture thoroughly into the steak, allowing it to tenderize and season the meat.
    2. Master the Grilling
    Preheat your grill to high heat, ensuring proper char and caramelization. Grill the steak for just 2-3 minutes per side for medium-rare, letting it rest before slicing against the grain for maximum tenderness.
    3. Grill the Onions
    While the steak rests, grill thick-cut onion slices until they develop char marks and become tender. Their natural sugars will caramelize, adding sweetness to balance the savory meat.
    4. Create the Sauce
    Blend mayonnaise with fresh horseradish, adjusting the amount to your preferred level of heat. Add chopped chives for fresh, oniony notes that complement both meat and sauce.
    5. Build Your Sandwich
    Layer the components thoughtfully – sauce on both sides of toasted ciabatta, followed by lettuce, grilled onions, and thinly sliced steak. The order matters for both stability and flavor distribution.
    Delicious Steak Sandwich with Creamy Horseradish Sauce


    pin it
    Delicious Steak Sandwich with Creamy Horseradish Sauce | myhomemaderecipe.com

    One summer evening, while experimenting with different cuts of steak, I discovered that skirt steak’s loose grain structure made it perfect for sandwiches. The way it absorbs marinade and cooks quickly has made it my go-to choice for casual entertaining.

    Perfect Temperature Guide

    For the best results, cook your steak to the desired internal temperature. For a rare steak with a red center, aim for 125°F. A medium-rare steak, featuring a warm pink center, should reach 135°F. If you prefer a slightly pink center, cook your steak to 145°F for a medium finish.

    Make-Ahead Success

    Prepare the horseradish sauce up to three days ahead and store in an airtight container. The marinade can be made a day in advance, but don’t add it to the meat until 20-30 minutes before cooking.

    Bread Selection Tips

    While ciabatta is my favorite, any sturdy bread works well. Just ensure it’s toasted to prevent sogginess from the meat juices. Sourdough and French bread are excellent alternatives.

    Customization Options

    Create your perfect sandwich by adding grilled mushrooms, melted provolone, or crispy bacon. For extra kick, increase the horseradish or add pickled jalapeños.

    From backyard barbecues to quick weeknight dinners, this steak sandwich has become my signature dish. The combination of perfectly grilled meat, sweet charred onions, and zesty horseradish sauce creates something that’s both simple and special. Whether you’re an experienced griller or just starting out, this recipe delivers restaurant-quality results right from your own kitchen.

    Yummy Steak Sandwich with Creamy Horseradish Sauce Recipe


    pin it
    Yummy Steak Sandwich with Creamy Horseradish Sauce Recipe | myhomemaderecipe.com

    Frequently Asked Questions

    → Can I use a different cut of steak?
    Yes! While skirt steak is ideal, flank steak, sirloin flap, or even leftover grilled steak works great.
    → How spicy is the horseradish sauce?
    With 1 tablespoon horseradish to 1¼ cups mayo, it’s mild. Add more horseradish gradually to taste if you want more kick.
    → Can I make this ahead?
    You can prepare the horseradish sauce up to 2 days ahead. The steak can marinate for up to 8 hours in the refrigerator.
    → What if I don’t have a grill?
    A cast iron skillet or grill pan works great too. Cook the steak 3-4 minutes per side for medium-rare.
    → Why cut against the grain?
    Cutting against the grain breaks up the muscle fibers, making each bite more tender and easier to chew.

  • Quick Korean Egg Rice (Gyeran Bap) Recipe – My Home Made Recipe

    Quick Korean Egg Rice (Gyeran Bap) Recipe – My Home Made Recipe

    Hot steaming rice topped with a perfectly fried egg, drizzled with sesame oil and soy sauce creates this comforting Korean rice bowl that’s both simple and satisfying. Each spoonful combines fluffy grains with runny yolk and aromatic seasonings, making a quick meal that feels like a warm hug in a bowl.

    During my busiest days, this recipe has become my reliable comfort food. The combination of hot rice and runny egg yolk creates a creamy sauce that transforms basic ingredients into something truly crave-worthy.

    Essential Ingredients

    • Short-grain rice: Choose sushi or Calrose rice for authentic sticky texture
    • Fresh eggs: The fresher the better for perfect sunny-side-up cooking
    • Sesame oil: Adds essential nutty aroma and flavor
    • Quality soy sauce: Provides savory depth
    • Unsalted butter: Creates richness when melted into hot rice

    Step By Step Instructions

    1. Perfect Your Rice
    Begin with hot, freshly cooked short-grain rice for best results. If using leftover rice, reheat thoroughly until steaming. Immediately mix with butter while hot.
    2. Master the Egg
    Heat your pan over medium heat with just enough oil. Crack egg carefully to keep yolk intact. Cook until whites are set but yolk remains runny. Spoon hot oil over yolk for even cooking.
    3. Layer Your Bowl
    Start with buttered rice in a large bowl – size matters for easy mixing. Place fried egg gently on top.
    4. Season with Care
    Drizzle sesame oil and soy sauce around the edges. Sprinkle with sesame seeds and green onions.
    5. Final Assembly
    Break the yolk and mix everything together just before eating, allowing the runny yolk to create a creamy sauce.
    10 min Easy Korean Egg Rice (Gyeran Bap)


    pin it
    10 min Easy Korean Egg Rice (Gyeran Bap) | myhomemaderecipe.com

    Living in Korea taught me that sometimes the simplest dishes bring the most comfort. This humble rice bowl appears in countless households as a quick breakfast or late-night meal, each family adding their own special touch.

    Perfect Temperature Tips

    Keep components at the right temperature for best results: rice should be steaming hot, eggs should go straight from pan to bowl, and cold garnishes should be added last,

    Storage Solutions

    While best eaten fresh, you can prepare components ahead: store cooked rice for up to 4 days refrigerated, reheat rice thoroughly before using, and always cook eggs fresh,

    Customization Guide

    Make it your own with these additions: add gochujang for spice, top with kimchi for tang, include sautéed vegetables for extra nutrition, and mix in protein like tuna or tofu,

    Serving Suggestions

    Create a complete meal by adding: Korean cucumber salad, quick pickled vegetables, miso soup, or extra banchan (side dishes),

    What began as a necessity during busy days has become one of my favorite comfort meals. This bowl proves that with quality ingredients and proper technique, even the simplest dishes can bring immense satisfaction. Whether you’re cooking breakfast or need a quick dinner, this Korean classic delivers comfort in every bite.

    10 min Easy Korean Egg Rice Recipe


    pin it
    10 min Easy Korean Egg Rice Recipe | myhomemaderecipe.com

    Frequently Asked Questions

    → What type of rice works best?
    Short grain rice is traditional, but jasmine rice works too. The key is using freshly cooked hot rice or properly reheated leftover rice.
    → How should I cook the egg?
    Sunny side up is traditional, but you can cook it any way you prefer – scrambled, over easy, or with crispy edges.
    → Can I make this ahead?
    While best fresh, you can cook rice ahead. Just reheat thoroughly and cook the egg fresh when ready to eat.
    → Is this dish customizable?
    Very! Add kimchi, tuna, seaweed, avocado, or sautéed vegetables to make it your own.
    → How do I get the egg yolk perfect?
    Spoon hot oil over the yolk while cooking to help it set without overcooking the whites.